

[寒假大作战]2.yolov8模型训练和转换
![[寒假大作战]2.yolov8模型训练和转换](https://ebaina.oss-cn-hangzhou.aliyuncs.com/res/images/202206/30/20220630-141043-801.png)
[寒假大作战]2.yolov8模型训练和转换
一、参考文档
yolov8算法移植/HiEuler-Pico-OpenEuler Yolov8模型训练和转换.md · HiEuler PICO/doc - 码云 - 开源中国
参考官方的gitee博客
二、环境搭建
2.1VMware、WSL和Windows
在之前的环境搭建中,用到了VMware和Windows,其中VMware是为了搭建Ubuntu openeuler编译环境 Windows是方便烧写固件。但是模型的训练需要用到GPU,也就是主机的显卡,而Vmware想使用到主机的GPU是有一定要求的,首先是GPU支持虚拟技术,然后是一系列的设置,设置过程很麻烦,对显卡也有一定的要求,所以模型的训练并不在VMware的Ubuntu中,而是使用了WSL(windows system linux)wsl是微软官方提供的运行在windows上的最小linux系统,可以直接使用主机的GPU,也就是直接使用主机的显卡。这个就不多介绍了,b站上有很多视频。
其实windows上也可以进行yolov8的训练,但是官方教程使用的linux环境,大家也可以租服务器使用,因为我对这方面没有了解过,就是用wsl来训练yolov8
2.2更改软件源
wsl设置的软件源默认也是国外软件源,要设置为国内的
sudo vim /etc/apt/sources.list
deb http://mirrors.aliyun.com/ubuntu/ focal main restricted universe multiverse
deb http://mirrors.aliyun/XMLSchemaInstance.com/ubuntu/ focal-updates main restricted universe multiverse
deb http://mirrors.aliyun.com/ubuntu/ focal-backports main restricted universe multiverse
deb http://mirrors.aliyun.com/ubuntu/ focal-security main restricted universe multiverse
sudo apt-get update
2.3anaconda
anaconda作用

anaconda主要就是为了方便包管理和环境管理,在训练ai的时候,需要很多的库和包,对于这些库和包的版本要求很高,为了方便管理特定的包和库的版本,anaconda应运而生
anconda下载
使用这个连接下载anaconda https://gitee.com/link?target=https%3A%2F%2Frepo.anaconda.com%2Farchive%2FAnaconda3-2024.02-1-Linux-x86_64.sh
下载完成后传给wsl,可以在文件管理器中直接拖拽到想要的目录
anaconda安装
添加可执行权限
chmod +x Anaconda3-2024.02-1-Linux-x86_64.sh
键入ENTER
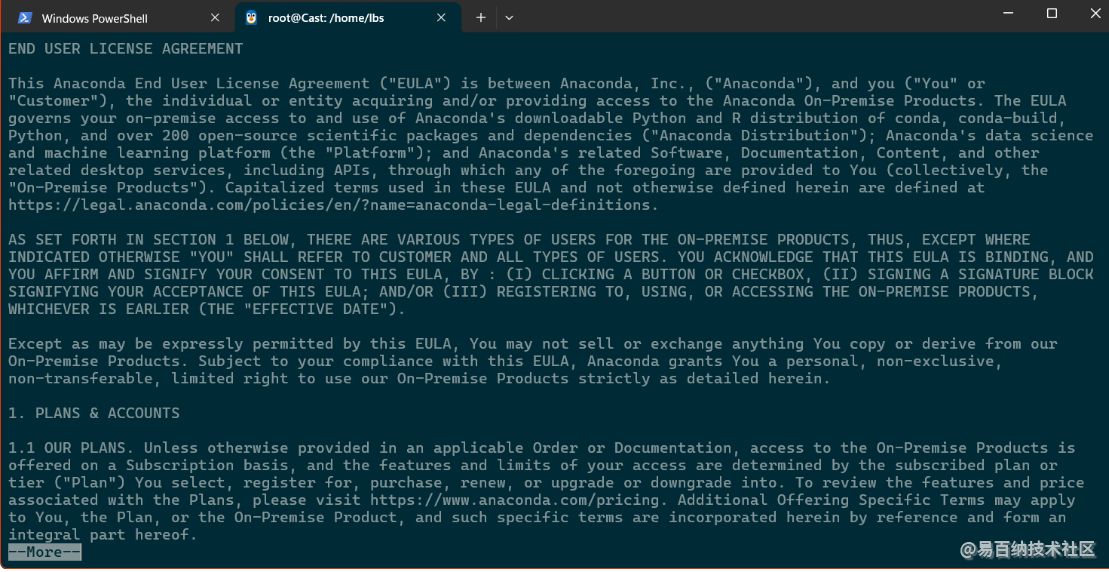
阅读协议 键入q退出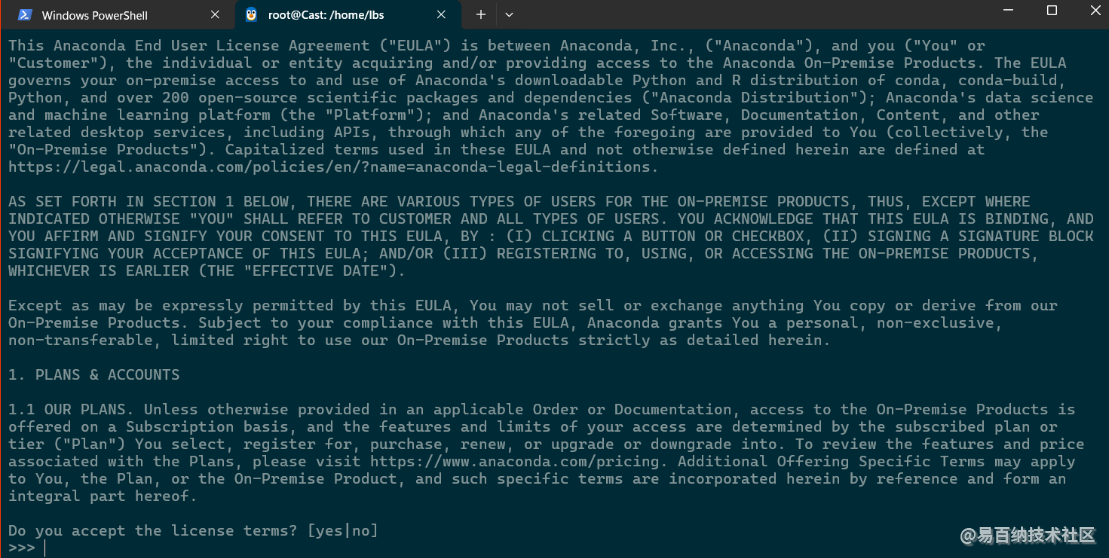
键入yes接收协议
之后直接回车(选择安装路径)
等待安装完成后还有一个yes/no选项 键入yes即可
重新开启终端发现命令提示符前面多出一个base 表示原来环境
anaconda使用
安装完毕就可以使用conda创建yolov8所需要的虚拟环境了
命令行中键入conda create -n yolov8 python=3.8
等待下载完毕
y/n 键入y
之后可以使用conda activate yolov8来启动这个虚拟环境
一些其他的conda指令
# -n 指定虚拟环境的名称后续会用到
# 后续跟虚拟环境中要装的软件包,也可以为空,此处以python3.11为例
# conda create -n <env_name> [依赖...]
conda create -n <env_name> python=3.11

# 激活虚拟环境
conda activate <env_name>

# 查看现有的虚拟环境
conda info -e

# 删除虚拟环境
conda remove -n <env_name> --all

# 退出环境,不加环境名称直接退出当前环境到base
conda deactivate <env_name>
在虚拟环境里使用pip 或者 conda 来安装包 虚拟环境里的包的版本与其他的版本不联系
2.4torch和torchvision
requirements文件
在用户目录下 创建yolov8文件夹cd /home/usr mkdir yolov8
创建requirements_yolov8.txt文件vim requirements_yolov8.txt 在里面输入
# Usage: pip install -r requirements_yolov8.txt

# Base ----------------------------------------
matplotlib>=3.2.2
numpy>=1.21.6
opencv-python>=4.6.0
Pillow>=7.1.2
PyYAML>=5.3.1
requests>=2.23.0
scipy>=1.4.1
torch==2.1.0
torchvision==0.16.0
tqdm>=4.64.0

# Plotting ------------------------------------
pandas>=1.1.4
seaborn>=0.11.0

# Export --------------------------------------
onnx>=1.12.0  # ONNX export
onnxsim>=0.4.1  # ONNX simplifier

# Extras --------------------------------------
psutil  # system utilization
thop>=0.1.1  # FLOPs computation

ninja
这个文件是指定yolov8所需要的各种包的配置
torch和torchvision安装
确定cuda版本
使用nvcc -V
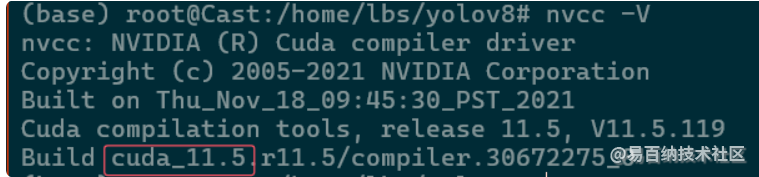
cuda是11.5 需要安装适配这个版本的torch和torchvision
进入这个连接
https://download.pytorch.org/whl/cu115/
注意cu115是cuda 11.5版本 如果是别的版本要更改例如cuda是11.3 连接就是cu113
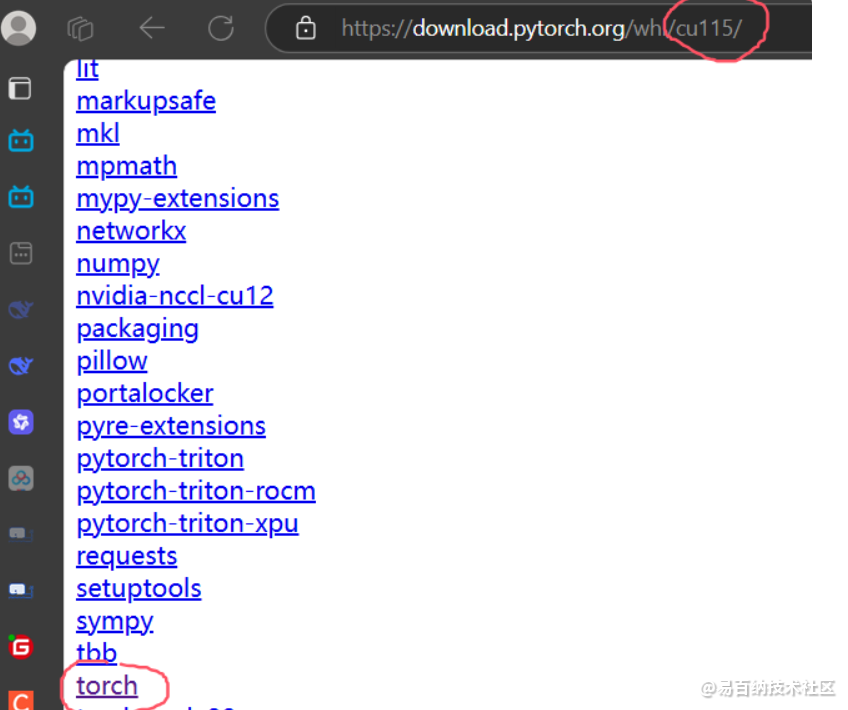
点击这里面的torch

选择对应的版本torch的版本 首先选择cu115的 然后尾缀要是linux 如果windows环境要选win 然后cp代表了python的版本 之前指定的python=3.8这里选择cp38记住之后可以在这个网页上下载(但不推荐因为是外网),推荐将名字复制下来,然后在国内的源上找
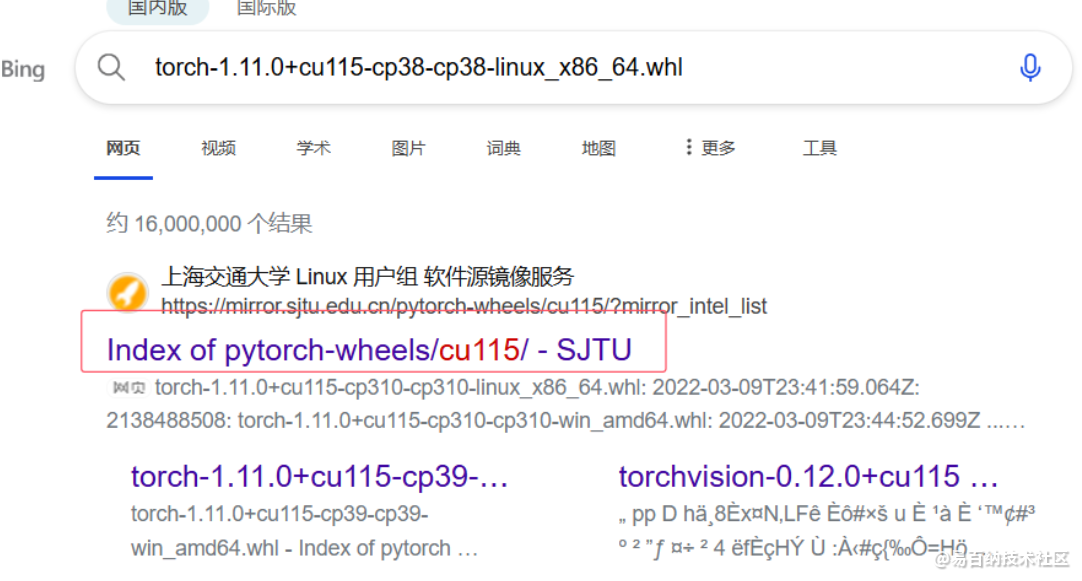
例如这个上海交通大学的连接 进去之后下载然后传给wsl
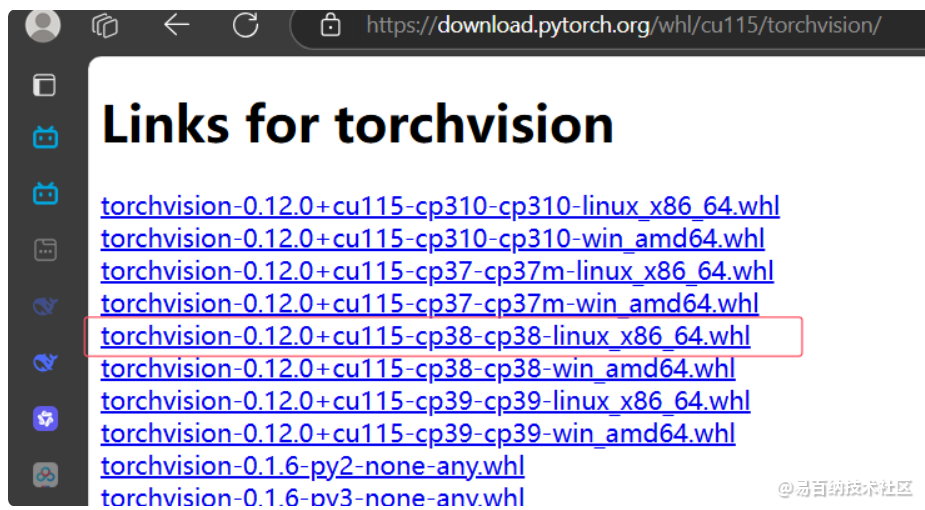
torchvision同理
进入wsl先激活虚拟环境
conda activate yolov8
sudo chmod 777 *.whl
pip install torch-1.11.0+cu115-cp38-cp38-linux_x86_64.whl
pip install torchvision-0.12.0+cu115-cp38-cp38-linux_x86_64.whl
下载yolov8需要的软件和资源
pip install --upgrade pip  -i https://pypi.tuna.tsinghua.edu.cn/simple
pip install -r requirements_yolov8.txt -i https://pypi.tuna.tsinghua.edu.cn/simple
pip install ultralytics==8.0.68 -i https://pypi.tuna.tsinghua.edu.cn/simple
打补丁
下载这个目录下的源码和补丁
yolov8算法移植/resources · HiEuler PICO/doc - 码云 - 开源中国
然后执行下面操作进行解压和打补丁
tar -zxvf ultralytics-8.0.68.tar.gz

mv   ultralytics-8.0.68   ultralytics

cd ultralytics

cp ../yolov8n.pt  ./

cp ../0001-yolov8-rpn.patch  ./

cp ../test.py  ./

patch -p1 < 0001-yolov8-rpn.patch
进入ultralytics文件夹执行test.py文件导出原始的onnx模型python test.py
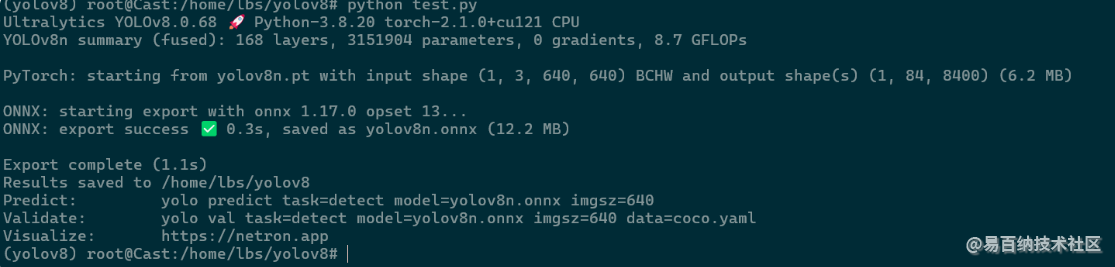
出现这个就说明环境没问题
三、数据集制作
准备视频
数据集是训练yolo模型的,要做某一方面的任务就要准备相应的数据集,例如要做行人检测,就需要拍摄多个场景有行人的视频(可以在b站上搜相关视频,然后使用插件下载视频)
这里假设视频已经准备好了
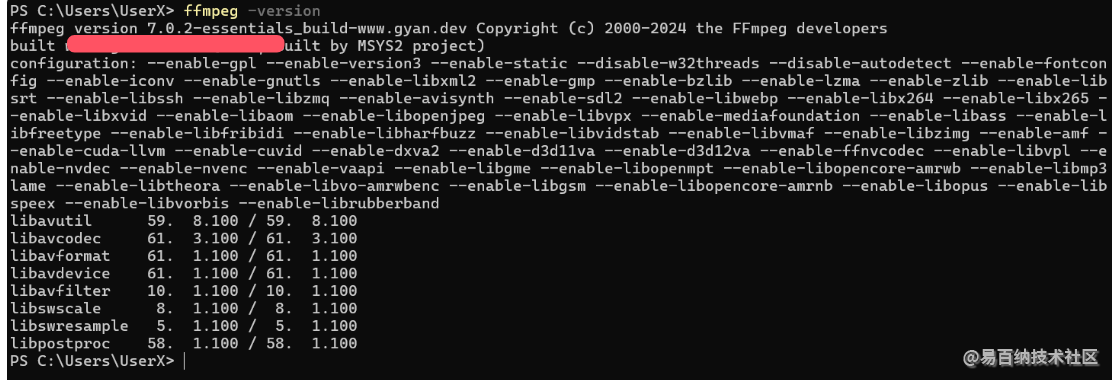
安装ffmpeg
Builds - CODEX FFMPEG @ gyan.dev
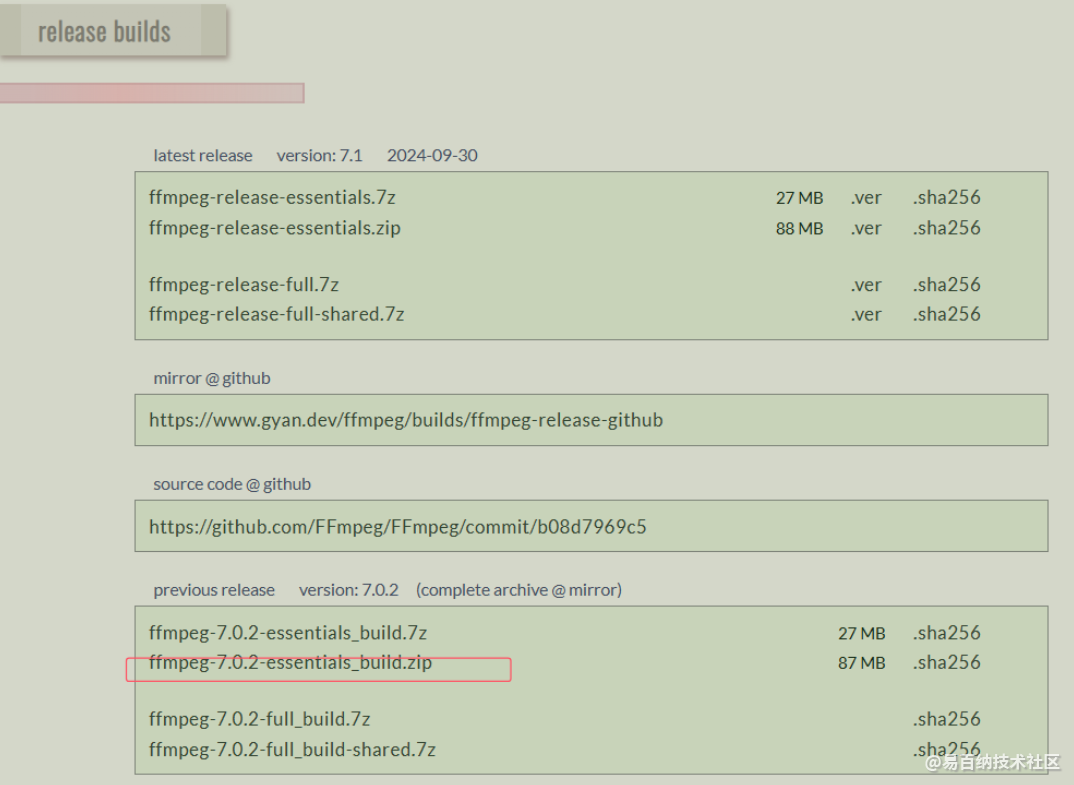
下载下面的这个
安装完成添加到系统路径
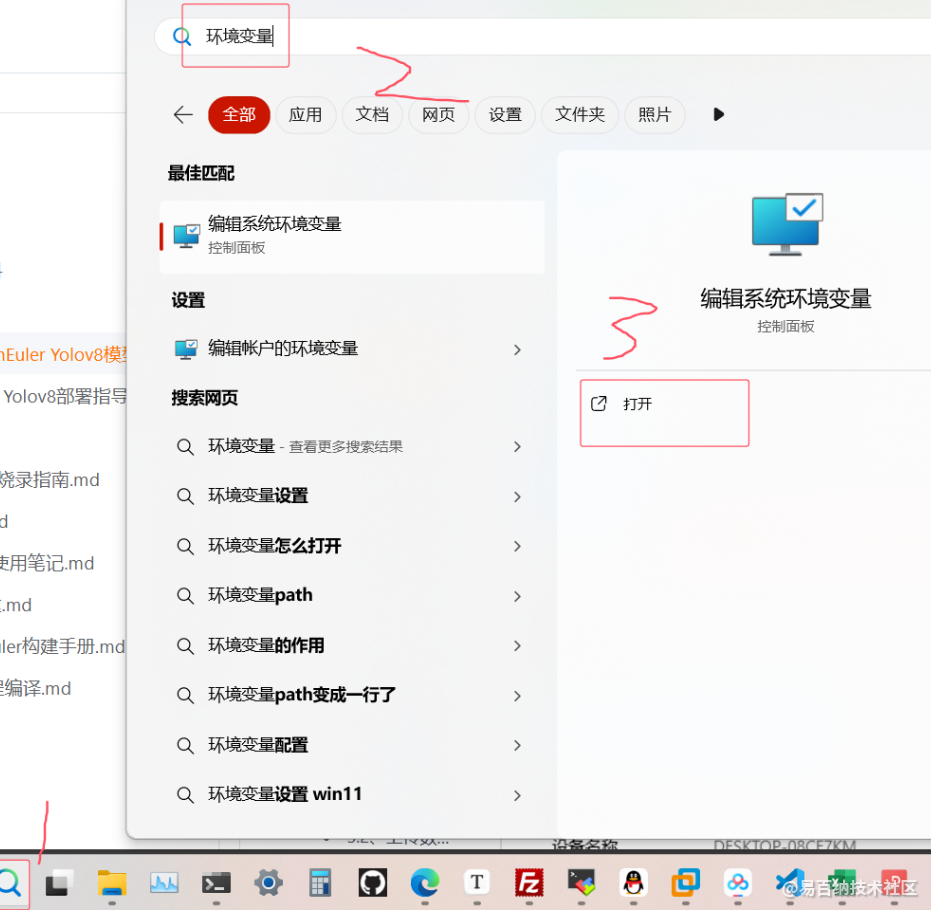
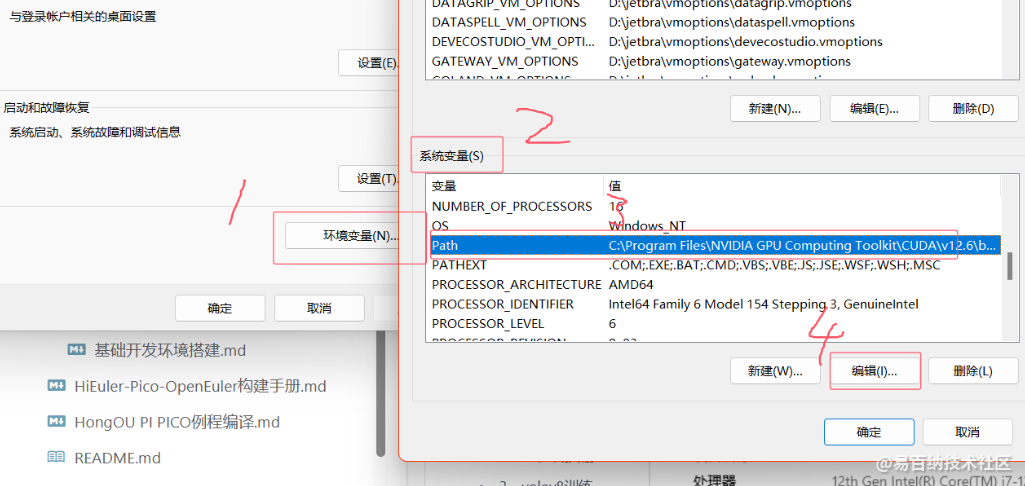
在path里添加环境变量
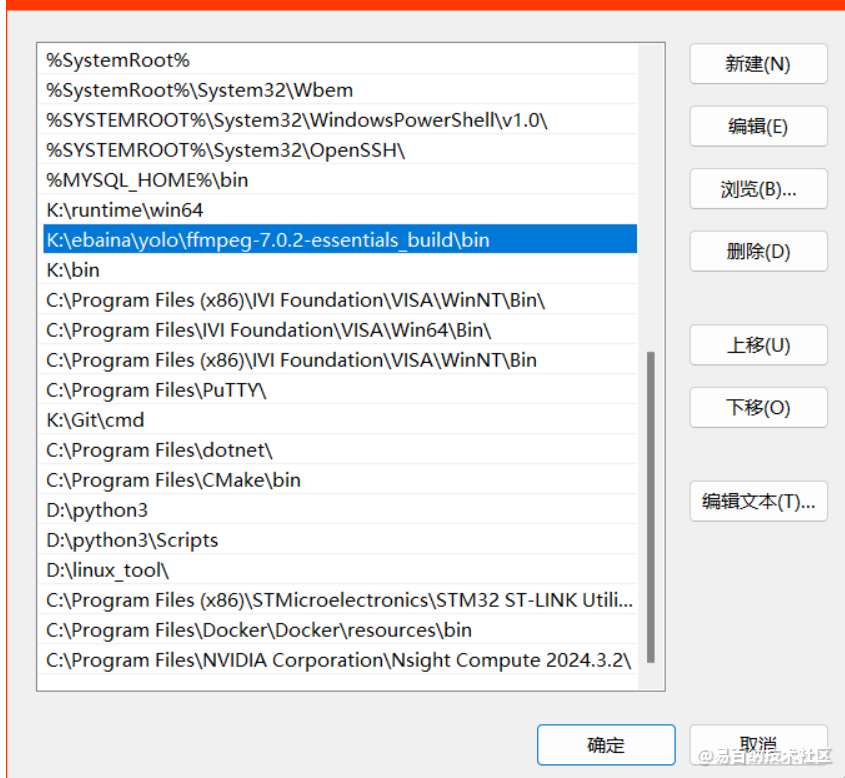
添加ffmpeg的bin文件夹
在终端键入ffmpeg -version就可以查看版本
然后对视频进行抽帧
#参数-vf "fps=15"一秒抽15张图片,-q:v 1为输出图片质量,1为最高,<video_name>为视频名称,<pic_anme>为输出图片名称
ffmpeg -i <video_name>.mp4 -q:v 1 -vf "fps=15" <pic_anme>_%06d.png
这里就是获取大量数据的来源
图像预处理
CV610要求的yolov8图片尺寸640x640 所以要将图片进行处理之后才能作为数据集
使用pip install opencv-python下载opencv-python库
之后使用官方提供的图像处理文件image_processing.py
import os
import cv2
import cv2 as cv
from numpy import *
import numpy as np

def image_processing(open_dir,save_dir):
    conter = 0
    for filename in os.listdir(open_dir):
        # 获取得到文件后缀
        split_file = os.path.splitext(filename)
        new_filename= split_file[0]+'.jpg'
        img_dir = os.path.join(open_dir,filename)
        save_img_dir = os.path.join(save_dir,new_filename)

        #图片处理
        img = cv2.imread(img_dir)
        height, width = img.shape[:2]

        #裁剪位置,这里裁剪的是图片中心,根据情况而定
        y0 = int(height/2-width/2)
        y1 = int(height/2+width/2)
        x0 = int(0)
        x1 = int(width)
        img = img[y0:y1, x0:x1]  # 裁剪坐标为[y0:y1, x0:x1]

        #调整图片大小,第二个参数
        img = cv2.resize(img,(640,640),interpolation = cv2.INTER_AREA)

        cv2.imwrite(save_img_dir, img,[cv2.IMWRITE_JPEG_QUALITY, 100])
        conter = conter + 1
        print("Image_processing Successful!",conter)
    print("Image_processing over!")


if __name__=="__main__":
    #图片输入路径
    open_dir="./111"
    #图片输出路径
    save_dir="./222"
    image_processing(open_dir,save_dir)
这里注意更改最后的图片输入路径和图片输出路径
同时裁剪的中心要视图片的实际情况而定
在终端里使用python image_processing.py来执行这个脚本
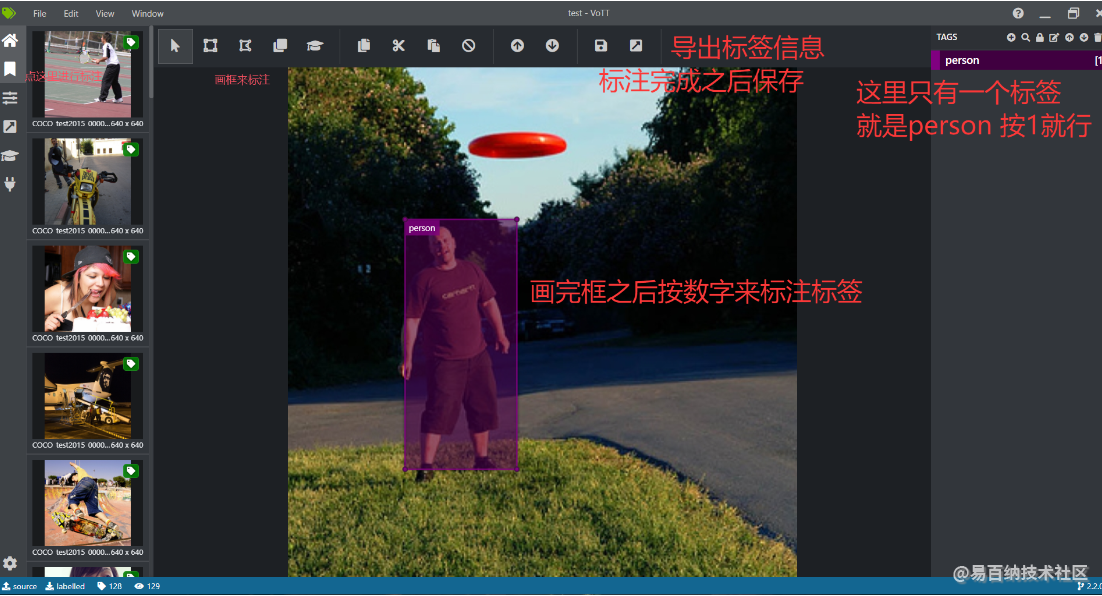
数据集标注
安装VoTT(表标签的软件)
VoTT download | SourceForge.net
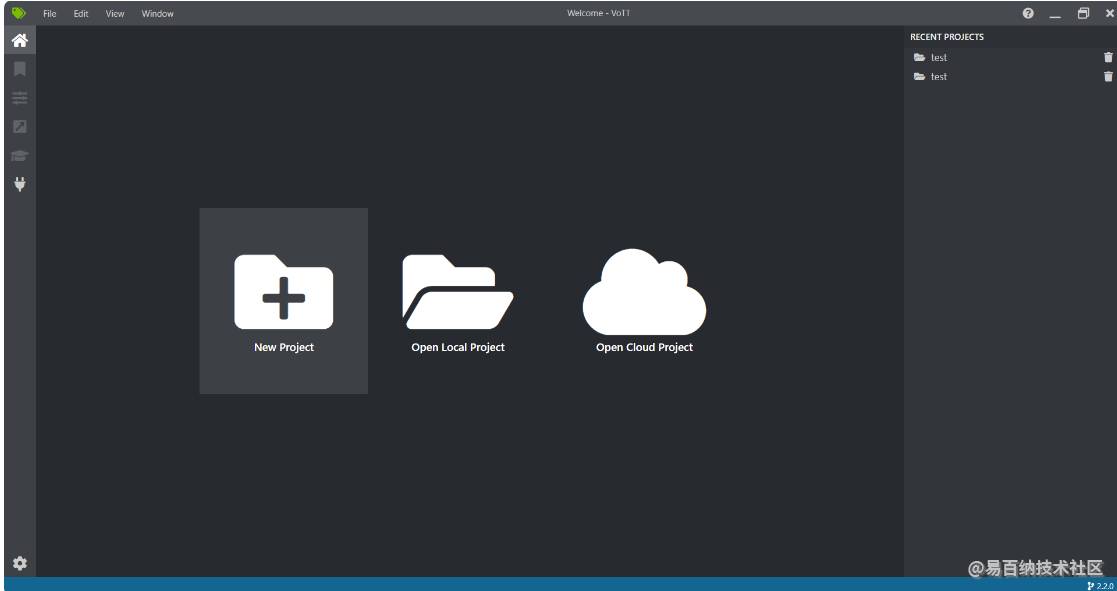
新建工程
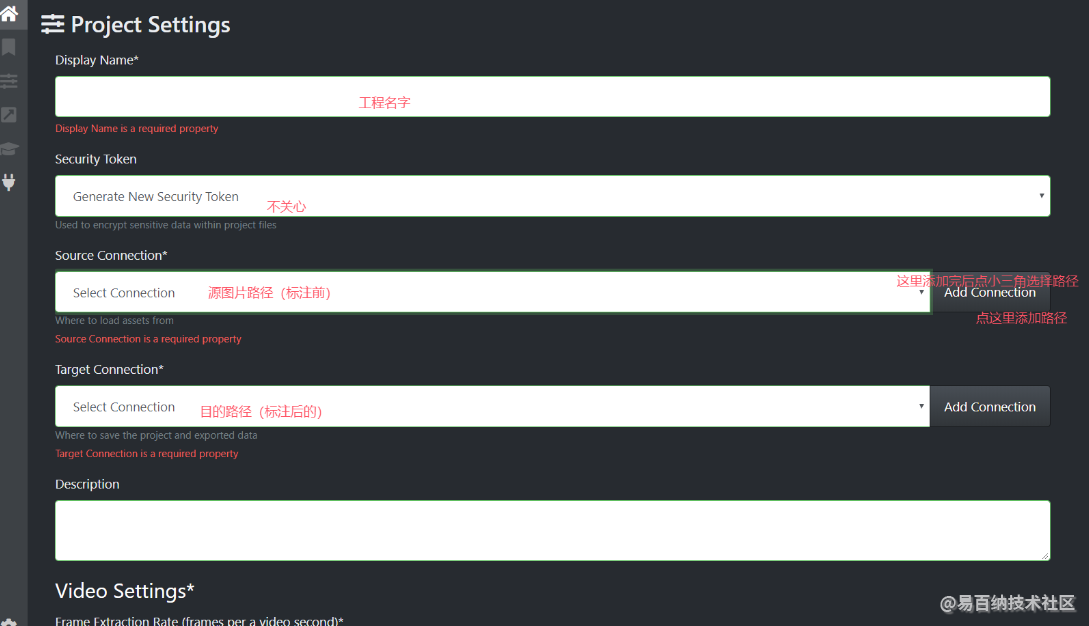
添加路径页面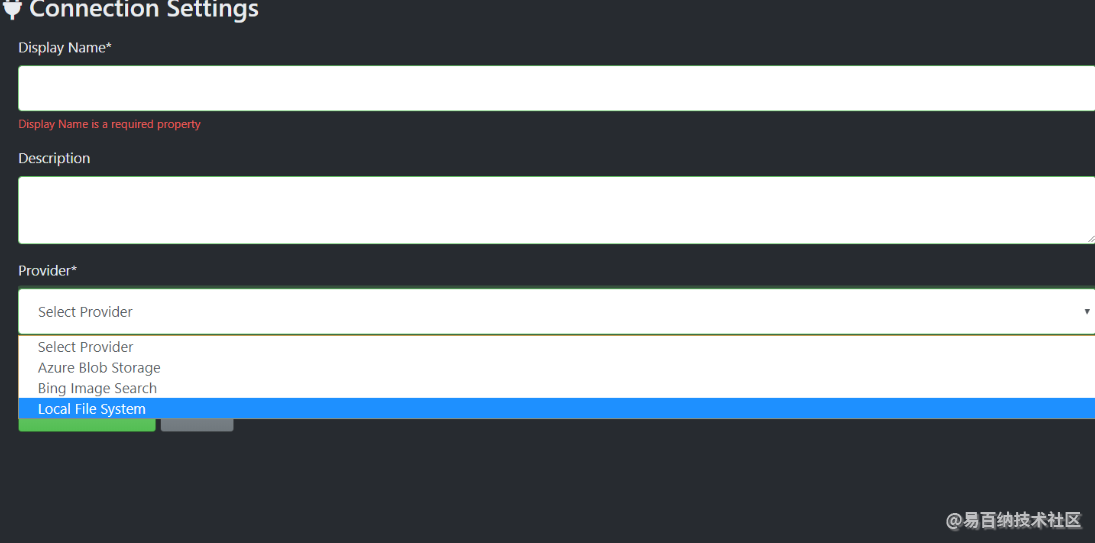
第一项是路径名字 第二项是描述 第三项选择本地文件系统 然后选择路径之后选择保存
在tag里键入关心的标签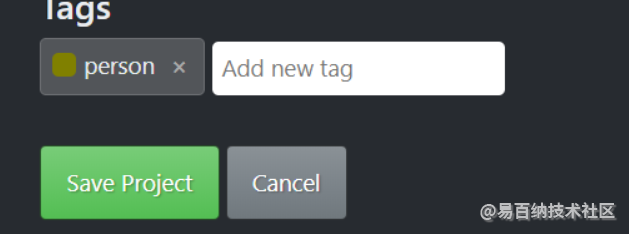
写完之后回车确认之后保存工程
导出格式设置
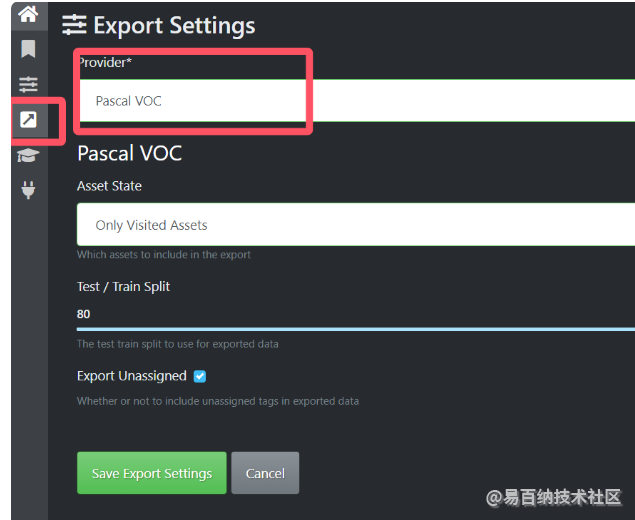
选择PascalVOC类型数据
全标注完成后导出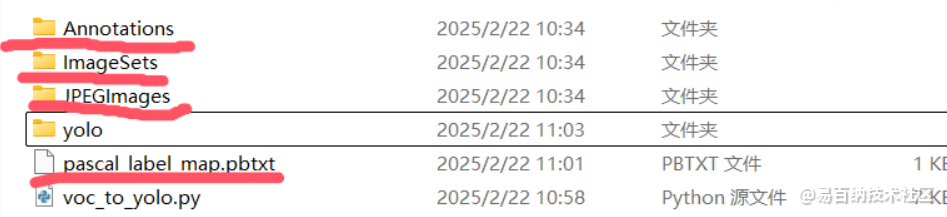
在目标文件夹下多出4个文件
Annotations是标签信息 Imagesets是图片信息 JPEGIMmages是图片
由于PascalVOC并不是yolo需要的数据格式还需进一步数据转换
创建voc_to_yolo.py文件 和yolo文件夹
这里还是使用官方脚本
import os
import xml.etree.ElementTree as ET
import random
from shutil import copyfile
import argparse

def get_normalized_box(box, image_width, image_height):
    xmin = float(box.find("xmin").text) / image_width
    ymin = float(box.find("ymin").text) / image_height
    xmax = float(box.find("xmax").text) / image_width
    ymax = float(box.find("ymax").text) / image_height

    return ((xmin + xmax) / 2, (ymin + ymax) / 2, xmax - xmin, ymax - ymin)

count_zero_dimensions = 0
files_with_zero_dimensions = []
train_images_count = 0
val_images_count = 0
test_images_count = 0
total_images_count = 0
original_images_total_count = 0

def convert_xml_to_txt(xml_path, out_path, split, class_mapping):
    global count_zero_dimensions, files_with_zero_dimensions, train_images_count, \
        val_images_count, test_images_count, total_images_count, original_images_total_count

    if not os.path.exists(out_path):
        os.makedirs(out_path)

    filename = os.path.splitext(os.path.basename(xml_path))[0]
    txt_file = open(os.path.join(out_path, filename + ".txt"), "w")
    root = ET.parse(xml_path).getroot()
    size = root.find("size")
    width = int(size.find("width").text)
    height = int(size.find("height").text)

    if width == 0 or height == 0:
        count_zero_dimensions += 1
        files_with_zero_dimensions.append(filename)
        print(f"Warning: {filename} has zero width or height. Excluding this data.")
        return

    for obj in root.iter("object"):
        name = obj.find("name").text
        index = class_mapping.get(name)
        if index is not None:
            box = get_normalized_box(obj.find("bndbox"), width, height)
            txt_file.write("%s %f %f %f %f\n" % (index, *box))
        else:
            print(f"Warning: Unknown class '{name}' in {xml_path}")

    txt_file.close()
    print(f"{xml_path} converted for {split}")

    if split == "train":
        train_images_count += 1
    elif split == "val":
        val_images_count += 1
    elif split == "test":
        test_images_count += 1

    total_images_count += 1

def split_dataset(original_images_folder, annotations_folder, out_path, class_mapping,
                  train_ratio=0.8, val_ratio=0.1, test_ratio=0.1):
    global original_images_total_count, count_zero_dimensions, files_with_zero_dimensions, \
        train_images_count, val_images_count, test_images_count, total_images_count

    file_list = os.listdir(annotations_folder)
    random.shuffle(file_list)

    train_split = int(len(file_list) * train_ratio)
    val_split = int(len(file_list) * (train_ratio + val_ratio))

    train_files = file_list[:train_split]
    val_files = file_list[train_split:val_split]
    test_files = file_list[val_split:]

    # Create output folders
    os.makedirs(os.path.join(out_path, "images", "train"), exist_ok=True)
    os.makedirs(os.path.join(out_path, "images", "val"), exist_ok=True)
    os.makedirs(os.path.join(out_path, "images", "test"), exist_ok=True)
    os.makedirs(os.path.join(out_path, "labels", "train"), exist_ok=True)
    os.makedirs(os.path.join(out_path, "labels", "val"), exist_ok=True)
    os.makedirs(os.path.join(out_path, "labels", "test"), exist_ok=True)

    for file in file_list:
        annotation_path = os.path.join(annotations_folder, file)
        original_images_total_count += 1

        # Only convert and copy when width and height are both non-zero
        root = ET.parse(annotation_path).getroot()
        size = root.find("size")
        width = int(size.find("width").text)
        height = int(size.find("height").text)

        if width == 0 or height == 0:
            count_zero_dimensions += 1
            files_with_zero_dimensions.append(file)
            print(f"Warning: {file} contains zero width or height...Excluding this data")
            continue

        for split, files in [("train", train_files), ("val", val_files), ("test", test_files)]:
            if file in files:
                output_folder_images = os.path.join(out_path, "images", split)
                output_folder_labels = os.path.join(out_path, "labels", split)
                convert_xml_to_txt(annotation_path, output_folder_labels, split, class_mapping)
                copyfile(os.path.join(original_images_folder, file.replace(".xml", ".jpg")),
                         os.path.join(output_folder_images, os.path.basename(file.replace(".xml", ".jpg"))))

    print(f'Total occurrences of zero width or height: {count_zero_dimensions}')
    print(f'Files with zero width or height: {tuple(files_with_zero_dimensions)}')
    print(f'Total number of images in the original dataset: {original_images_total_count}')
    print(f'Total number of images in the dataset after excluding zero width or height: {total_images_count}')
    print(f'Number of images in the training set: {train_images_count}')
    print(f'Number of images in the validation set: {val_images_count}')
    print(f'Number of images in the test set: {test_images_count}')

if __name__ == '__main__':
    parser = argparse.ArgumentParser(description='Process some images and annotations.')
    # 把标签和代表标签的数字以字典形式对应好
    parser.add_argument('--class_mapping', type=dict, default={'test':0},
                        help='Mapping of class names to indices')
    # default改为只存放图片的地址
    parser.add_argument('--original_images_folder', type=str,default='./voc/JPEGImages',
                        help='Path to the folder containing original images')
    # default改为只存放xml的地址
    parser.add_argument('--annotations_folder', type=str,default='./voc/Annotations',
                        help='Path to the folder containing annotations')
    # 指定一个路径存放转化后的训练集,验证集,测试集,最后一级地址可以不用建文件夹会自动生成
    parser.add_argument('--out_path', type=str,default='./yolo',
                        help='Output path for processed images and labels')
    # 指定训练集,验证集,测试集所占比例
    parser.add_argument('--train_ratio', type=float, default=0.8, help='Ratio of images for training set')
    parser.add_argument('--val_ratio', type=float, default=0.1, help='Ratio of images for validation set')
    parser.add_argument('--test_ratio', type=float, default=0.1, help='Ratio of images for test set')

    args = parser.parse_args()

    original_images_folder = args.original_images_folder
    annotations_folder = args.annotations_folder
    out_path = args.out_path
    class_mapping = args.class_mapping

    split_dataset(original_images_folder, annotations_folder, out_path, class_mapping,
                  train_ratio=args.train_ratio, val_ratio=args.val_ratio, test_ratio=args.test_ratio)
只需要关心这一部分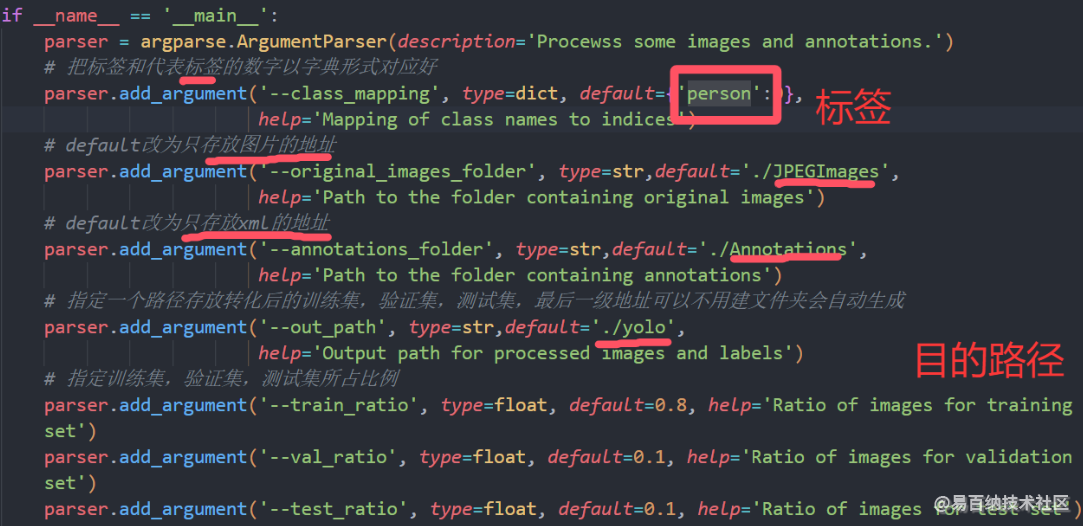
设置标签、相关路径和比例这样数据集就制作完毕了
四、模型训练
4.1查看显卡
使用nvidia-smi命令查看显卡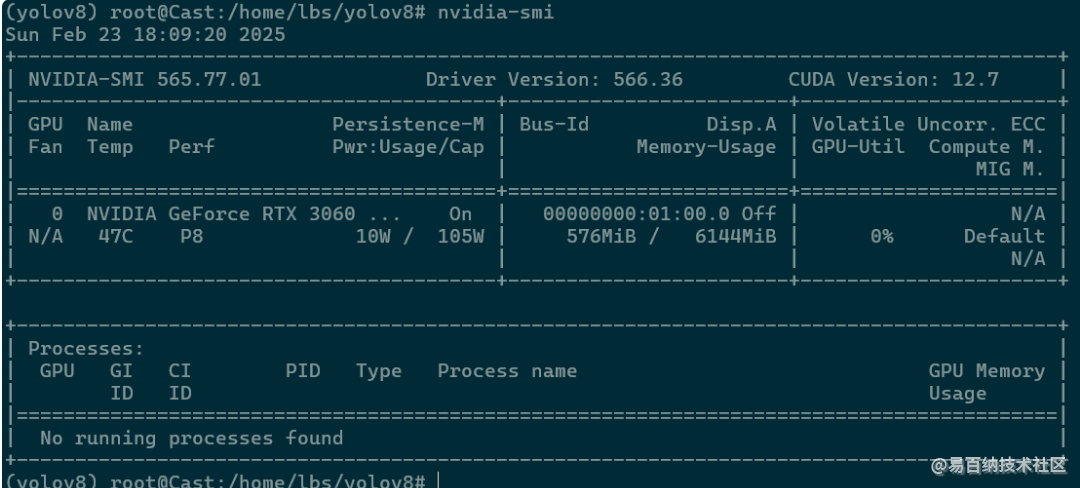
在wsl上可以正确检测到主机的显卡 如果使用vmware就会报错
将主机上的yolo文件夹拖到wsl的yolov8文件夹下
4.2修改yaml文件
拷贝码下ultralytics/ultralytics/datasets/coco128.yaml文件到ultralytics目录下修改

这里我只有一个关心的person标签其他的删掉就行
4.3模型训练
修改完毕保存退出 执行下面命令
#这里添加0,1,2,3四个显卡训练,添加参数每次批次图像数量batch=16,需要与显卡数量成整数倍
yolo detect mode=train data=./test.yaml model=yolov8n.pt epochs=150 batch=16 imgsz=640 device=0,1,2,3
如果在自己电脑上训练device=0 batch建议改成8
然后可以再开一个终端看看GPU使用情况
#1s刷新一次
watch -n 1 nvidia-smi
可以使用训练出来的模型预测测试集
#model为模型路径,source为测试集路径,conf为阈值,0.5代表置信度高于0.5时标出识别框
yolo detect predict  model=./runs/detect/train6/weights/best.pt  source=../datasets/HandGesture/4 save=True  conf=0.5
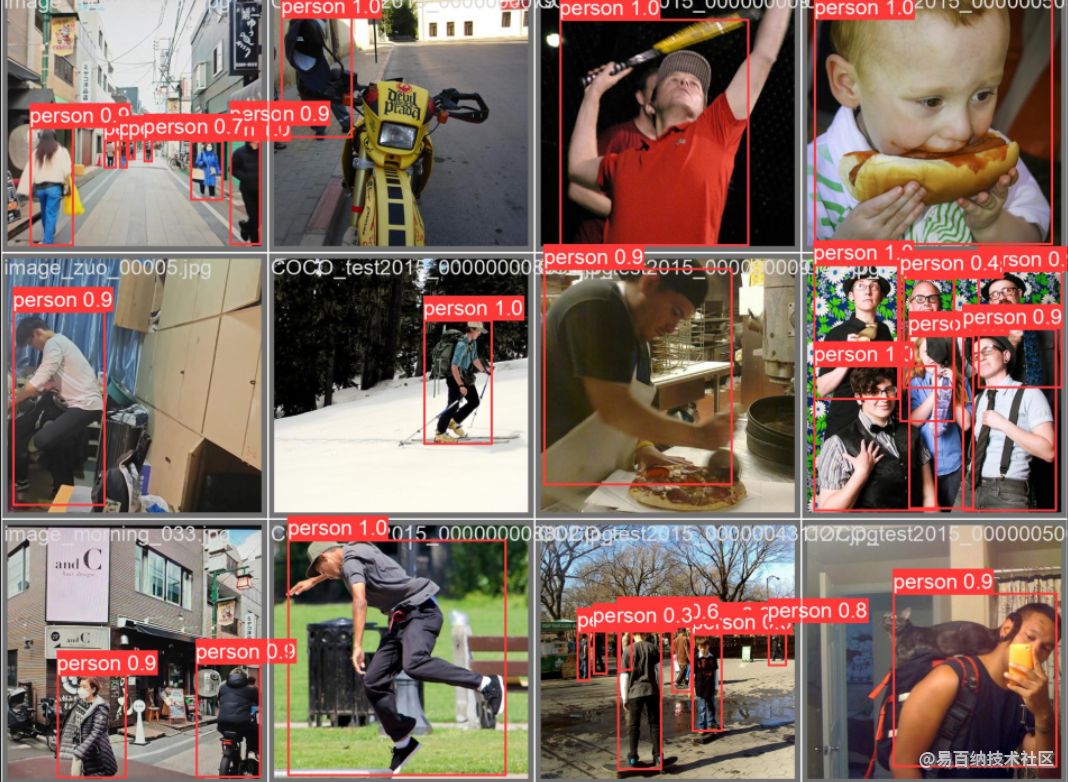
高于0.5的都标注出来了可以看到效果差强人意 因为数据集我只做了100多张照片 (标注还是蛮累的)
4.4导出模型
修改test.py

修改导出路径
python test.py
将runs压缩然后下载到Ubuntu虚拟机里
4.5模型转换
后面的模型转换看官方文档就行yolov8算法移植/HiEuler-Pico-OpenEuler Yolov8模型训练和转换.md · HiEuler PICO/doc - 码云 - 开源中国
- 分享
- 举报
 微信扫码分享
 QQ好友
QQ好友
 暂无数据
暂无数据-
浏览量:1534次2025-02-28 15:03:44
-
浏览量:1206次2025-02-19 11:16:14
-
浏览量:1420次2025-02-18 23:04:53
-
浏览量:1001次2025-02-21 15:47:34
-
浏览量:1193次2025-02-23 16:03:47
-
2024-12-10 11:13:53
-
2024-12-10 11:25:33
-
浏览量:1263次2025-02-09 15:30:36
-
2024-12-10 10:34:18
-
2024-12-10 10:52:33
-
浏览量:4862次2024-03-05 15:05:36
-
浏览量:4455次2024-02-02 18:15:06
-
浏览量:1261次2023-09-06 17:53:04
-
浏览量:2829次2024-02-23 17:41:04
-
浏览量:3513次2023-12-19 17:25:07
-
浏览量:3788次2023-11-25 17:47:33
-
浏览量:2795次2023-12-29 17:03:02
-
浏览量:3334次2024-02-28 16:15:25
-
浏览量:5370次2021-04-21 17:06:33


-
广告/SPAM
-
恶意灌水
-
违规内容
-
文不对题
-
重复发帖
山住一

 微信支付
微信支付
举报类型
- 内容涉黄/赌/毒
- 内容侵权/抄袭
- 政治相关
- 涉嫌广告
- 侮辱谩骂
- 其他
详细说明
审核成功
审核失败


关注公众号
社区问题咨询:Ebaina-CN
定制需求咨询:xxqk158820
