

LINUX下简单实现ISP图像处理从RAW到RGB,BMP算法、RGB到JPEG库的使用

在这里分享一下相关的ISP的一些基本简单图像处理算法。在一般的市面上,相关的ISP算法都是非常复杂,且经过不同serson设备的情况进行固定参数并且固化在芯片内来实现。所以硬件ISP的效率会比软件算法实现的ISP要高,而且后续开发者所要做的事情比较少。但是缺点就是实现逻辑复杂,而且不同设备并不是完全通用。下面,由我来分享一下最近的干货。
这里实现的是ISP的功能是对图像的处理,以及像素的变化,一般摄像头都是自带硬件ISP,所以你拿到的图片都是经过处理过的。这里是范例讲解ISP内部一些简单的算法实现!在LINUX上对图片直接变换。分享一些最简单的方法帮助大家理解处理的流程,有一些处理比较复杂,所以楼主打算下一篇文章再次补上,点名白平衡要跨域处理。
ISP 处理流程:
Bayer、黑电平补偿 (black level compensation)、镜头矫正(lens shading correction)、坏像素矫正(bad pixel correction)、颜色插值 (demosaic)、Bayer 噪声去除、 白平衡(AWB) 矫正、 色彩矫正(color correction)、gamma 矫正、色彩空间转换(RGB 转换为 YUV)、在YUV 色彩空间上彩噪去除与边缘加强、色彩与对比度加强,中间还要进行自动曝光控制等, 然后输出 YUV(或者RGB) 格式的数据, 再通过 I/O 接口传输到 CPU 中处理。
首先我们要了解一些图片的格式:
JPEG(Joint Photographic Experts Group):一种有损压缩格式,适合存储照片和图像,能够在压缩图像的同时保持较高的图像质量,但不适合存储带有透明背景的图像。
PNG(Portable Network Graphics):一种无损压缩格式,适合存储带有透明背景的图像,支持高分辨率和透明度控制,但文件较大。
GIF(Graphics Interchange Format):一种支持动画的无损压缩格式,适合存储简单的动画和图形,但颜色数较少,不适合存储复杂的图像。
BMP(Bitmap):一种无压缩格式,适合存储简单的图形和图像,但文件较大,不适合存储大量的图像。
Raw RGB: Raw RGB是一种基于原始红、绿、蓝(RGB)值的图像格式,每个像素都由三个颜色通道组成。Raw RGB通常以二进制格式存储,每个像素占用3个或4个字节的存储空间。由于它不进行任何压缩,因此通常需要更多的存储空间,并且需要更大的带宽来传输图像数据。
YUYV: YUYV是一种基于亮度(Y)和色度(U、V)的图像格式,每个像素由两个亮度样本和一个色度样本组成。它是一种有损压缩格式,通常以二进制格式存储,每个像素占用2个或4个字节的存储空间。由于它能够更有效地压缩图像数据,因此在视频采集和传输中常常使用。
YCrCb: YCrCb是一种基于亮度(Y)和色度(Cr、Cb)的图像格式,每个像素由一个亮度样本和两个色度样本组成。它是一种无损或有损压缩格式,通常以二进制格式存储,每个像素占用2至4个字节的存储空间。由于它能够更有效地压缩图像数据,并且支持高质量图像和视频的编码和解码,因此在数字图像和视频处理中广泛使用。
Raw: Raw是一种未经压缩或有损压缩的图像格式,通常包含从图像传感器捕获的原始像素数据。在Raw格式中,每个像素都由一个亮度值或颜色值组成,并且没有进行图像处理或颜色校正。Raw格式通常由相机或其他数字图像设备使用,以便用户可以使用专业软件进行后期处理和编辑。由于Raw格式保留了原始图像的所有信息,因此它通常需要更多的存储空间和更长的传输时间。但是,Raw格式也提供了更大的灵活性和更高的图像质量,因为它允许用户在后期处理中进行更多的编辑和调整。Raw格式的常见扩展名包括.CR2、.NEF、.ARW等。
这篇博客主要处理RAW到RGB888的一些步骤,上面介绍的图像格式中常见的PNG,JPG(JPEG)图像格式是进行压缩编码过后的图片,PNG一般能压缩到原像素大小图片的一半左右,还多出了透明度。JPG格式甚至能压缩到原图的百分之二三十。BMP是没有被压缩的图片,不过他经过了色域转换。RAW格式就是一张灰阶图,它没经过色彩空间的变换,只是一张每个像素记录灰度值的图片。一般有RAW10,RAW8,RAW12,也就是每个像素两个字节,里面高位或者低位的前后10,8,12个位是有效位。
过程一般是RAW转化为RGB再转化为BMP,或者RGB再次转化为YUV格式(这种格式方便传输)。也可以由RGB转化为YCrCb后再变化为JPEG(过程复杂),或者RGB数据解码为像素数据,再变为PNG。
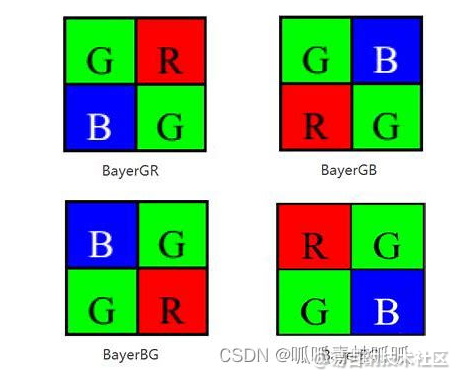
在写代码之前我们要弄懂什么叫RAW的颜色和灰阶(灰度)。在RAW图中每个像素实际上都是代表了一种颜色。一般情况下主要有这四种分布情况,这是我们直接拿出四个格子的像素颜色作为参考(例如第一种我们把他叫做GRBG格式的bayer图),以此类推。每个我们看见的BMP彩色照片每个像素都是由三种颜色RGB组成的,但是bayer图每个像素只有一种颜色,所以放大来看就是和下面的图一样,但是如果一个像素包含三种颜色RGB为例,那他就不是单纯的红、绿、蓝,而是三种颜色的混色。RAW格式是没有混色的格式图片,它每个像素只有一种颜色。每个颜色的值代表着这个颜色的深浅度。
写代码前一定要注意!!!溢出!!溢出!!对于十六位加法要很多像素相加的最好用六十四位作为total值!出现什么问题先排除是不是溢出问题!!!还有就是计算无符号数是没有小数的,比如说阴影矫正如果没有小数,就会出现每一圈亮度波纹的没有过度(因为都是整数倍从1直接跳到2,缺少了1和2之间的倍数图像就会变化的很突兀)看起来亮度就是一圈一圈的。解决这种方法最好就是变大十倍乃至一百倍相乘运算后再次除以十倍乃至一百倍,这样就能解决无符号数不能计算小数的问题!!!
读取一张RAW格式图片:
这里不详细说明其他,只说明对RAW到RGB,RGB到BMP,以及RGB使用libjpeg转化为jpg格式的过程。这里楼主用的是一张5600 * 5600像素的低十位有效的RAW图。记得注意你当前环境的大小端,低位是前十位还是后十位,如果和我不一样得要把大小端颠倒过来计算。这里提供一个转换函数:
// 大小端转换,写成内联函数效率高
inline uint16_t swap_endian(uint16_t num)
{
    return (num >> 8) | (num << 8);
}
- 1
- 2
- 3
- 4
- 5
首先第一步,再Linux下我们要对RAW文件进行读取。(这里读取后我直接把他转成BMP查看是否正确)。以下是读取代码:
vector<vector<uint16_t>> read_raw(const char *filename, int rows, int cols)
{
    vector<vector<uint16_t>> image(rows, vector<uint16_t>(cols));
    FILE *fp;
    uint16_t buffer[1];
    int i, j;
    fp = fopen(filename, "rb");
    if (fp == NULL)
    {
        perror("Error opening file");
        exit(1);
    }
    for (i = 0; i < rows; i++)
    {
        for (j = 0; j < cols; j++)
        {
            if (fread(buffer, sizeof(uint16_t), 1, fp) != 1)
            {
                printf("Error reading file: row %d, col %d\n", i, j);
                exit(1);
            }
            image[i][j] = buffer[0];
        }
    }
    fclose(fp);
    return image;
}
- 1
- 2
- 3
- 4
- 5
- 6
- 7
- 8
- 9
- 10
- 11
- 12
- 13
- 14
- 15
- 16
- 17
- 18
- 19
- 20
- 21
- 22
- 23
- 24
- 25
- 26
- 27
两个字节两个字节大小的读取,把读到的数据放到一个5600 * 5600的二维向量中。这里用向量有个好处,就是可以忽略数组的越界问题。虽然上面的读取简单,但是响应速度比较慢读一次五六秒,对于一个图像处理芯片来说肯定是越快越好,所以我对其进行了优化,采用的多线程读取。下面是多线程读取raw格式文件部分主要的代码,这是所有线程都要用到的结构体:
#define THREAD_NUM 24 // 定义线程数
#define PIXEL_SIZE 2  // 定义每个像素占用的字节数为2字节

// 线程传递消息结构体
struct ThreadArg
{
    int start_row;                        // 线程处理的起始行号
    int end_row;                          // 线程处理的结束行号
    int image_width;                      // 图像的宽度
    int image_height;                     // 图像高度
    const char *filename;                 // 文件名
    vector<vector<uint16_t>> *image_data; // 传入的图像数组
    vector<vector<Pixel>> *rgb_data; // 传入的图像数组
    uint16_t min_p;                       // 最小值参数
    // ThreadArg() = default; // 默认构造函数
};
- 1
- 2
- 3
- 4
- 5
- 6
- 7
- 8
- 9
- 10
- 11
- 12
- 13
- 14
- 15
- 16
然后就是线程读取函数,和线程函数的代码:
void *read_image(void *arg)
{
    ThreadArg *thread_arg = (ThreadArg *)arg; // 将传递给该线程的参数强制转换为 ThreadArg 指针
    int start_row = thread_arg->start_row;    // 获取该线程需要处理的起始行号和结束行号
    int end_row = thread_arg->end_row;
    int image_width = thread_arg->image_width; // 获取图像的宽度、文件路径以及二维矢量的指针
    const char *filename = thread_arg->filename;
    vector<vector<uint16_t>> *image_data = thread_arg->image_data;
    FILE *fp = fopen(filename, "rb");
    if (fp == NULL)
    {
        cerr << "Failed to open file " << filename << endl;
        pthread_exit(NULL);
    }
    fseek(fp, start_row * image_width * PIXEL_SIZE, SEEK_SET); // 将文件指针定位到该线程需要处理的起始位置
    for (int i = start_row; i < end_row; i++)                  // 循环读取该线程需要处理的所有行
    {
        vector<uint16_t> row_data(image_width); // 创建一个临时的一维矢量,用于存储当前行的数据
        fread(row_data.data(), PIXEL_SIZE, image_width, fp);
        (*image_data)[i] = row_data;
    }
    fclose(fp);
    pthread_exit(NULL);
}

vector<vector<uint16_t>> thread_read_raw(const char *filename, int image_width, int image_height)
{
    vector<vector<uint16_t>> *image_data = new vector<vector<uint16_t>>(image_height, vector<uint16_t>(image_width));
    pthread_t threads[THREAD_NUM]; // 创建多个线程,每个线程读取图像的一部分
    ThreadArg *thread_args = new ThreadArg[THREAD_NUM];
    int rows_per_thread = image_height / THREAD_NUM;
    int i;
    for (i = 0; i < THREAD_NUM - 1; i++) // 计算该线程需要处理的起始行号和结束行号
    {
        thread_args[i].start_row = i * rows_per_thread;
        thread_args[i].end_row = thread_args[i].start_row + rows_per_thread;
        thread_args[i].filename = filename;
        thread_args[i].image_data = image_data;
        thread_args[i].image_width = image_width;
        pthread_create(&threads[i], NULL, read_image, (void *)&thread_args[i]); // 创建线程并启动
    }
    // 处理最后一个线程需要处理的行数可能不足 rows_per_thread 的情况
    thread_args[i].start_row = i * rows_per_thread;
    thread_args[i].end_row = image_height;
    thread_args[i].filename = filename;
    thread_args[i].image_data = image_data;
    thread_args[i].image_width = image_width;
    pthread_create(&threads[i], NULL, read_image, (void *)&thread_args[i]); // 创建线程并启动

    for (i = 0; i < THREAD_NUM; i++) // 等待所有线程执行完毕
    {
        pthread_join(threads[i], NULL);
    }
    vector<vector<uint16_t>> result(*image_data); // 将指针指向的二维矢量复制到一个新的二维矢量中
    delete image_data;
    delete[] thread_args;
    return result;
}
- 1
- 2
- 3
- 4
- 5
- 6
- 7
- 8
- 9
- 10
- 11
- 12
- 13
- 14
- 15
- 16
- 17
- 18
- 19
- 20
- 21
- 22
- 23
- 24
- 25
- 26
- 27
- 28
- 29
- 30
- 31
- 32
- 33
- 34
- 35
- 36
- 37
- 38
- 39
- 40
- 41
- 42
- 43
- 44
- 45
- 46
- 47
- 48
- 49
- 50
- 51
- 52
- 53
- 54
- 55
- 56
- 57
- 58
这是读取到的一张图片: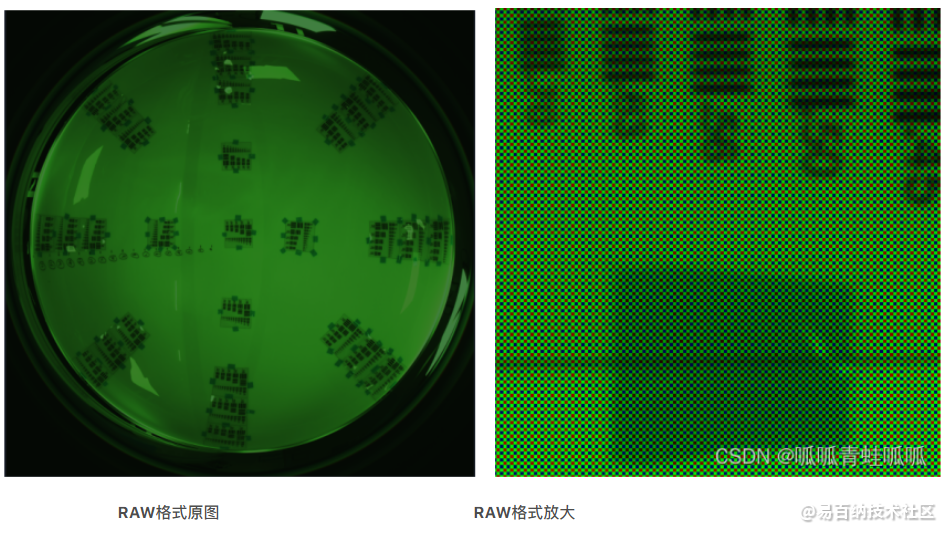
放大后清晰的看见一张RAW格式的图是由红绿蓝三色组成。
坏点矫正:
坏点是指在数字图像中出现的一些不正常的像素点,它们可能是传感器损坏、传输过程中出现的错误或其他原因引起的。坏点的存在会影响图像的质量和准确性,因此需要进行坏点处理。比如说serson上某个感光传感器损坏,导致拍出的那一个点的像素缺失。
楼主本人对坏点处理的方法是判断每个像素是否低于相邻像素的平均值0x80(这个值是看自己设置)可以调成自己合适的参数。
uint16_t seek_bad_Pixel(vector<vector<uint16_t>> &image)
{
    int width = image.size(), height = image[0].size(), m = 0, n = 0;
    uint16_t min_pixel = image[0][0];
    // 寻找坏点
    for (int i = 0; i < width; i++)
    {
        for (int j = 0; j < height; j++)
        {
            // 判断坏点
            if (abs((correct_bad_Pixel(image, i, j) - image[i][j])) > 0x80)
            {
                image[i][j] = correct_bad_Pixel(image, i, j);
            }

            if (image[i][j] < min_pixel)
            {
                min_pixel = image[i][j];
            }
        }
    }
    return min_pixel;
}

uint16_t correct_bad_Pixel(vector<vector<uint16_t>> &image, int bad_pixel_x, int bad_pixel_y)
{
    int width = image.size(), height = image[0].size(), count = 0;
    uint16_t sum = 0, direction_avaerage = 0, direction_up = 0, direction_dowm = 0, direction_right = 0, direction_left = 0; // 周围元素的总和
    if (bad_pixel_x < 0 || bad_pixel_x >= width || bad_pixel_y < 0 || bad_pixel_y >= height)
    {
        return -1;
    }
    if (bad_pixel_x - 2 >= 0)
    {
        direction_up = image[bad_pixel_x - 2][bad_pixel_y];
        count++;
    }
    if (bad_pixel_x + 2 < width)
    {
        direction_dowm = image[bad_pixel_x + 2][bad_pixel_y];
        count++;
    }
    if (bad_pixel_y - 2 >= 0)
    {
        direction_right = image[bad_pixel_x][bad_pixel_y - 2];
        count++;
    }
    if (bad_pixel_y + 2 < height)
    {
        direction_left = image[bad_pixel_x][bad_pixel_y + 2];
        count++;
    }
    sum = direction_up + direction_dowm + direction_right + direction_left;
    direction_avaerage = sum / count;
    return direction_avaerage;
}
- 1
- 2
- 3
- 4
- 5
- 6
- 7
- 8
- 9
- 10
- 11
- 12
- 13
- 14
- 15
- 16
- 17
- 18
- 19
- 20
- 21
- 22
- 23
- 24
- 25
- 26
- 27
- 28
- 29
- 30
- 31
- 32
- 33
- 34
- 35
- 36
- 37
- 38
- 39
- 40
- 41
- 42
- 43
- 44
- 45
- 46
- 47
- 48
- 49
- 50
- 51
- 52
- 53
- 54
- 55
- 56
由于我拿到的RAW图在sensor出来的时候已经进行过坏点矫正了,所以和原图没什么区别(serson一般自带了ISP)。这是网上搜到的其他矫正方法,感兴趣的也可以自己去尝试以下。
坏点修复:通过对坏点周围的像素进行插值或其他算法处理,将坏点处的像素值估计出来,以达到修复的效果。
坏点剔除:将坏点从图像中剔除,即将其像素值置为背景值或其他合适的值。这种方法适用于坏点数量较少且分布较散的情况。
坏点替换:将坏点处的像素值替换为周围像素的平均值或其他合适的值。这种方法适用于坏点数量较多且分布较集中的情况。
坏点标记:将坏点在图像中标记出来,以便后续的处理或分析。这种方法适用于需要保留原始图像信息的情况。
坏点检测:通过对图像中的像素值进行统计分析,检测出可能存在的坏点。这种方法适用于大规模图像处理和自动化处理的情况。 总之,坏点处理方法的选择应根据具体情况进行,以达到最 佳的处理效果。
黑电平矫正:
由于图像传感器中各个像素元件之间的差异,以及电路噪声等因素,黑电平的基准值可能存在一定的偏移。如果不对黑电平进行校正,图像中的黑色部分可能会出现灰色或者色偏等不正常的显示情况。简单来说是个什么情况呢?就是像素传感器在完全不感光的情况下,会出现暗电流(漏电)现象,导致在纯黑环境,搜集到的像素值也不为0。所以拍出来的照片都是在那不为零的基础上叠加的,发生了偏移。所以我们要减去这一部分的系数,来让照片恢复正常。通常,这种暗电流的情况和相机自身的温度也是由非线性的关系。而且要拿到该相机拍的一张纯黑的图作为参照来处理。但是楼主这里没有相关的图像和参数,根据大佬的指导,可以用本相片中最暗的一个像素值作为基准,然后让整一张图片偏移这个值。
暗电流是指在相机或图像传感器没有受到光照的情况下,由于材料内部自由电子的热运动而产生的电流。温度是影响暗电流的重要因素之一,两者之间存在一定的关系。 一般来说,温度越高,暗电流就越大。这是因为在高温下,材料内部的自由电子热运动加剧,导致更多的电子穿过PN结并流入电路中。此外,随着温度的升高,PN结的导电性能也会发生变化,从而进一步影响暗电流的大小。 因此,在进行高精度的图像采集和处理时,需要对暗电流进行校准和补偿,以减少其对图像质量的影响。同时,也需要注意相机或图像传感器的工作环境和温度控制,以保证暗电流的稳定性和可控性。
以下是这个简单的范例函数:
int Black_Level_Correction(vector<vector<uint16_t>> &image)
{
    int width = image.size(), heigth = image[0].size(), i, j;
    uint16_t min_pixel = image[0][0];
    // 第一遍遍历整个数组找到最小的像素值作为黑电平的补偿数
    for (i = 0; i < width; i++)
    {
        for (j = 0; j < heigth; j++)
        {
            if (image[i][j] < min_pixel)
            {
                min_pixel = image[i][j];
            }
        }
    }
    // 第二遍遍历数组用黑电平补偿数对图片每个像素进行补偿
    for (i = 0; i < width; i++)
    {
        for (j = 0; j < heigth; j++)
        {
            image[i][j] -= min_pixel;
        }
    }
    return min_pixel;
}
- 1
- 2
- 3
- 4
- 5
- 6
- 7
- 8
- 9
- 10
- 11
- 12
- 13
- 14
- 15
- 16
- 17
- 18
- 19
- 20
- 21
- 22
- 23
- 24
- 25
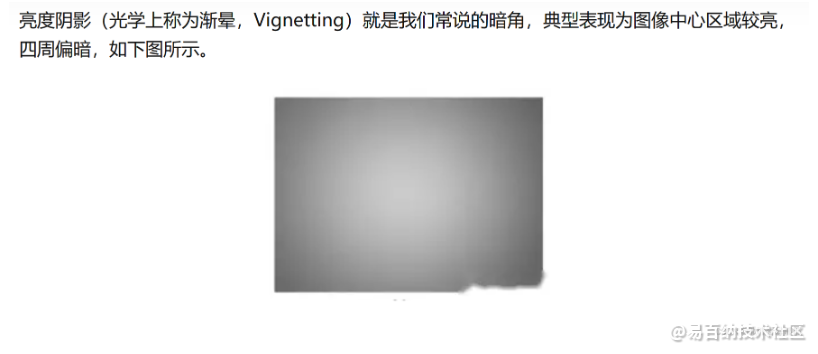
阴影矫正:
阴影矫正是数字图像处理中的一项技术,用于去除图像中的阴影效果,以提高图像的质量和准确性。阴影效果是指由于光线的遮挡、衰减或反射等原因,在图像中出现的较暗的区域。阴影效果会影响图像的亮度、对比度和色彩平衡,降低图像的可读性和识别性。因此,阴影矫正成为数字图像处理中的一项重要技术。 阴影矫正的原理是基于图像中的光照模型,即光线从光源到物体表面的反射和衰减过程。光线经过物体表面反射后,会遵循一定的光照规律分布到物体表面的不同部位,形成明暗不同的区域。在阴影区域中,光线受到遮挡或衰减,导致反射光强度变弱,因此需要对阴影区域进行矫正。
网格法
镜头阴影的渐变曲率从中心到边缘逐渐增大,增益曲线表现为中心疏,边缘密。因此将图像划分成中间疏、四周密的网格,每个块内有不同的增益。位于每个块内的像素点认为具有相同的增益值有相同的增益。网格法如下图所示,该方法能适应不同的镜头模组,阴影校正效果较好。
同心圆法
镜头阴影从图像中心到四周越来越严重,且基本是呈现中心对称的,根据镜头阴影的这个特点,提出了一种镜头阴影校正方法,即根据各像素点与图像中心的距离R计算出一个校正系数。如下图所示,该方法简单、复杂度低、占用内存少,但是镜头装配过程复杂,不存在这种完全对称的情况,因此,该方法镜头阴影校正的效果一般欠佳,不具有实际应用价值。
同心圆算式增益可以自己安排但是要注意合理性,增益和R(距离)的关系一定是乘法,而不是加法,因为如果是本来是黑色距离再远,它也是黑色,如果你把本来是纯黑的点变成了其他颜色那就错了,我们增益的是非黑色的点。最后,要注意溢出和小数倍的存在。
为了让初学者能有简单理解,这里采用的是第二种方法。以下是范例代码:
void Shadow_Correction(vector<vector<uint16_t>> &image, double compensation)
{

    int width = image.size(), heigth = image[0].size(), arv_x = 0, arv_y = 0, i, j, count = 0, count_1 = 0;
    float R = 0.0;
    arv_x = (int)width / 2;
    arv_y = (int)heigth / 2;
    for (i = 0; i < width; i++)
    {
        for (j = 0; j < heigth; j++)
        {
            // 计算距离
            R = (float)abs(sqrt(pow(arv_x - i, 2) + pow(arv_y - j, 2)));
            if (R > 2800)
            {
                R = 0;
            }
            //如何矫正的值这里是自己决定的公式也是可以自己设定,甚至可以非线性,具体要看你照片的效果
            // image[i][j] = (double)pow((1.0+(R/280)/10),3)*image[i][j];
            image[i][j] = (float)((float)10 + (float)(R / compensation)) * image[i][j];
            image[i][j] = image[i][j] / 10;
            if (image[i][j] > 0x3ff)
            {
                image[i][j] = 0x3ff; // 防止曝光过度
            }
        }
    }
}
- 1
- 2
- 3
- 4
- 5
- 6
- 7
- 8
- 9
- 10
- 11
- 12
- 13
- 14
- 15
- 16
- 17
- 18
- 19
- 20
- 21
- 22
- 23
- 24
- 25
- 26
- 27
- 28
阴影矫正对比图片: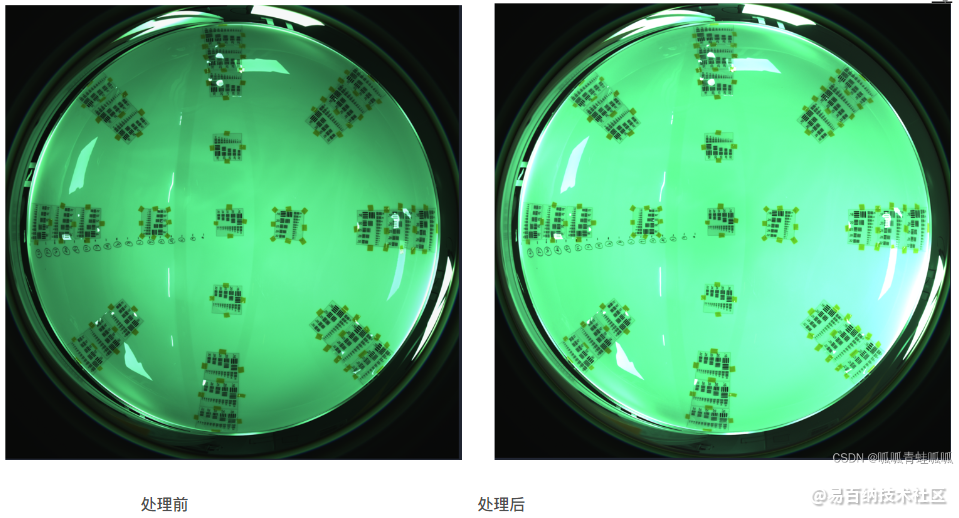
注意:为了大家更直观的看清楚我这给大家看的是RGB插值后的BMP图片的效果!
可以看出处理后,镜头附近的阴影消失了很多,整个镜头也颜色鲜艳了,具体要多少参数自己调整。但是使用圆心法的缺陷也暴露出来了,可以看出处理后镜头的右下角,以及绿的发蓝了,亮度过高了,这也验证了镜头的阴影并不是完全的中心对称的。而且也能看出处理后上方还是由一些阴影,如果提拉亮度继续想要消除阴影,那本来明亮的地方就会溢出,过亮变成白色。所以分区处理像素亮度是最好的,对不同区域进行分别处理,但是这样也相对复杂。
以上的多线程版本:
上面的虽然便于理解但是,运行速度比较慢。楼主写了个多线程版本并且把他们集合在一个函数里面,但是好像没快特别多。并不是线程越多越快,因为切换线程和恢复上下文也是需要时间了,当线程大于一定数量反而会更慢。如果大家由改进更快的代码请和楼主分享一下!
void *process_chunk(void *arg)
{
ThreadArg *args = (ThreadArg *)arg;
int start = args->start_row;
int end = args->end_row;
std::vector<std::vector<uint16_t>> *image = args->image_data;
uint16_t min_pixel = args->min_p;
int heigth = (*image)[0].size();
float R = 0.0;
int arv_x = (int)(*image).size() / 2;
int arv_y = heigth / 2;
for (int i = start; i < end; i++)
{
for (int j = 0; j < heigth; j++)
{
// 黑电平矫正
(*image)[i][j] -= min_pixel;
// 阴影矫正
R = (float)abs(sqrt(pow(arv_x - i, 2) + pow(arv_y - j, 2)));
if (R > 2800)
{
R = 0;
}
(*image)[i][j] = (float)((float)10 + (float)(R / 280.0)) * (*image)[i][j];
(*image)[i][j] = (*image)[i][j] / 10;
if ((*image)[i][j] > 0x3ff)
{
(*image)[i][j] = 0x3ff; // 防止曝光过度
}
}
}
delete args;
pthread_exit(NULL);
}
void thread_pre_correction(vector<vector<uint16_t>> &image)
{
int width = image.size(), heigth = image[0].size(), i, j;
uint16_t min_pixel;
float R = 0.0;
int arv_x = (int)width / 2;
int arv_y = (int)heigth / 2;
min_pixel = seek_bad_Pixel(image); // 坏点矫正并且返回最小值
pthread_t *threads = new pthread_t[THREAD_NUM]; // 创建线程数组
int chunk_size = width / THREAD_NUM; // 计算每个线程的任务量
for (int t = 0; t < THREAD_NUM; t++)
{
int start = t * chunk_size;
int end = (t == THREAD_NUM - 1) ? width : (t + 1) * chunk_size;
ThreadArg *args = new ThreadArg;
args->start_row = start;
args->end_row = end;
args->image_data = ℑ
args->min_p = min_pixel;
pthread_create(&threads[t], nullptr, &process_chunk, args);
}
for (int t = 0; t < THREAD_NUM; t++)
{
pthread_join(threads[t], nullptr); // 等待所有线程处理完毕
}
delete[] threads;
}
- 1
- 2
- 3
- 4
- 5
- 6
- 7
- 8
- 9
- 10
- 11
- 12
- 13
- 14
- 15
- 16
- 17
- 18
- 19
- 20
- 21
- 22
- 23
- 24
- 25
- 26
- 27
- 28
- 29
- 30
- 31
- 32
- 33
- 34
- 35
- 36
- 37
- 38
- 39
- 40
- 41
- 42
- 43
- 44
- 45
- 46
- 47
- 48
- 49
- 50
- 51
- 52
- 53
- 54
- 55
- 56
- 57
- 58
- 59
- 60
- 61
- 62
RGB插值(RAW域->RGB域):
RGB插值是数字图像处理中的一种方法,用于将原始图像中的缺失像素值进行估计和填充。RGB是红、绿、蓝三种颜色分量的缩写,对于一张彩色图像而言,每个像素都有三个分量的值,分别对应红、绿、蓝三种颜色的亮度值。这里采用最近邻插值法(Nearest Neighbor Interpolation):将缺失像素的值设置为最近邻像素的值。这里生成的格式是RGB888,因为是低十位有效,这里再次舍去最低位两个字节,实际上是损失精度的。
先给一个简单插值范例,自己插自己的值R=G=B得出一张纯灰色的图。
struct Pixel
{
    uint8_t r;
    uint8_t g;
    uint8_t b;
};


vector<vector<Pixel>> color_interpolation_grey(vector<vector<uint16_t>> &image)
{
    int height = image[0].size(), width = image.size();
    vector<vector<Pixel>> rgbImage(width, vector<Pixel>(height));
    for (int j = 0; j < width; j++)
    {
        for (int i = 0; i < height; i++)
        {
            // 抹干净高六位
            image[i][j] = image[i][j] & 0x3FF; // 0000001111111111
            // 右移两位
            image[i][j] = image[i][j] >> 2;
            rgbImage[i][j].b = image[i][j];
            rgbImage[i][j].g = image[i][j];
            rgbImage[i][j].r = image[i][j];
        }
    }
    return rgbImage;
}
- 1
- 2
- 3
- 4
- 5
- 6
- 7
- 8
- 9
- 10
- 11
- 12
- 13
- 14
- 15
- 16
- 17
- 18
- 19
- 20
- 21
- 22
- 23
- 24
- 25
- 26
- 27
灰色插值后的图片: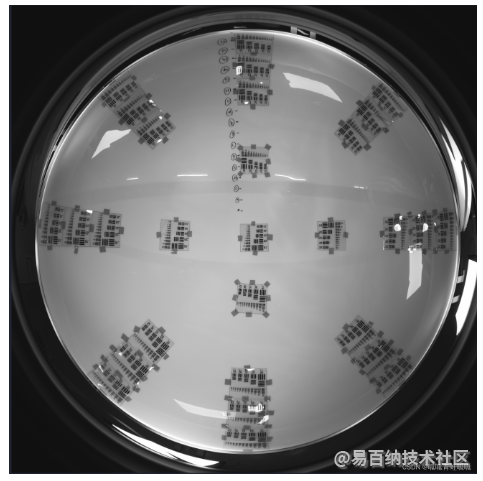
注意:为了大家更直观的看清楚我这给大家看的是RGB插值后的BMP图片的效果!
彩色RGB插值,有多种插值方法。因为每个像素只有一种颜色。比如在RAW格式的图片中,绿色像素它将缺少红色,蓝色的值,以此类推。所以我们要补齐他的值,让每一个像素都由三种颜色混色在一起,丰富颜色。对此有多种方法,我给出的代码是用的相邻插值法。
这是楼主用的这张RAW图的格式(GBRG)。
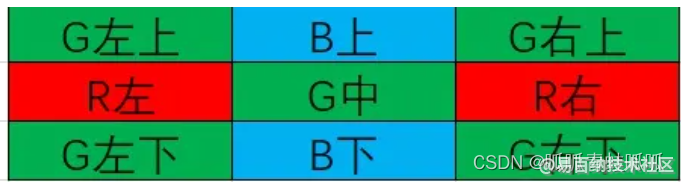
对于各种颜色的插值:
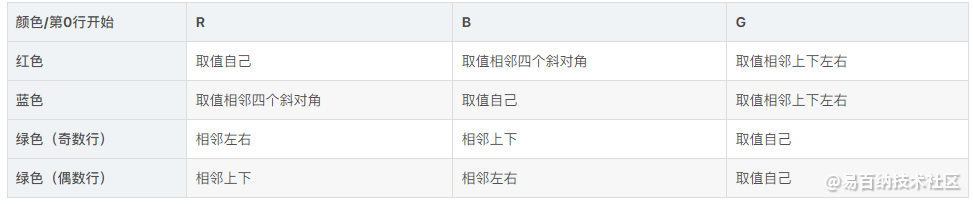
下面给出范例代码:
vector<vector<Pixel>> color_interpolation(vector<vector<uint16_t>> &image)
{
    int height = image[0].size(), width = image.size();
    vector<vector<Pixel>> rgbImage(width, vector<Pixel>(height));
    for (int i = 0; i < width; i++)
    {
        for (int j = 0; j < height; j++)
        {
            int Gcount = 0, Rcount = 0, Bcount = 0;
            bool Green = ((i % 2 == 0) && (j % 2 == 0)) || ((i % 2 == 1) && (j % 2 == 1));
            //GBRG格式
            bool Red = (i % 2 == 1) && (j % 2 == 0);
            bool Blue = (i % 2 == 0) && (j % 2 == 1);
            uint16_t temporary_R = 0, temporary_G = 0, temporary_B = 0; // 防止溢出16位来让八位累加!!
            if (Green)
            {
                for (int x = i - 1; x <= i + 1; x++)
                {
                    for (int y = j - 1; y <= j + 1; y++)
                    {
                        // 判断边界内有效数据
                        if (x >= 0 && x < width && y >= 0 && y < height && !(x == i && y == j))
                        {
                            if ((i % 2 == 0)) // 偶数行红蓝读取
                            {
                                // 红色
                                if ((x == i && y == j - 1) || (x == i && y == j + 1))
                                {
                                    temporary_R += image[x][y];
                                    Rcount++;
                                }
                                // 蓝色
                                if ((x == i - 1 && y == j) || (x == i + 1 && y == j))
                                {
                                    temporary_B += image[x][y];
                                    Bcount++;
                                }
                            }
                            if ((i % 2 == 1))
                            {
                                // 红色
                                if ((x == i - 1 && y == j) || (x == i + 1 && y == j))
                                {
                                    temporary_R += image[x][y];
                                    Rcount++;
                                }
                                // 蓝色
                                if ((x == i && y == j - 1) || (x == i && y == j + 1))
                                {
                                    temporary_B += image[x][y];
                                    Bcount++;
                                }
                            }
                        }
                    }
                }
                rgbImage[i][j].g = (image[i][j] / 1) >> 2;
                rgbImage[i][j].r = (temporary_R / Rcount) >> 2;
                rgbImage[i][j].b = (temporary_B / Bcount) >> 2;
            }
            if (Blue)
            {
                for (int x = i - 1; x <= i + 1; x++)
                {
                    for (int y = j - 1; y <= j + 1; y++)
                    {
                        if (x >= 0 && x < width && y >= 0 && y < height && !(x == i && y == j))
                        {
                            // 绿色插值上下左右
                            if ((x == i && y == j - 1) || (x == i && y == j + 1) || (x == i - 1 && y == j) || (x == i + 1 && y == j))
                            {
                                temporary_G += image[x][y];
                                Gcount++;
                            }
                            // 对蓝色四个角插值
                            if ((x == i - 1 && y == j - 1) || (x == i + 1 && y == j - 1) || (x == i - 1 && y == j + 1) || (x == i + 1 && y == j + 1))
                            {
                                temporary_B += image[x][y];
                                Bcount++;
                            }
                        }
                    }
                }
                rgbImage[i][j].g = (temporary_G / (uint16_t)Gcount) >> 2;
                rgbImage[i][j].r = (image[i][j] / (uint16_t)1) >> 2;
                rgbImage[i][j].b = (temporary_B / (uint16_t)Bcount) >> 2;
            }
            if (Red)
            {
                for (int x = i - 1; x <= i + 1; x++)
                {
                    for (int y = j - 1; y <= j + 1; y++)
                    {
                        if (x >= 0 && x < width && y >= 0 && y < height && !(x == i && y == j))
                        {
                            // 绿色插值上下左右
                            if ((x == i && y == j - 1) || (x == i && y == j + 1) || (x == i - 1 && y == j) || (x == i + 1 && y == j))
                            {
                                temporary_G += image[x][y];
                                Gcount++;
                            }
                            // 对四角红色插值
                            if ((x == i - 1 && y == j - 1) || (x == i + 1 && y == j - 1) || (x == i - 1 && y == j + 1) || (x == i + 1 && y == j + 1))
                            {
                                temporary_R += image[x][y];
                                Rcount++;
                            }
                        }
                    }
                }
                rgbImage[i][j].g = (temporary_G / (uint16_t)Gcount) >> 2;
                rgbImage[i][j].r = (temporary_R / (uint16_t)Rcount) >> 2;
                rgbImage[i][j].b = (image[i][j] / (uint16_t)1) >> 2;
            }
        }
    }
    return rgbImage;
}
- 1
- 2
- 3
- 4
- 5
- 6
- 7
- 8
- 9
- 10
- 11
- 12
- 13
- 14
- 15
- 16
- 17
- 18
- 19
- 20
- 21
- 22
- 23
- 24
- 25
- 26
- 27
- 28
- 29
- 30
- 31
- 32
- 33
- 34
- 35
- 36
- 37
- 38
- 39
- 40
- 41
- 42
- 43
- 44
- 45
- 46
- 47
- 48
- 49
- 50
- 51
- 52
- 53
- 54
- 55
- 56
- 57
- 58
- 59
- 60
- 61
- 62
- 63
- 64
- 65
- 66
- 67
- 68
- 69
- 70
- 71
- 72
- 73
- 74
- 75
- 76
- 77
- 78
- 79
- 80
- 81
- 82
- 83
- 84
- 85
- 86
- 87
- 88
- 89
- 90
- 91
- 92
- 93
- 94
- 95
- 96
- 97
- 98
- 99
- 100
- 101
- 102
- 103
- 104
- 105
- 106
- 107
- 108
- 109
- 110
- 111
- 112
- 113
- 114
- 115
- 116
- 117
- 118
下面是一张RAW图直RGB接插值后生成BMP的图片效果:
注意:为了大家更直观的看清楚我这给大家看的是RGB插值后的BMP图片的效果!
插值成功的话整个图片应该是偏向于一种颜色,不一定是绿色,这也是正常的。而且还要对像素观察一下,如果成功的插值像素都是趋向于一种颜色,绵密的,而不是每个像素都是分明的。下面是正确插值与错误插值的像素对比: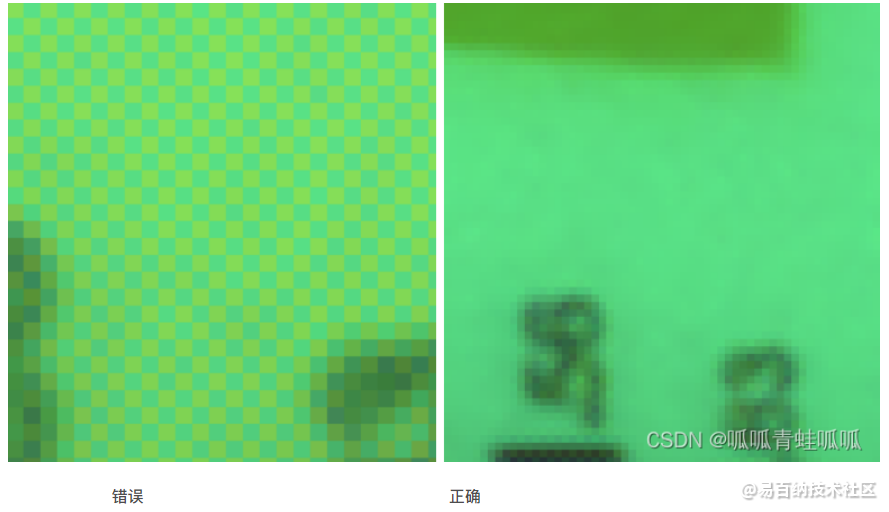
生成一个BMP文件:
BMP是一种通用格式,我们只要把格式头写好,然后往里面方RGB数据就行,BMP的写入方式是倒着写的,请看下面代码:
void Raw_to_Bmp_Pixel16_Enablelow10(vector<vector<Pixel>> &image, const char *filename)
{
    int width = image.size();
    int height = image[0].size();
    FILE *pFile = fopen(filename, "wb");
    if (!pFile)
    {
        printf("Error: Unable to open file %s\n", filename);
        return;
    }
    // 54个字节的报头
    uint32_t bmpSize = width * height * sizeof(uint16_t) + 54;
    uint32_t offset = 54;
    // 14个字节的格式头和40个字节的信息头
    fwrite("BM", sizeof(char), 2, pFile);
    fwrite(&bmpSize, sizeof(uint32_t), 1, pFile);
    fwrite("\0\0\0\0", sizeof(char), 4, pFile);
    fwrite(&offset, sizeof(uint32_t), 1, pFile);
    uint32_t headerSize = 40;
    uint32_t planes = 1;
    uint32_t bitsPerPixel = 24;
    uint32_t compression = 0;
    uint32_t bmpDataSize = width * height * sizeof(uint16_t);
    uint32_t resolutionX = 0;
    uint32_t resolutionY = 0;
    uint32_t colors = 0;
    uint32_t importantColors = 0;
    fwrite(&headerSize, sizeof(uint32_t), 1, pFile);
    fwrite(&width, sizeof(uint32_t), 1, pFile);
    fwrite(&height, sizeof(uint32_t), 1, pFile);
    fwrite(&planes, sizeof(uint16_t), 1, pFile);
    fwrite(&bitsPerPixel, sizeof(uint16_t), 1, pFile);
    fwrite(&compression, sizeof(uint32_t), 1, pFile);
    fwrite(&bmpDataSize, sizeof(uint32_t), 1, pFile);
    fwrite(&resolutionX, sizeof(uint32_t), 1, pFile);
    fwrite(&resolutionY, sizeof(uint32_t), 1, pFile);
    fwrite(&colors, sizeof(uint32_t), 1, pFile);
    fwrite(&importantColors, sizeof(uint32_t), 1, pFile);
    for (int i = 0; i < height; i++)
    {
        for (int j = 0; j < width; j++)
        {
            Pixel pixel = image[height - 1 - i][j];
            /*
                 1 2   的读取方式 3 4 1 2
                 3 4
            */
            // uint16_t lowTen = pixel.r & 0x3FF;   // 0000001111111111
            fwrite(&pixel.r, sizeof(uint8_t), 1, pFile);
            fwrite(&pixel.g, sizeof(uint8_t), 1, pFile);
            fwrite(&pixel.b, sizeof(uint8_t), 1, pFile);
        }
    }
    fclose(pFile);
}
- 1
- 2
- 3
- 4
- 5
- 6
- 7
- 8
- 9
- 10
- 11
- 12
- 13
- 14
- 15
- 16
- 17
- 18
- 19
- 20
- 21
- 22
- 23
- 24
- 25
- 26
- 27
- 28
- 29
- 30
- 31
- 32
- 33
- 34
- 35
- 36
- 37
- 38
- 39
- 40
- 41
- 42
- 43
- 44
- 45
- 46
- 47
- 48
- 49
- 50
- 51
- 52
- 53
- 54
- 55
上面给的一些范例图片就是BMP格式的图片的,在这里就不多做展示了。
使用libjpeg库把RGB转化为JPG格式:
这个库怎么下载参考这个链接:https://blog.csdn.net/qq_62815119/article/details/127709812
记得色彩空间要设置为3,cinfo.input_components = 3; // R, G, B
还有输入的格式要设置成RGB, cinfo.in_color_space = JCS_RGB;
void write_jpeg_file(const char* filename, vector<vector<Pixel>>& data, int width, int height, int quality) {
    struct jpeg_compress_struct cinfo;
    struct jpeg_error_mgr jerr;
    FILE* outfile;
    JSAMPROW row_pointer[1];
    int row_stride;
    cinfo.err = jpeg_std_error(&jerr);
    jpeg_create_compress(&cinfo);
    if ((outfile = fopen(filename, "wb")) == NULL) {
        fprintf(stderr, "can't open %s\n", filename);
        exit(1);
    }
    jpeg_stdio_dest(&cinfo, outfile);
    cinfo.image_width = width;
    cinfo.image_height = height;
    cinfo.input_components = 3; // R, G, B
    cinfo.in_color_space = JCS_RGB;
    jpeg_set_defaults(&cinfo);
    jpeg_set_quality(&cinfo, quality, TRUE);
    jpeg_start_compress(&cinfo, TRUE);
    row_stride = width * 3;
    while (cinfo.next_scanline < cinfo.image_height) {
        int y = cinfo.next_scanline;
        row_pointer[0] = &data[y][0].r;
        jpeg_write_scanlines(&cinfo, row_pointer, 1);
    }
    jpeg_finish_compress(&cinfo);
    fclose(outfile);
    jpeg_destroy_compress(&cinfo);
}
- 1
- 2
- 3
- 4
- 5
- 6
- 7
- 8
- 9
- 10
- 11
- 12
- 13
- 14
- 15
- 16
- 17
- 18
- 19
- 20
- 21
- 22
- 23
- 24
- 25
- 26
- 27
- 28
- 29
- 30
下面是这次生成的JPG格式图:

- 分享
- 举报
 微信扫码分享
 QQ好友
QQ好友
 暂无数据
暂无数据-
浏览量:1664次2019-12-23 09:44:21
-
浏览量:2541次2020-08-05 20:49:45
-
浏览量:1277次2023-12-11 11:01:31
-
浏览量:2981次2020-08-23 20:59:44
-
浏览量:4026次2020-09-24 11:58:24
-
浏览量:1024次2023-12-22 10:53:00
-
浏览量:1269次2024-01-19 17:52:40
-
浏览量:3586次2022-05-17 16:45:07
-
浏览量:1589次2024-02-22 15:52:02
-
浏览量:2142次2024-02-23 18:01:42
-
浏览量:10295次2024-01-04 14:35:55
-
浏览量:1002次2024-01-11 15:05:58
-
浏览量:2160次2023-12-29 16:51:41
-
浏览量:1580次2023-07-11 12:40:32
-
浏览量:7240次2022-03-21 09:00:27
-
浏览量:5581次2020-08-11 10:30:44
-
浏览量:3363次2020-11-20 10:19:03
-
浏览量:14470次2019-09-21 19:14:57
-
浏览量:2114次2018-10-15 21:38:57

tomato
===============


-
广告/SPAM
-
恶意灌水
-
违规内容
-
文不对题
-
重复发帖
tomato

 微信支付
微信支付
举报类型
- 内容涉黄/赌/毒
- 内容侵权/抄袭
- 政治相关
- 涉嫌广告
- 侮辱谩骂
- 其他
详细说明
审核成功
审核失败


关注公众号
社区问题咨询:Ebaina-CN
定制需求咨询:xxqk158820
