Pytorch版本YOLOv3模型转Darknet weights模型然后转caffemodel再转wk模型在nnie上面推理
前言
最近一直在研究海思的嵌入式设备的模型部署,手头上面训练好的YOLOv3 Pytorch版本的模型需要放在海思的嵌入式芯片上面去推理,我的芯片是Hi3519AV100(对应nnie版本是1.2)。查看官方文档,发现都是一些什么IDE使用指南之类的,写的都是边边角角,没有一个整个能够跑通的demo。所以,自己研究了好久,走了很多弯路,终于找到一套能够完全跑通的链路,这里分享给大家,让大家能够在实际使用中少走一些弯路。
1. 海思nnie设备以及转换思路
关于海思的nnie设备,是海思的一套官方深度学习的加速引擎,支持很多图像相关的算法,这里就不一一列举了,有兴趣的可以自行百度,我们本来是想迁移YOLOv4的模型,但是发现实际模型转换和量化时候并不能支持YOLOv4,原因是nnie不支持mish激活函数。所以最后我们只能够改用了YOLOv3。
转换思路
由于nnie模型量化生成wk文件时候,官方只支持caffemodel,所以需要先转化成caffemodel才能够有nnie的模型,而caffemodel最好是由c++版本darknet通过caffe的api去转化为佳,所以我们给出来的转化思路如下:
Pytorch pth模型 —— Darknet weights模型 —— caffemodel —— nnie wk模型
值得注意的一点是,如果您本来的模型已经是darknet版本的weights,那么就不需要第一步的转化而直接进行第二步。
2. Pytorch pth模型 —— Darknet weights模型
这里我们的项目原本就有一个Darknet的类,因为Pytorch的YOLOv3是第三方去适配的,所以,不同的版本也许是有差异的,我的版本如下:
class Darknet(nn.Module):
    # YOLOv3 object detection model

    def __init__(self, cfg, img_size=(416, 416), verbose=False):
        super(Darknet, self).__init__()

        self.module_defs = parse_model_cfg(cfg)
        self.module_list, self.routs = create_modules(self.module_defs, img_size, cfg)
        self.yolo_layers = get_yolo_layers(self)
        # torch_utils.initialize_weights(self)

        # Darknet Header https://github.com/AlexeyAB/darknet/issues/2914#issuecomment-496675346
        self.version = np.array([0, 2, 5], dtype=np.int32)  # (int32) version info: major, minor, revision
        self.seen = np.array([0], dtype=np.int64)  # (int64) number of images seen during training
        self.info(verbose) if not ONNX_EXPORT else None  # print model description

        self.header_info = np.array([0, 0, 0, self.seen, 0], dtype=np.int32)

    def forward(self, x, augment=False, verbose=False):
        ....darknet代码
这里只需要在Darknet类多加一个save_darknet_weights方法
    def save_darknet_weights(self, path, cutoff=-1):
        """
            @:param path    - path of the new weights file
            @:param cutoff  - save layers between 0 and cutoff (cutoff = -1 -> all are saved)
        """
        fp = open(path, "wb")
        # self.header_info[3] = self.seen
        # self.header_info.tofile(fp)

        header_info = np.array([0, 2, 0, 32013312, 0], dtype=np.int32)
        header_info.tofile(fp)

        # Iterate through layers
        for i, (module_def, module) in enumerate(zip(self.module_defs[:cutoff], self.module_list[:cutoff])):
            if module_def["type"] == "convolutional":
                conv_layer = module[0]
                # If batch norm, load bn first
                if module_def["batch_normalize"]:
                    bn_layer = module[1]
                    bn_layer.bias.data.cpu().numpy().tofile(fp)
                    bn_layer.weight.data.cpu().numpy().tofile(fp)
                    bn_layer.running_mean.data.cpu().numpy().tofile(fp)
                    bn_layer.running_var.data.cpu().numpy().tofile(fp)
                # Load conv bias
                else:
                    conv_layer.bias.data.cpu().numpy().tofile(fp)
                # Load conv weights
                conv_layer.weight.data.cpu().numpy().tofile(fp)

        fp.close()
最后,我们通过定义weights_export.py文件来调用这个方法。
"""
把pth文件转化成.weights文件
"""
import torch
from models import Darknet
from train_module import prepare_parse_test_config, print_args

weights_path = "./weights_test/best.pt"

config = prepare_parse_test_config("config.yaml")
print_args(config)

net = Darknet(config["cfg"], 416)
data = torch.load(weights_path, map_location=torch.device('cpu'))
net.load_state_dict(data["model"])


net.save_darknet_weights("./weights_test/best.weights")
调用完成以后就可以进行模型的转换了。这里我们的思路主要是加载完模型以后,然后调用即可,注意不用版本的加载模型可能有稍微区别,大家稍微适配一下自己的代码即可。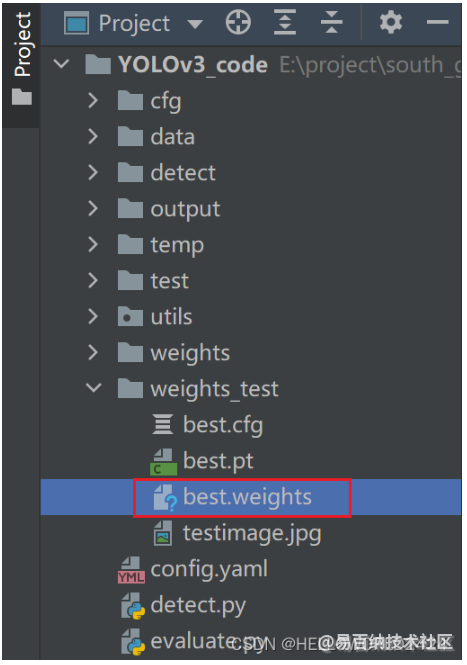
上面是我经过转换后输出的weights模型。
3. Darknet weights模型 —— caffemodel
这一步,可以参考一下我之前写的文档:
YOLOv4 darknet模型转换成caffemodel再转om在Atlas服务器上面推理
样例上面说的是YOLOv4,其实YOLOv3的操作步骤是一模一样的,按照上面帖子的内容完成转换即可。其中,不同于Altas服务器的适配,转换输出的caffemodel,以及prototxt文件是不需要做任何修改的。
4. Caffemodel —— wk模型
这一步就比较复杂了,需用用到海思的IDE叫做RuyiStudio,使用之前,需要先按照好MingGW-W64编译器,关于编译器的按照,可以参考《HiSVP 开发指南.pdf》,MingGW-W64需要安装7.3.0版本,按照配好就可以打开IDE了。
新建并且配置环境
设置芯片类型
我们新建一个projects,新建完成以后第一步需要选择设备的芯片,我们是Hi3519AV100,设置如下图所示:
设置指令仿真模式
需要设置指令仿真模式,仿真时候才会使用指令模型,指令仿真模式的设置如下图: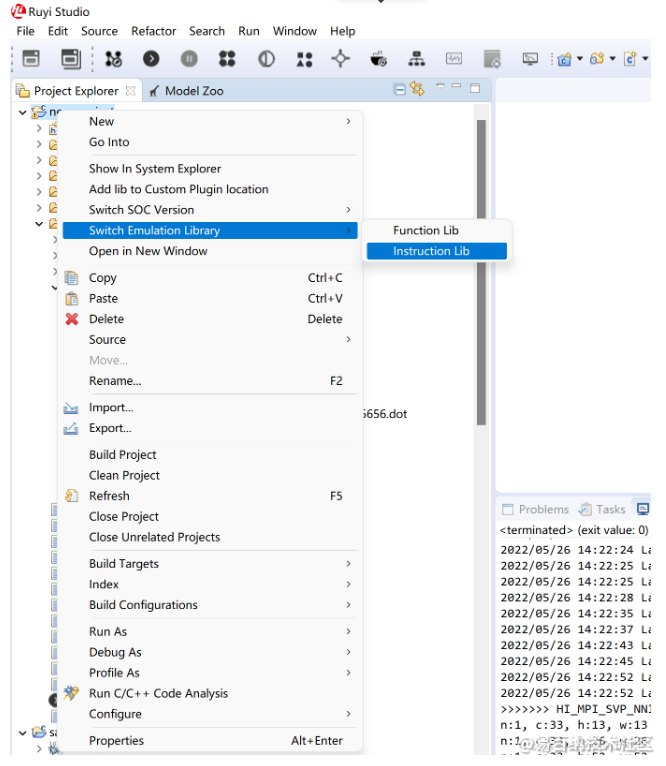
准备数据文件
我们再项目目录下新建一个temp文件夹,准备好需要的文件: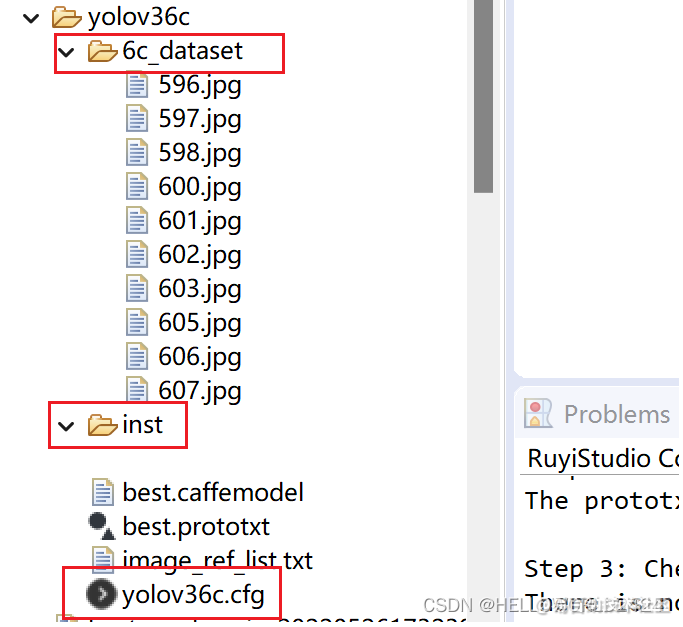
其中,有刚刚生成的caffemodel文件,6c_dataset是有用于量化的数据图片,一般从训练数据集中抽10多张图出来就可以了,inst文件夹用于存放转换输出文件。其余的文件说明如下:
image_ref_list.txt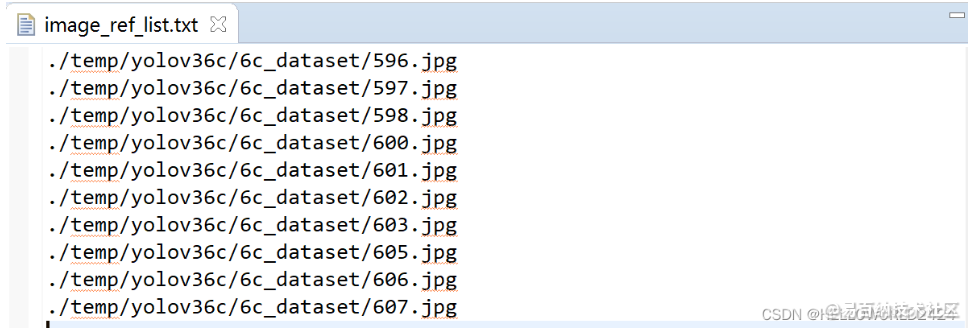
里面填写用于量化模型的数据路径,一张一张图填下来即可。
yolov36c.cfg
从project默写的配置文件复制出来,具体的设置如下,其中需要强调的是,生成的是inst指令模型,图片通道顺序是RGB模式,等,其他参数见图: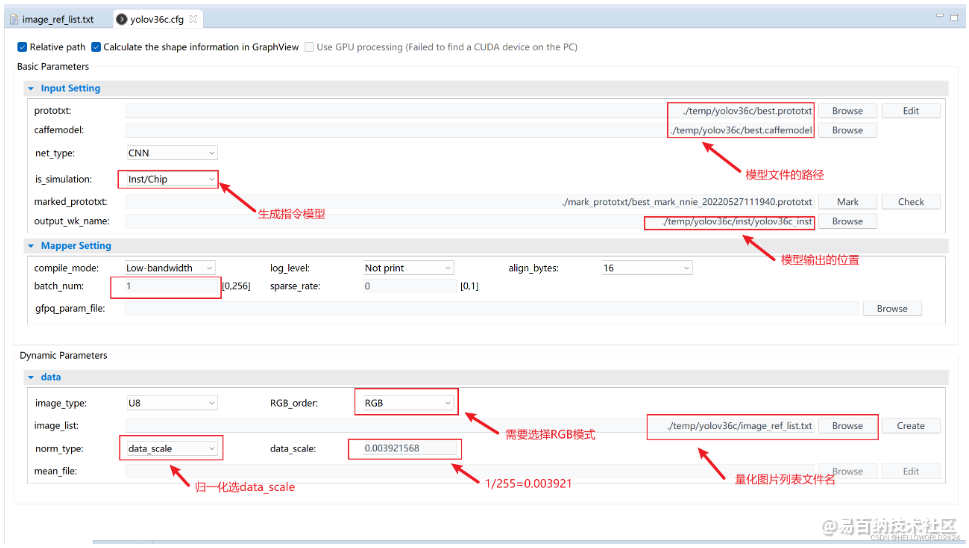
开始量化生成wk量化文件
上面这些参数都调整完成以后,我们就可以开始量化了,点击下面的量化开始按钮执行模型的量化。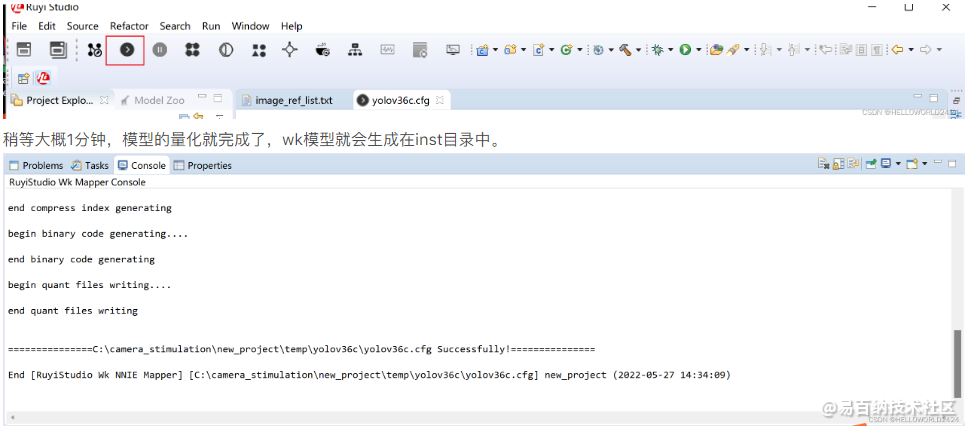
生成了inst文件如下面所示:
5. 仿真
数据准备
为了验证wk模型是否可用,我们需要对模型进行仿真,在海思Hi3519A V100R001C02SPC010.rar文件里面有一个sample_stimulator的项目,可用用于仿真,我们先在下面的目录放好我们的模型文件。
图片列表与bgr图片生成
如上图yolov3下面的image_test_list.txt,需要修改仿真所用的图片,图片的格式是bgr,关于如何使用jpg图片去生成bgr图片,这里就不展开了,这里直接给出Python版本的代码:
# -*- coding: UTF-8 -*-
# author: AnnSun
# date :2020.05.12
import cv2


def jpg2bgr(jpg_path, save_img_size, save_bgr_path):
    """
    把jpg文件转换成
    :param save_bgr_path:
    :param jpg_path:
    :param save_img_size:
    :return:
    """
    img = cv2.imread(jpg_path)
    if img is None:
        print("img is none")
    else:
        img = cv2.resize(img, (save_img_size, save_img_size))
        (B, G, R) = cv2.split(img)
        with open(save_bgr_path, 'wb') as fp:
            for i in range(save_img_size):
                for j in range(save_img_size):
                    fp.write(B[i, j])
                    # print(B[i, j])
            for i in range(save_img_size):
                for j in range(save_img_size):
                    fp.write(G[i, j])
            for i in range(save_img_size):
                for j in range(save_img_size):
                    fp.write(R[i, j])
            print("save success")


def bgr2jpg(bgr_path, imgsize, blank_path):
    """查看bgr文件内容并显示为图片"""
    f = open(bgr_path, 'rb')
    src = cv2.imread(blank_path)
    src = cv2.resize(src, (imgsize, imgsize))
    print(src.shape)
    print(f.name)
    (B, G, R) = cv2.split(src)

    data = f.read(imgsize * imgsize * 3)
    for j in range(imgsize):
        for i in range(imgsize):
            B[j, i] = data[j * imgsize + i]
            G[j, i] = data[j * imgsize + i + imgsize * imgsize]
            R[j, i] = data[j * imgsize + i + imgsize * imgsize * 2]
    newimg = cv2.merge([B, G, R])
    cv2.imshow("new", newimg)
    f.close()
    cv2.waitKey(0)
我们修改image_test_list.txt如下,图片放在相对应的位置就可以了。
修改代码
在sample_simulator/src/SvpSampleDetectionOneSeg.cpp文件中的第31行,改成我们的模型yolov36c_inst.wk。
#ifndef USE_FUNC_SIM /* inst wk */
const HI_CHAR *g_paszModelName_d[] = {
    "../../data/detection/yolov1/inst/inst_yolov1_inst.wk",
    "../../data/detection/yolov2/inst/inst_yolov2_inst.wk",
    "../../data/detection/yolov3/inst/yolov36c_inst.wk",
    "../../data/detection/ssd/inst/inst_ssd_inst.wk"
};
在sample_simulator/include/SvpSampleYolo.h文件中从54行修改如下的参数。\
/* YOLO V3 */
#define SVP_SAMPLE_YOLOV3_SRC_WIDTH                (416) // 入网尺寸
#define SVP_SAMPLE_YOLOV3_SRC_HEIGHT               (416)

#define SVP_SAMPLE_YOLOV3_GRIDNUM_CONV_82          (19) // feature map 1 输出的长宽
#define SVP_SAMPLE_YOLOV3_GRIDNUM_CONV_94          (38) // feature map 2 输出的长宽
#define SVP_SAMPLE_YOLOV3_GRIDNUM_CONV_106         (76) // feature map 3 输出的长宽
#define SVP_SAMPLE_YOLOV3_CHANNLENUM               (33) // (num_class + 5) * 3
#define SVP_SAMPLE_YOLOV3_PARAMNUM                 (11) // num_class + 5
#define SVP_SAMPLE_YOLOV3_BOXNUM                   (3)  // 不用改
#define SVP_SAMPLE_YOLOV3_CLASSNUM                 (6)  // num_class
#define SVP_SAMPLE_YOLOV3_MAX_BOX_NUM              (10)

#define SVP_SAMPLE_YOLOV3_SCORE_FILTER_THREASH     (0.5f)  // 置信度阈值
#define SVP_SAMPLE_YOLOV3_NMS_THREASH              (0.45f) // nms阈值
在sample_simulator/src/SvpSampleYolov3.cpp中,第十行,修改anchor的数值:
static HI_DOUBLE s_SvpSampleYoloV3Bias[SVP_SAMPLE_YOLOV3_SCALE_TYPE_MAX][6] = {
    {116,90, 156,198, 373,326},
    {30,61, 62,45, 59,119},
    {10,13, 16,30, 33,23}
};
这里需要注意的一点是小的feature map是对应大的anchor的,SvpSampleYolo.h上面的feature map是从小往大的写,所以anchor是从大往小的写。
开始仿真
首先在编译的按钮下面选择release版本,然后点击编译,系统就会对项目进行编译了。
编译完成以后我们就可以运行Release文件夹下面的sample_simulator.exe文件,进行仿真。仿真的过程比较久,大概需要10分钟运行完成。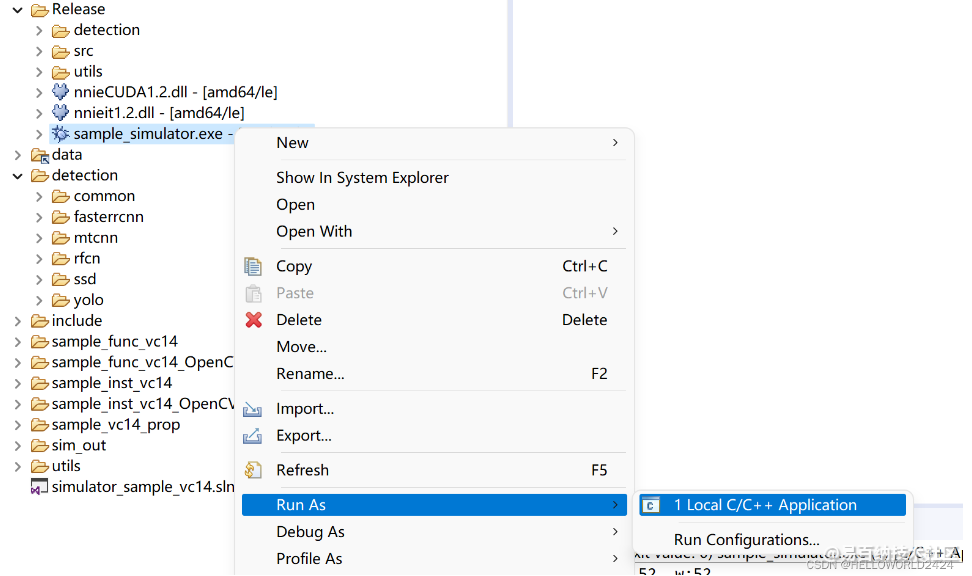
运行结束以后的输出如下所示。
我们可以在sample_simulator/sim_out/result_SVP_SAMPLE_YOLO_V3/文件夹中查看仿真的输出结果了: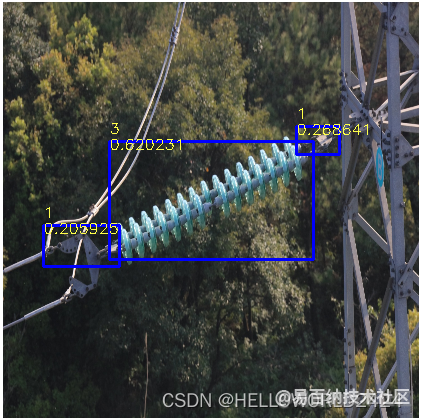
上面的仿真结果是,值得注意的是,上面输出的候选框坐标是对resize后入网尺寸而定的,如果需要原图的坐标,就需要做映射回去。
- 分享
- 举报
 暂无数据
暂无数据-
2024-01-22 10:56:03
-
浏览量:1276次2024-01-22 15:27:25
-
浏览量:3151次2024-02-19 15:26:47
-
浏览量:3561次2024-03-05 15:34:48
-
浏览量:3734次2024-02-04 17:13:47
-
2024-01-03 22:05:50
-
浏览量:4591次2024-01-05 14:11:13
-
浏览量:2585次2024-02-18 16:38:33
-
浏览量:2413次2023-04-14 10:20:01
-
浏览量:1241次2023-06-03 16:03:04
-
浏览量:4874次2020-08-05 20:38:05
-
浏览量:2830次2024-02-23 17:41:04
-
浏览量:1279次2023-12-20 16:31:10
-
浏览量:3243次2024-01-05 16:46:11
-
2024-02-02 14:41:10
-
2024-01-06 11:14:41
-
浏览量:2536次2023-12-27 15:46:55
-
浏览量:4619次2024-02-19 17:07:05
-
浏览量:2010次2023-04-12 18:59:36
- Jetson Nano之ROS入门 -- YOLO目标检测与定位
- 飞桨 PP-PicoDet 配置与训练
- HiEuler-Pico-OpenEuler Yolov8模型训练和转换——onnx模型转换(四)
- win10环境实现yolov5 TensorRT加速试验(环境配置+训练+推理)
- YOLOv8 AS-One:目标检测AS-One 来了!(YOLO就是名副其实的卷王之王)
- 海思3516部署yolov8检测算法精度问题排查
- 从0开始yolov8模型目标检测训练 验证和测试
- 深度学习基础:使用scikit-learn进行多类分类
- 浅述OpenCVCV方向(OpenCV学习笔记)
- YOLOv8-pose关键点检测自制数据集
-
广告/SPAM
-
恶意灌水
-
违规内容
-
文不对题
-
重复发帖
保持微笑


 微信支付
微信支付举报类型
- 内容涉黄/赌/毒
- 内容侵权/抄袭
- 政治相关
- 涉嫌广告
- 侮辱谩骂
- 其他
详细说明


 微信扫码分享
 QQ好友
QQ好友


