

海思3516a实现OSD叠加水印

一、三个文件的编译
freetype+SDL+SDL_ttf简介:
FreeType2是一个简单的跨平台的字体绘制引擎
SDL(Simple DirectMedia Layer)是一套开放源代码的跨平台多媒体开发库,使用C语言写成。SDL提供了数种控制图像、声音、输出入的函数,让开发者只要用相同或是相似的代码就可以开发出跨多个平台(Linux、Windows、Mac OS X等)的应用软件。
SDL_ttf是TrueType字体渲染库,使用SDL库,几乎一样的便携。这取决于FreeType2处理TrueType字体数据。它允许程序员使用多个TrueType字体无需代码的字体渲染程序本身。随着轮廓字体和反走样的力量,高质量的文本输出可以毫不费力的获得。
交叉编译可以参考一下网上的例子:
交叉编译链接1
交叉编译链接2
二、海思SDK使用步骤
1.创建叠加字符
代码如下(示例):
#include<stdio.h>
#include "./SDL/SDL.h"
#include "./SDL/SDL_ttf.h"

int main(int argc, const char *argv[])
{
    char pstr[128] = {0};
    if(argv[1] == NULL)
    {
        snprintf(pstr, 128, "%s","hello world");
    }
    else
    {
        snprintf(pstr, 128, "%s", argv[1]);
    }
    SDL_PixelFormat *fmt;
    TTF_Font *font;
    SDL_Surface *text, *temp;

    if (TTF_Init() < 0 )
    {
        fprintf(stderr, "Couldn't initialize TTF: %s\n",SDL_GetError());
        SDL_Quit();
    }

    font = TTF_OpenFont("./msyh.ttf", 15);
    if ( font == NULL )
    {
        fprintf(stderr, "Couldn't load %d pt font from %s: %s\n",18,"ptsize", SDL_GetError());
    }

    SDL_Color forecol = { 0x80, 0xff, 0x00, 0xff };//0 245 255
    text = TTF_RenderUTF8_Solid(font, pstr, forecol);
    //text = TTF_RenderUTF8_Shaded(font,pstr, forecol,forecol_gb);
    //TTF_RenderUTF8_Blended(font, pstr, forecol);

    fmt = (SDL_PixelFormat*)malloc(sizeof(SDL_PixelFormat));
    memset(fmt,0,sizeof(SDL_PixelFormat));
    fmt->BitsPerPixel = 16;
    fmt->BytesPerPixel = 2;
    //fmt->colorkey = 0xffffffff;
    //fmt->alpha = 0xff;
    fmt->Amask = 0x8000;
    fmt->Rmask = 0x7C00;          //ARGB1555
    fmt->Gmask = 0x03E0;
    fmt->Bmask = 0x001f;

    //Uint32 colorkey=SDL_MapRGB(fmt,0xff,0xFF,0xFF);
    //SDL_SetColorKey(text, SDL_SRCALPHA, colorkey);
    temp = SDL_ConvertSurface(text,fmt,0);
    SDL_SaveBMP(temp, "save.bmp");

    SDL_FreeSurface(text);
    SDL_FreeSurface(temp);
    TTF_CloseFont(font);
    TTF_Quit();

    return 0;
}
- 1
- 2
- 3
- 4
- 5
- 6
- 7
- 8
- 9
- 10
- 11
- 12
- 13
- 14
- 15
- 16
- 17
- 18
- 19
- 20
- 21
- 22
- 23
- 24
- 25
- 26
- 27
- 28
- 29
- 30
- 31
- 32
- 33
- 34
- 35
- 36
- 37
- 38
- 39
- 40
- 41
- 42
- 43
- 44
- 45
- 46
- 47
- 48
- 49
- 50
- 51
- 52
- 53
- 54
- 55
- 56
- 57
- 58
- 59
这只是一个独立的例子,也是参考了网上网友编写的,可以测试一下编译出的库文件有没有问题。实际项目中不可能直接使用一张图片添加OSD,需要直接获取bmp图像的存储数据,然后在视频上叠加。下面给出代码:
TTF_Font *font = NULL;
   /* Initialize the TTF library */
if ( TTF_Init() < 0 )
{
    return;
}
   font = TTF_OpenFont("simhei.ttf", 33);
   if ( font == NULL ) {
    printf("%s %d The fonts is NULL !\n",__FUNCTION__,__LINE__);
    return;
}
   RgnHandle = 1;
char tmp_buf[128] = "如果要显示C++ Hello World";
   SDL_Color forecol=   { 0xff, 0xff, 0xff, 0xff};
SDL_Surface *text = TTF_RenderUTF8_Solid(font, tmp_buf, forecol);
   if(text == NULL)
{
    printf("%s:[%d] The text is NULL !\n",__FUNCTION__,__LINE__);
    return;
}
       SDL_PixelFormat *fmt;
fmt = (SDL_PixelFormat*)malloc(sizeof(SDL_PixelFormat));
if(fmt == NULL)
{
    printf("%s:[%d] The fmt is NULL !\n",__FUNCTION__,__LINE__);
}
memset(fmt, 0, sizeof(SDL_PixelFormat));
fmt->BitsPerPixel = 16;
fmt->BytesPerPixel = 2;
fmt->Rmask = 0xff000000;//0x00FF0000
fmt->Gmask = 0x0000ff00;//0x0000FF00
fmt->Bmask = 0x000000ff;//0x000000FF
fmt->Amask = 0;
   fmt->colorkey = 0x000000ff;
   fmt->alpha = 0xff;
SDL_Surface *osd_test = SDL_ConvertSurface(text, fmt, 0);
   if(osd_test == NULL)
{
    printf("%s:[%d] The osd_test is NULL !\n",__FUNCTION__,__LINE__);
}
- 1
- 2
- 3
- 4
- 5
- 6
- 7
- 8
- 9
- 10
- 11
- 12
- 13
- 14
- 15
- 16
- 17
- 18
- 19
- 20
- 21
- 22
- 23
- 24
- 25
- 26
- 27
- 28
- 29
- 30
- 31
- 32
- 33
- 34
- 35
- 36
- 37
- 38
- 39
- 40
通过上述代码可以看出bmp图像数据存储在变量“osd_test”中的osd_test->pixels里,其中osd_test->w,osd_test->h中存储的是图像的真实尺寸大小,后面有用到。
2.添加叠加区域到视频通道
步骤如下:
(1)用户填充区域属性并创建区域。
(2)将该区域指定到具体通道中(如 VENC)。在指定到具体通道时,需要输入通道的显示属性。
(3)以上步骤完成区域的创建和使用。用户还可以通过以下操作来控制区域属性以及在某通道的通道显示属性。
“通过 HI_MPI_RGN_GetAttr、HI_MPI_RGN_SetAttr 获取和设置区域属性。
”通过 HI_MPI_RGN_SetBitMap(仅针对 Overlay)设置区域的位图信息。
“通过 HI_MPI_RGN_GetDisplayAttr 和 HI_MPI_RGN_SetDisplayAttr 获取和设置区域在某通道(如 VENC 通道)的通道显示属性。
”最后用户可以将该区域从通道中撤出(非必须操作),再销毁区域。
/*该步骤是创建叠加区域*/
RGN_HANDLE RgnHandle;
RGN_ATTR_S stRgnAttr;
stRgnAttr.enType = OVERLAY_RGN;
stRgnAttr.unAttr.stOverlay.enPixelFmt = PIXEL_FORMAT_RGB_1555;//PIXEL_FORMAT_RGB_565
stRgnAttr.unAttr.stOverlay.stSize.u32Width  = osd_test->w;
stRgnAttr.unAttr.stOverlay.stSize.u32Height = osd_test->h;
stRgnAttr.unAttr.stOverlay.u32BgColor = 0xffffff00;
   int overlay_w = stRgnAttr.unAttr.stOverlay.stSize.u32Width;
   int overlay_h = stRgnAttr.unAttr.stOverlay.stSize.u32Height;
RgnHandle = 1;
s32Ret = HI_MPI_RGN_Create(RgnHandle, &stRgnAttr);
if(HI_SUCCESS != s32Ret)
{
    SAMPLE_PRT("HI_MPI_RGN_Create (%d) failed with %#x!\n", \
            RgnHandle, s32Ret);
    return;
}
- 1
- 2
- 3
- 4
- 5
- 6
- 7
- 8
- 9
- 10
- 11
- 12
- 13
- 14
- 15
- 16
- 17
- 18
/*该步骤是将该区域指定到具体通道中*/
MPP_CHN_S stChn;
stChn.enModId = HI_ID_VENC;
stChn.s32DevId = 0;
stChn.s32ChnId = 0;
RGN_CHN_ATTR_S stChnAttr;
memset(&stChnAttr,0,sizeof(stChnAttr));
stChnAttr.bShow = HI_TRUE;
stChnAttr.enType = OVERLAY_RGN;
stChnAttr.unChnAttr.stOverlayChn.stPoint.s32X = 0;
stChnAttr.unChnAttr.stOverlayChn.stPoint.s32Y = 1000;
stChnAttr.unChnAttr.stOverlayChn.u32BgAlpha = 128;
stChnAttr.unChnAttr.stOverlayChn.u32FgAlpha = 80;
stChnAttr.unChnAttr.stOverlayChn.u32Layer = 0;

stChnAttr.unChnAttr.stOverlayChn.stQpInfo.bAbsQp = HI_FALSE;
stChnAttr.unChnAttr.stOverlayChn.stQpInfo.s32Qp  = 0;

stChnAttr.unChnAttr.stOverlayChn.stInvertColor.stInvColArea.u32Height = 16*2;
stChnAttr.unChnAttr.stOverlayChn.stInvertColor.stInvColArea.u32Width = 16*2;
stChnAttr.unChnAttr.stOverlayChn.stInvertColor.u32LumThresh = 0;
//stChnAttr.unChnAttr.stOverlayChn.stInvertColor.bInvColEn = HI_TRUE;
//stChnAttr.unChnAttr.stOverlayChn.stInvertColor.enChgMod = LESSTHAN_LUM_THRESH;

s32Ret = HI_MPI_RGN_AttachToChn(RgnHandle, &stChn, &stChnAttr);
if(HI_SUCCESS != s32Ret)
{
    SAMPLE_PRT("HI_MPI_RGN_AttachToChn (%d) failed with %#x!\n",\
            RgnHandle, s32Ret);
    return;
}
- 1
- 2
- 3
- 4
- 5
- 6
- 7
- 8
- 9
- 10
- 11
- 12
- 13
- 14
- 15
- 16
- 17
- 18
- 19
- 20
- 21
- 22
- 23
- 24
- 25
- 26
- 27
- 28
- 29
- 30
- 31
/*该步骤是设置区域的位图信息*/
Joseph_Osd_Bmp.pData = malloc(2*(osd_test->w)*(osd_test->h));
if(Joseph_Osd_Bmp.pData == NULL)
{
printf("%s:[%d] The osd_bmp_data is NULL ,when malloc !\n",__FUNCTION__,__LINE__);
}
printf("%s: bmp_w:[%d] bmp_h:[%d]", __FUNCTION__, osd_test->w, osd_test->h);
memset(Joseph_Osd_Bmp.pData,0,(2*(osd_test->w)*(osd_test->h)));

Joseph_Osd_Bmp.u32Width = osd_test->w;
Joseph_Osd_Bmp.u32Height = osd_test->h;
memcpy(Joseph_Osd_Bmp.pData,osd_test->pixels,(2*(osd_test->w)*(osd_test->h)));
//Joseph_Osd_Bmp->pData = osd_test->pixels;
Joseph_Osd_Bmp.enPixelFormat= PIXEL_FORMAT_RGB_1555;

s32Ret = HI_MPI_RGN_SetBitMap(RgnHandle,&Joseph_Osd_Bmp);
if(s32Ret != HI_SUCCESS)
{
    SAMPLE_PRT("HI_MPI_RGN_SetBitMap failed with %#x!\n", s32Ret);
    exit(0);
    return;
}
SDL_FreeSurface(text);
text = NULL;
SDL_FreeSurface(osd_test);
text = NULL;
free(fmt);
fmt = NULL;
free(Joseph_Osd_Bmp.pData);
Joseph_Osd_Bmp.pData = NULL;
TTF_CloseFont(font);
font = NULL;
TTF_Quit();
- 1
- 2
- 3
- 4
- 5
- 6
- 7
- 8
- 9
- 10
- 11
- 12
- 13
- 14
- 15
- 16
- 17
- 18
- 19
- 20
- 21
- 22
- 23
- 24
- 25
- 26
- 27
- 28
- 29
- 30
- 31
- 32
- 33
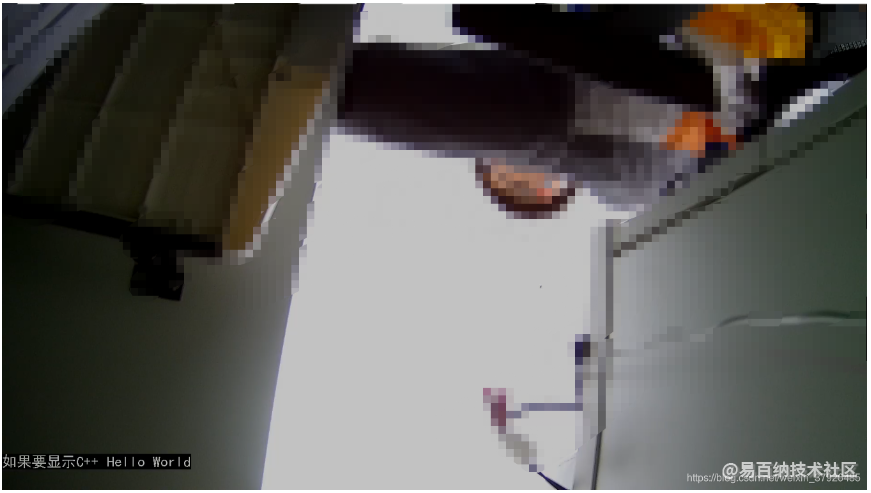
重点来了,小伙伴们在尝试添加水印时,有可能会遇到明明水印文件字体是常规,不是倾斜的,但在视频上显示倾斜,而且还显示不全,这个问题我遇到了。
stRgnAttr.unAttr.stOverlay.stSize.u32Width  = osd_test->w;
stRgnAttr.unAttr.stOverlay.stSize.u32Height = osd_test->h;
- 1
- 2
这两句特别重要,如果你是随意设置的,就会出现这种现象,需要设置的和bmp图像大小一直才行,这个也是一点一点试出来的,先生成bmp数据,然后取得尺寸。
还遇到一个问题:我想把字号变大:
font = TTF_OpenFont("./msyh.ttf", 15)
- 1
你会发现设置一些数字后,在你运行程序时报错,报参数设置错误:0xA0038003 HI_ERR_RGN_ILLEGAL_PARAM 参数超出合法范围。这个地方还没有研究透彻,我设置23不行,25可以,30不行,33可以,挺怪的,后续再继续研究吧。最后上效果图:
- 分享
- 举报
 微信扫码分享
 QQ好友
QQ好友
 暂无数据
暂无数据-
浏览量:1301次2024-01-19 17:52:40
-
浏览量:1028次2024-01-11 15:05:58
-
浏览量:1594次2024-01-19 17:57:59
-
浏览量:2318次2024-01-02 16:35:00
-
浏览量:4347次2020-08-14 11:25:29
-
浏览量:5101次2020-08-11 10:32:41
-
浏览量:5617次2020-08-11 10:30:44
-
浏览量:3986次2020-08-11 10:29:05
-
浏览量:1839次2024-03-05 17:10:43
-
浏览量:13513次2020-11-14 10:57:08
-
浏览量:1989次2023-07-30 08:53:58
-
浏览量:2514次2020-09-21 19:06:02
-
浏览量:6039次2020-08-03 18:36:13
-
浏览量:2927次2020-08-04 20:12:26
-
浏览量:2015次2024-01-25 16:21:59
-
浏览量:4057次2020-09-24 11:58:24
-
浏览量:3672次2020-07-30 11:57:30
-
浏览量:1493次2024-01-13 18:14:30
-
浏览量:7149次2020-09-27 14:15:09
-
浏览量:6809次2022-08-11 09:31:37


-
广告/SPAM
-
恶意灌水
-
违规内容
-
文不对题
-
重复发帖
小菜很菜

 微信支付
微信支付
举报类型
- 内容涉黄/赌/毒
- 内容侵权/抄袭
- 政治相关
- 涉嫌广告
- 侮辱谩骂
- 其他
详细说明
审核成功
审核失败


关注公众号
社区问题咨询:Ebaina-CN
定制需求咨询:xxqk158820
