技术专栏
经典卷积神经网络——resnet
文章目录
前言
随着深度学习的不断发展,从开山之作Alexnet到VGG,网络结构不断优化,但是在VGG网络研究过程中,人们发现随着网络深度的不断提高,准确率却没有得到提高,如图所示:

人们觉得深度学习到此就停止了,不能继续研究了,但是经过一段时间的发展,残差网络(resnet)解决了这一问题。
一、resnet

如图所示:简单来说就是保留之前的特征,有时候当图片经过卷积进行特征提取,得到的结果反而没有之前的很好,所以resnet提出保留之前的特征,这里还需要经过一些处理,在下面代码讲解中将详细介绍。
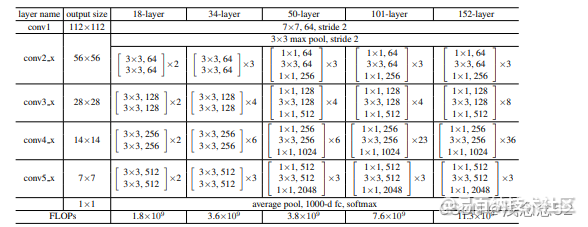
二、resnet网络结构

本文将主要介绍resnet18
三、resnet18
1.导包
import torch
import torchvision.transforms as trans
import torchvision as tv
import torch.nn as nn
from torch.autograd import Variable
from torch.utils import data
from torch.optim import lr_scheduler
2.残差模块
这个模块完成的功能如图所示:

class tiao(nn.Module):
    def __init__(self,shuru,shuchu):
        super(tiao, self).__init__()
        self.conv1=nn.Conv2d(in_channels=shuru,out_channels=shuchu,kernel_size=(3,3),padding=(1,1))
        self.bath=nn.BatchNorm2d(shuchu)
        self.relu=nn.ReLU()
    def forward(self,x):
        x1=self.conv1(x)
        x2=self.bath(x1)
        x3=self.relu(x2)

        x4=self.conv1(x3)
        x5=self.bath(x4)
        x6=self.relu(x5)

        x7=x6+x

        return x7
3.通道数翻倍残差模块
模块完成功能如图所示:

在这个模块中,要注意原始图像的通道数要进行翻倍,要不然后面是不能进行相加。
class tiao2(nn.Module):
    def __init__(self,shuru):
        super(tiao2, self).__init__()
        self.conv1=nn.Conv2d(in_channels=shuru,out_channels=shuru*2,kernel_size=(3,3),stride=(2,2),padding=(1,1))
        self.conv11=nn.Conv2d(in_channels=shuru,out_channels=shuru*2,kernel_size=(1,1),stride=(2,2))
        self.batch=nn.BatchNorm2d(shuru*2)
        self.relu=nn.ReLU()
        self.conv2=nn.Conv2d(in_channels=shuru*2,out_channels=shuru*2,kernel_size=(3,3),stride=(1,1),padding=(1,1))
    def forward(self,x):
        x1=self.conv1(x)
        x2=self.batch(x1)
        x3=self.relu(x2)

        x4=self.conv2(x3)
        x5=self.batch(x4)
        x6=self.relu(x5)

        x11=self.conv11(x)

        x7=x11+x6

        return x7
4.rensnet18模块
class resnet18(nn.Module):
    def __init__(self):
        super(resnet18, self).__init__()
        self.conv1=nn.Conv2d(in_channels=3,out_channels=64,kernel_size=(7,7),stride=(2,2),padding=(3,3))
        self.bath=nn.BatchNorm2d(64)
        self.relu=nn.ReLU()
        self.max=nn.MaxPool2d(2,2)
        self.tiao1=tiao(64,64)
        self.tiao2=tiao(64,64)
        self.tiao3=tiao2(64)
        self.tiao4=tiao(128,128)
        self.tiao5=tiao2(128)
        self.tiao6=tiao(256,256)
        self.tiao7=tiao2(256)
        self.tiao8=tiao(512,512)
        self.a=nn.AdaptiveAvgPool2d(output_size=(1,1))
        self.l=nn.Linear(512,10)
    def forward(self,x):
        x1=self.conv1(x)
        x2=self.bath(x1)
        x3=self.relu(x2)
        x4=self.tiao1(x3)
        x5=self.tiao2(x4)
        x6=self.tiao3(x5)
        x7=self.tiao4(x6)
        x8=self.tiao5(x7)
        x9=self.tiao6(x8)
        x10=self.tiao7(x9)
        x11=self.tiao8(x10)
        x12=self.a(x11)
        x13=x12.view(x12.size()[0],-1)
        x14=self.l(x13)

        return x14
这个网络简单来说16层卷积,1层全连接,训练参数相对较少,模型相对来说比较简单。
5.数据测试
model=resnet18().cuda()
input=torch.randn(1,3,64,64).cuda()
output=model(input)
print(output)

6.损失函数,优化器
损失函数
loss=nn.CrossEntropyLoss()
在优化器中,将学习率进行每10步自动衰减
opt=torch.optim.SGD(model.parameters(),lr=0.001,momentum=0.9)
exp_lr=lr_scheduler.StepLR(opt,step_size=10,gamma=0.1)


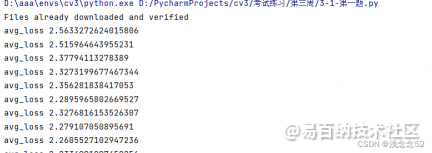
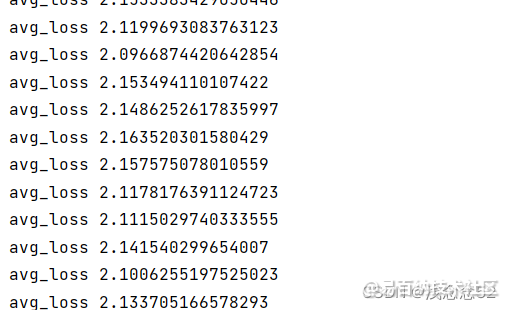
在这里可以看一下对比图,发现添加学习率自动衰减,loss下降速度会快一些,这说明模型拟合效果比较好。
7.加载数据集,数据增强
这里我们仍然选择cifar10数据集,首先对数据进行增强,增加模型的泛华能力。
  transs=trans.Compose([
        trans.Resize(256),
        trans.RandomHorizontalFlip(),
        trans.RandomCrop(64),
        trans.ColorJitter(brightness=0.5,contrast=0.5,hue=0.3),
        trans.ToTensor(),
        trans.Normalize((0.5,0.5,0.5),(0.5,0.5,0.5))
    ])
ColorJitter函数中brightness(亮度)contrast(对比度)
saturation(饱和度)hue(色调)
加载cifar10数据集:
    train=tv.datasets.CIFAR10(
        root=r'E:\桌面\资料\cv3\数据集\cifar-10-batches-py',
        train=True,
        download=True,
        transform=transs
    )

    trainloader=data.DataLoader(
        train,
        num_workers=4,
        batch_size=8,
        shuffle=True,
        drop_last=True
    )
8.训练数据
    for i in range(3):
        running_loss=0
        for index,data in enumerate(trainloader):
            x,y=data
            x=x.cuda()
            y=y.cuda()

            x=Variable(x)
            y=Variable(y)

            opt.zero_grad()
            h=model(x)
            loss1=loss(h,y)
            loss1.backward()
            opt.step()

            running_loss+=loss1.item()

            if index%100==99:
                avg_loos=running_loss/100

                running_loss=0

                print("avg_loss",avg_loos)
9.保存模型
torch.save(model.state_dict(),'resnet18.pth')
10.加载测试集数据,进行模型测试
首先加载训练好的模型
model.load_state_dict(torch.load('resnet18.pth'),False)
读取数据
 test = tv.datasets.ImageFolder(
        root=r'E:\桌面\资料\cv3\数据',
        transform=transs,
    )

    testloader = data.DataLoader(
        test,
        batch_size=16,
        shuffle=False,
    )
测试数据
acc=0
total=0
    for data in testloader:

        inputs,indel=data

        out=model(inputs.cuda())
        _,prediction=torch.max(out.cpu(),1)
        total+=indel.size(0)
        b=(prediction==indel)
        acc+=b.sum()

    print("准确率%d %%"%(100*acc/total))
四、resnet深层对比
上面提到VGG网络层次越深,准确率越低,为了解决这一问题,才提出了残差网络(resnet),那么在resnet网络中,到底会不会出现这一问题。

如图所示:随着,训练层次不断提高,模型越来越好,成功解决了VGG网络的问题,到现在为止,残差网络还是被大多数人使用。
声明:本文内容由易百纳平台入驻作者撰写,文章观点仅代表作者本人,不代表易百纳立场。如有内容侵权或者其他问题,请联系本站进行删除。
红包
点赞
收藏
评论
打赏
- 分享
- 举报
评论
0个
手气红包
 暂无数据
暂无数据相关专栏
-
浏览量:1851次2023-07-05 10:11:54
-
浏览量:4333次2018-02-14 10:30:11
-
浏览量:944次2023-07-18 13:41:23
-
浏览量:1125次2023-07-05 10:11:45
-
浏览量:5414次2021-04-15 15:51:43
-
浏览量:1130次2023-09-06 11:12:55
-
浏览量:812次2023-09-06 10:09:13
-
浏览量:5681次2021-05-21 17:03:03
-
浏览量:2045次2024-02-20 17:08:32
-
浏览量:1143次2024-02-01 14:20:47
-
浏览量:4530次2024-02-20 17:35:09
-
浏览量:1392次2024-02-01 14:28:23
-
浏览量:1062次2023-03-21 10:37:02
-
浏览量:4581次2021-04-19 14:54:23
-
浏览量:1549次2024-02-06 11:56:53
-
浏览量:2127次2024-02-06 11:41:16
-
浏览量:1000次2023-09-04 11:16:00
-
浏览量:141次2023-08-31 08:46:00
-
浏览量:5324次2021-07-26 11:28:05
置顶时间设置
结束时间
删除原因
-
广告/SPAM
-
恶意灌水
-
违规内容
-
文不对题
-
重复发帖
打赏作者
热爱秃头的每一天
您的支持将鼓励我继续创作!
打赏金额:
¥1

¥5

¥10

¥50

¥100

支付方式:
 微信支付
微信支付
举报反馈
举报类型
- 内容涉黄/赌/毒
- 内容侵权/抄袭
- 政治相关
- 涉嫌广告
- 侮辱谩骂
- 其他
详细说明
审核成功
发布时间设置
发布时间:
请选择发布时间设置
是否关联周任务-专栏模块
审核失败
失败原因
请选择失败原因
备注
请输入备注


 微信扫码分享
 QQ好友
QQ好友


