详细介绍使用VS2019工具进行编译NCNN
文章目录
好久没碰NCNN了,以前的编译早就丢到爪哇国去了 ,想要编译一下,完全没有头绪。本着硬着头皮上的精神,再编译一遍,顺便把过程记录下来。作个备忘录。
平台:Windows10
编译工具:VS2019 community
Protobuf3.4.0的编译与安装
这个Protobuf经常用,但没仔细研究过,总之,凭经验碰上了就是一个麻烦的过程。老老实实一步步来吧。
安装MSYS2 + mingw-w64-install.exe
下载Windows下的安装包,到这里去下载
(1) 安装 msys2-x86\_64-20210725.exe
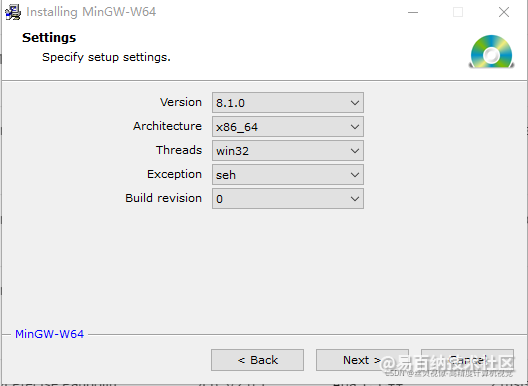
(2) 安装完MSYS2后,再安装mingw-w64-install.exe,注意界面下的几个选项,
version为版本号,一般软件都是自上向下兼容的,选择最高版本就好;
Architecture指的是电脑系统为多少位,其中i686为32位,x86_64为64位和32位交叉编译。
Threads为操作系统接口协议,符合 posix 协议的,和 Windows,如果你想要开发 Windows 程序,需要选择 win32 ,而开发 Linux、Unix、Mac OS 等其他操作系统下的程序,则需要选择 posix ;
Exception为选择异常处理模型,异常处理在开发中非常重要,你在开发的过程中,大部分的时间会耗在处理各种异常情况上。如果你之前选择了 64位,则这里有两个异常处理模型供你选择,seh 是新发明的,而 sjlj 则是古老的。seh 性能比较好,但不支持 32位。 sjlj 稳定性好,支持 32位。
Build revision构建版本号,选择最大即可。
(3) 选择路径,在MSYS2安装路径下找到/mingw64/bin,复制其路径。
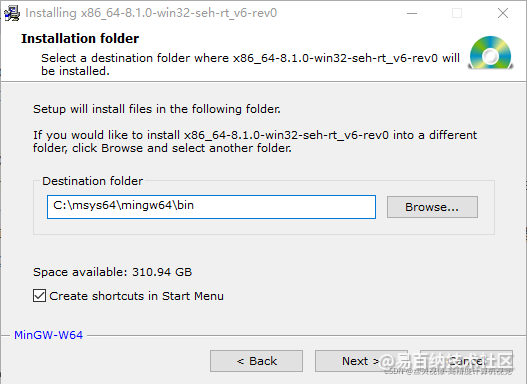
安装完了后,可以启动MSYS2看一下,
$pacman -Ss (该命令会列出所有的安装工具,开发工具包等)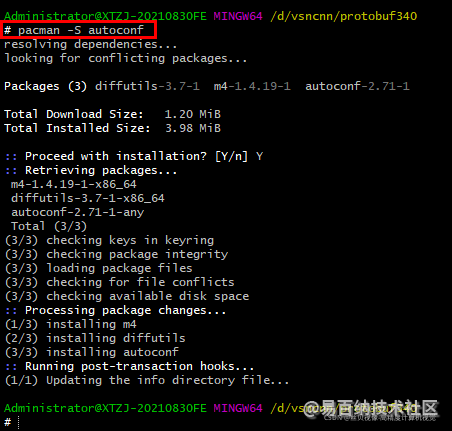
然后,可以直接运行一下我们的protobuf/autogen.sh,
没安装autoconf话会报错:autoconf command not found
因此,我们需要安装一下.
$pacman -S autoconf没安装automake的话会报错误:
Can’t exec “aclocal”: No such file or directory at /usr/share/autoconf/Autom4te/FileUtils.pm line 274.
因此,也要安装这个,
$pacman -S automake还有,没安装libtool的话会报告
configure.ac:30: error: possibly undefined macro: AC_PROG_LIBTOOL
$pacman -S libtool安装好上面三个脚本(也可以说是程序:autoconf, automake, libtool),然后就可以autogen.sh了,我的结果如下,
Administrator@XTZJ-20210830FE MINGW64 /d/vsncnn/protobuf340
\# ./autogen.sh
\+ autoreconf -f -i -Wall,no-obsolete
libtoolize: putting auxiliary files in AC\_CONFIG\_AUX\_DIR, 'build-aux'.
libtoolize: copying file 'build-aux/ltmain.sh'
libtoolize: putting macros in AC\_CONFIG\_MACRO\_DIRS, 'm4'.
libtoolize: copying file 'm4/libtool.m4'
libtoolize: copying file 'm4/ltoptions.m4'
libtoolize: copying file 'm4/ltsugar.m4'
libtoolize: copying file 'm4/ltversion.m4'
libtoolize: copying file 'm4/lt~obsolete.m4'
configure.ac:30: warning: The macro `AC\_PROG\_LIBTOOL' is obsolete.
configure.ac:30: You should run autoupdate.
m4/libtool.m4:99: AC\_PROG\_LIBTOOL is expanded from...
configure.ac:30: the top level
configure.ac:51: warning: The macro `AC\_LANG\_C' is obsolete.
configure.ac:51: You should run autoupdate.
../autoconf-2.71/lib/autoconf/c.m4:72: AC\_LANG\_C is expanded from...
m4/acx\_pthread.m4:63: ACX\_PTHREAD is expanded from...
../autoconf-2.71/lib/m4sugar/m4sh.m4:699: AS\_IF is expanded from...
configure.ac:51: the top level
configure.ac:51: warning: The macro `AC\_TRY\_LINK' is obsolete.
configure.ac:51: You should run autoupdate.
../autoconf-2.71/lib/autoconf/general.m4:2920: AC\_TRY\_LINK is expanded from...
m4/acx\_pthread.m4:63: ACX\_PTHREAD is expanded from...
../autoconf-2.71/lib/m4sugar/m4sh.m4:699: AS\_IF is expanded from...
configure.ac:51: the top level
configure.ac:27: installing 'build-aux/compile'
configure.ac:30: installing 'build-aux/config.guess'
configure.ac:30: installing 'build-aux/config.sub'
configure.ac:24: installing 'build-aux/install-sh'
configure.ac:24: installing 'build-aux/missing'
Makefile.am: installing 'build-aux/depcomp'
parallel-tests: installing 'build-aux/test-driver'
libtoolize: putting auxiliary files in AC\_CONFIG\_AUX\_DIR, 'build-aux'.
libtoolize: copying file 'build-aux/ltmain.sh'
libtoolize: Consider adding 'AC\_CONFIG\_MACRO\_DIRS(\[m4\])' to configure.ac,
libtoolize: and rerunning libtoolize and aclocal.
libtoolize: Consider adding '-I m4' to ACLOCAL\_AMFLAGS in Makefile.am.
configure.ac:25: warning: The macro `AC\_PROG\_LIBTOOL' is obsolete.
configure.ac:25: You should run autoupdate.
aclocal.m4:121: AC\_PROG\_LIBTOOL is expanded from...
configure.ac:25: the top level
configure.ac:48: warning: The macro `AC\_LANG\_C' is obsolete.
configure.ac:48: You should run autoupdate.
../autoconf-2.71/lib/autoconf/c.m4:72: AC\_LANG\_C is expanded from...
gtest/m4/acx\_pthread.m4:63: ACX\_PTHREAD is expanded from...
../autoconf-2.71/lib/m4sugar/m4sh.m4:699: AS\_IF is expanded from...
configure.ac:48: the top level
configure.ac:48: warning: The macro `AC\_TRY\_LINK' is obsolete.
configure.ac:48: You should run autoupdate.
../autoconf-2.71/lib/autoconf/general.m4:2920: AC\_TRY\_LINK is expanded from...
gtest/m4/acx\_pthread.m4:63: ACX\_PTHREAD is expanded from...
../autoconf-2.71/lib/m4sugar/m4sh.m4:699: AS\_IF is expanded from...
configure.ac:48: the top level
configure.ac:22: installing 'build-aux/compile'
configure.ac:25: installing 'build-aux/config.guess'
configure.ac:25: installing 'build-aux/config.sub'
configure.ac:19: installing 'build-aux/install-sh'
configure.ac:19: installing 'build-aux/missing'
Makefile.am: installing 'build-aux/depcomp'
parallel-tests: installing 'build-aux/test-driver'
libtoolize: putting auxiliary files in '.'.
libtoolize: copying file './ltmain.sh'
libtoolize: putting macros in AC\_CONFIG\_MACRO\_DIRS, 'm4'.
libtoolize: copying file 'm4/libtool.m4'
libtoolize: copying file 'm4/ltoptions.m4'
libtoolize: copying file 'm4/ltsugar.m4'
libtoolize: copying file 'm4/ltversion.m4'
libtoolize: copying file 'm4/lt~obsolete.m4'
configure.ac:63: warning: The macro `AC\_PROG\_CXX\_FOR\_BUILD' is obsolete.
configure.ac:63: You should run autoupdate.
m4/ax\_prog\_cxx\_for\_build.m4:36: AC\_PROG\_CXX\_FOR\_BUILD is expanded from...
configure.ac:63: the top level
configure.ac:94: warning: The macro `AC\_PROG\_LIBTOOL' is obsolete.
configure.ac:94: You should run autoupdate.
m4/libtool.m4:99: AC\_PROG\_LIBTOOL is expanded from...
configure.ac:94: the top level
configure.ac:116: warning: The macro `AC\_HEADER\_STDC' is obsolete.
configure.ac:116: You should run autoupdate.
../autoconf-2.71/lib/autoconf/headers.m4:704: AC\_HEADER\_STDC is expanded from...
configure.ac:116: the top level
configure.ac:177: warning: The macro `AC\_LANG\_C' is obsolete.
configure.ac:177: You should run autoupdate.
../autoconf-2.71/lib/autoconf/c.m4:72: AC\_LANG\_C is expanded from...
m4/acx\_pthread.m4:63: ACX\_PTHREAD is expanded from...
configure.ac:177: the top level
configure.ac:177: warning: The macro `AC\_TRY\_LINK' is obsolete.
configure.ac:177: You should run autoupdate.
../autoconf-2.71/lib/autoconf/general.m4:2920: AC\_TRY\_LINK is expanded from...
m4/acx\_pthread.m4:63: ACX\_PTHREAD is expanded from...
configure.ac:177: the top level
configure.ac:181: warning: The macro `AC\_LANG\_CPLUSPLUS' is obsolete.
configure.ac:181: You should run autoupdate.
../autoconf-2.71/lib/autoconf/c.m4:262: AC\_LANG\_CPLUSPLUS is expanded from...
m4/stl\_hash.m4:10: AC\_CXX\_STL\_HASH is expanded from...
configure.ac:181: the top level
configure.ac:181: warning: The macro `AC\_TRY\_COMPILE' is obsolete.
configure.ac:181: You should run autoupdate.
../autoconf-2.71/lib/autoconf/general.m4:2847: AC\_TRY\_COMPILE is expanded from...
m4/stl\_hash.m4:10: AC\_CXX\_STL\_HASH is expanded from...
configure.ac:181: the top level
configure.ac:66: installing './ar-lib'
configure.ac:61: installing './compile'
configure.ac:46: installing './config.guess'
configure.ac:46: installing './config.sub'
configure.ac:48: installing './install-sh'
configure.ac:48: installing './missing'
benchmarks/Makefile.am: installing './depcomp'
parallel-tests: installing './test-driver'
\+ rm -rf autom4te.cache config.h.in~
\+ exit 0
到这里,protobuf的准备工作基本结束。下一步,我们用cmake-gui来编译probobuf。
Cmake-gui生成protobuf项目
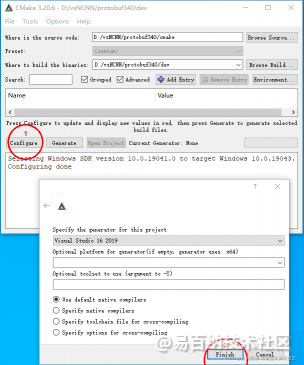
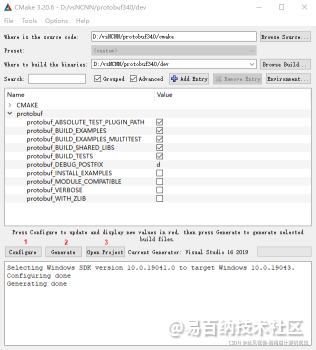
点击1,弹出对话框,选择你的编译器,这里是VS2019;然后, 如果一切正常的话,再configure一下,你会看到下面这样的界面;接下来Generate, Open Project。
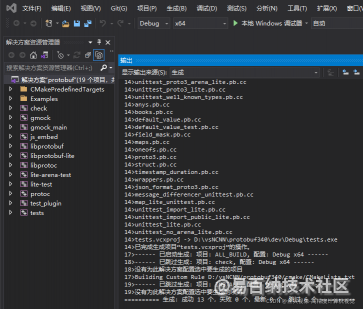
Open Project后,进入VS2019的界面。再接下来就没什么可说的了,直接生成项目就好了。当然,Debug和Release的都要生成。
Cmake-GUI配置NCNN并编译
到这里去下载
https://github.com/tencent/ncnn
可以说,安装好那个protobuf后, 90%的工作就完成了,@nihui女神的NCNN工作做得还是蛮到位的,很好编译。
完事后有两个问题,有两个工具没能生成,
已启动生成…
1>——— 已启动生成: 项目: caffe2ncnn, 配置: Debug x64 ———
2>——— 已启动生成: 项目: onnx2ncnn, 配置: Debug x64 ———
2>onnx2ncnn.obj : error LNK2001: 无法解析的外部符号 “private: static int google::protobuf::io::CodedInputStream::default_recursion_limit_“ (?default_recursion_limit_@CodedInputStream@io@protobuf@google@@0HA)
2>onnx2ncnn.obj : error LNK2001: 无法解析的外部符号 “class google::protobuf::internal::ExplicitlyConstructed<class std::basic_string<char,struct std::char_traits<char>,class std::allocator<char> > > google::protobuf::internal::fixed_address_empty_string” (?fixed_address_empty_string@internal@protobuf@google@@3V?$ExplicitlyConstructed@V?$basic_string@DU?$char_traits@D@std@@V?$allocator@D@2@@std@@@123@A)
2>onnx.pb.obj : error LNK2001: 无法解析的外部符号 “class google::protobuf::internal::ExplicitlyConstructed<class std::basic_string<char,struct std::char_traits<char>,class std::allocator<char> > > google::protobuf::internal::fixed_address_empty_string” (?fixed_address_empty_string@internal@protobuf@google@@3V?$ExplicitlyConstructed@V?$basic_string@DU?$char_traits@D@std@@V?$allocator@D@2@@std@@@123@A)
2>D:\vsNCNN\ncnn-master\dev\tools\onnx\Debug\onnx2ncnn.exe : fatal error LNK1120: 2 个无法解析的外部命令
2>已完成生成项目“onnx2ncnn.vcxproj”的操作 - 失败。
1>caffe2ncnn.obj : error LNK2001: 无法解析的外部符号 “private: static int google::protobuf::io::CodedInputStream::default_recursion_limit_“ (?default_recursion_limit_@CodedInputStream@io@protobuf@google@@0HA)
1>caffe.pb.obj : error LNK2001: 无法解析的外部符号 “class google::protobuf::internal::ExplicitlyConstructed<class std::basic_string<char,struct std::char_traits<char>,class std::allocator<char> > > google::protobuf::internal::fixed_address_empty_string” (?fixed_address_empty_string@internal@protobuf@google@@3V?$ExplicitlyConstructed@V?$basic_string@DU?$char_traits@D@std@@V?$allocator@D@2@@std@@@123@A)
1>D:\vsNCNN\ncnn-master\dev\tools\caffe\Debug\caffe2ncnn.exe : fatal error LNK1120: 2 个无法解析的外部命令
1>已完成生成项目“caffe2ncnn.vcxproj”的操作 - 失败。
3>——— 已跳过生成: 项目: INSTALL, 配置: Debug x64 ———
3>没有为此解决方案配置选中要生成的项目
========== 生成: 成功 0 个,失败 2 个,最新 33 个,跳过 1 个 ==========
按道理不应该呀,检查 一下,看不出什么问题。只好Search,这里有个办法,同时也给出了原因,
If you are building protobufs as a DLL then you will also need to define PROTOBUF_USE_DLLS in your client application to get it to pull in the DLL import __declspec stuff properly.

See https://code.google.com/p/protobuf/issues/detail?id=308#c9 for details.
所以,我们只需要在caffe2ncnn和onnx2ncc的项目属性中,也就是在预处理器 -> 预处理器定义中添加PROTOBUF_USE_DLLS,再重新编译,问题解决。
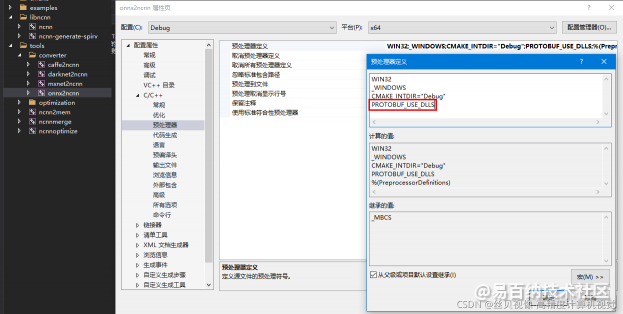
好了,到这里,NCNN在Windows10下的编译就完成了。
使用NCNN
NCNN官方就是采用静态库的方式编译的,下面这官方可执行文件的下载地址(前一个),
https://github.com/Tencent/ncnn/releases/download/20210720/ncnn-20210720-windows-vs2019.zip
https://github.com/Tencent/ncnn/releases/download/20210720/ncnn-20210720-windows-vs2019-shared.zip
需要注意的是,和官方的不同时,我们因为这里的编译是采用默认的MD/DLL的方式,所以库函数是没有编译到可执行文件中的,因此,生成exe文件后,执行时需要把下面的依赖库和exe文件放到一起,
libprotobuf.dll
libprotobuf-lite.dll
libprotoc.dll
如果是Debug版本,则需要下面的依赖库,
libprotobufd.dll
libprotobuf-lited.dll
libprotocd.dll
然后就可以正常使用了。
如果你嫌麻烦,可以直接编译成MT/Static静态库的方式。
- 分享
- 举报
 暂无数据
暂无数据-
浏览量:1988次2019-12-04 10:12:05
-
浏览量:2995次2018-11-01 20:53:32
-
浏览量:2620次2017-11-20 11:48:55
-
浏览量:3921次2022-08-16 19:12:41
-
浏览量:4529次2024-02-20 17:35:09
-
浏览量:2824次2019-12-02 11:08:50
-
浏览量:4795次2022-04-01 17:01:16
-
浏览量:5117次2024-05-23 13:45:40
-
浏览量:1735次2023-06-03 16:06:12
-
浏览量:11682次2024-01-19 13:48:15
-
浏览量:1832次2023-10-25 14:45:27
-
浏览量:12860次2020-12-15 19:07:24
-
浏览量:2685次2022-05-13 10:46:47
-
浏览量:1810次2024-04-04 22:59:26
-
浏览量:4298次2017-11-21 13:44:59
-
浏览量:2653次2018-06-27 17:06:49
-
浏览量:957次2023-09-11 18:04:33
-
浏览量:2586次2021-12-22 09:00:15
-
浏览量:2795次2023-12-29 17:03:02
-
广告/SPAM
-
恶意灌水
-
违规内容
-
文不对题
-
重复发帖
Tony


 微信支付
微信支付举报类型
- 内容涉黄/赌/毒
- 内容侵权/抄袭
- 政治相关
- 涉嫌广告
- 侮辱谩骂
- 其他
详细说明


 微信扫码分享
 QQ好友
QQ好友


