【深度学习】一个应用—肝脏CT图像自动分割(术前评估)
【深度学习】一个应用—肝脏CT图像自动分割(术前评估)
文章目录
1 目标
2 数据集
3 LITS2017
    3.1 LiTS数据的预处理
    3.2 LiTS数据的读取
    3.3 数据增强
    3.4 数据存储
4 U-Net3d搭建
5 结果- 1
- 2
- 3
- 4
- 5
- 6
- 7
- 8
- 9
- 10
1 目标
分割出CT腹部图像的肝脏区域。
2 数据集
肝脏和肿瘤分割数据集下载链接
LiTS2017:https://competitions.codalab.org/competitions/17094#participate

3D-IRCADb 01:https://www.ircad.fr/research/3d-ircadb-01/

SLIVER07:https://sliver07.grand-challenge.org/Download/#signin

LiTS2017和SLIVER07需要账号才能下载。
- 1
- 2
- 3
- 4
- 5
- 6
- 7
- 8
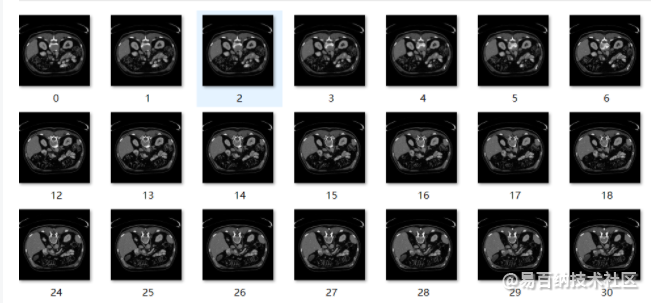
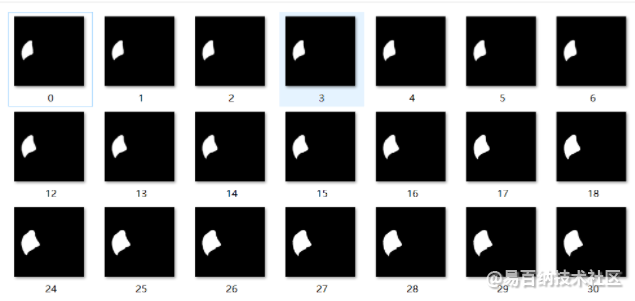
肝脏分割数据集,训练集一共有400张肝脏CT图像以及对应的分割模板,验证集一共有20张肝脏CT图像以及对应的分割模板,如下图所示


PATIENT_DICOM利用软件展示效果如下:一个dcm文件包含129张切片。

MASKS_DICOM下的liver分割图效果如下:

3 LITS2017
数据集的train集合一共130个样例,都为nii格式,原始CT数据为volume-*.nii,分割的ground truth为segmentation-0.nii,其中0为背景,1为肝脏,2为肿瘤,但是并不是每个样例里边都含有肿瘤
3.1 LiTS数据的预处理
在这里使用了这个源代码进行,找到包含肝脏或者肿瘤的slice,然后上下取n片,作为训练集合
    def fix_data(self):
        upper = 200
        lower = -200
        expand_slice = 20  # 轴向上向外扩张的slice数量
        size = 48  # 取样的slice数量
        stride = 3  # 取样的步长
        down_scale = 0.5
        slice_thickness = 2

        for ct_file in os.listdir(self.row_root_path + 'data/'):
            print(ct_file)
            # 将CT和金标准入读内存
            ct = sitk.ReadImage(os.path.join(self.row_root_path + 'data/', ct_file), sitk.sitkInt16)
            ct_array = sitk.GetArrayFromImage(ct)

            seg = sitk.ReadImage(os.path.join(self.row_root_path + 'label/', ct_file.replace('volume', 'segmentation')),
                                 sitk.sitkInt8)
            seg_array = sitk.GetArrayFromImage(seg)

            print(ct_array.shape, seg_array.shape)

            # 将金标准中肝脏和肝肿瘤的标签融合为一个
            seg_array[seg_array > 0] = 1

            # 将灰度值在阈值之外的截断掉
            ct_array[ct_array > upper] = upper
            ct_array[ct_array < lower] = lower

            # 找到肝脏区域开始和结束的slice,并各向外扩张
            z = np.any(seg_array, axis=(1, 2))
            start_slice, end_slice = np.where(z)[0][[0, -1]]

            # 两个方向上各扩张个slice
            if start_slice - expand_slice < 0:
                start_slice = 0
            else:
                start_slice -= expand_slice

            if end_slice + expand_slice >= seg_array.shape[0]:
                end_slice = seg_array.shape[0] - 1
            else:
                end_slice += expand_slice

            print(str(start_slice) + '--' + str(end_slice))
            # 如果这时候剩下的slice数量不足size,直接放弃,这样的数据很少
            if end_slice - start_slice + 1 < size:
                print('!!!!!!!!!!!!!!!!')
                print(ct_file, 'too little slice')
                print('!!!!!!!!!!!!!!!!')
                continue

            ct_array = ct_array[start_slice:end_slice + 1, :, :]
            seg_array = sitk.GetArrayFromImage(seg)
            seg_array = seg_array[start_slice:end_slice + 1, :, :]

            new_ct = sitk.GetImageFromArray(ct_array)
            new_seg = sitk.GetImageFromArray(seg_array)

            sitk.WriteImage(new_ct, os.path.join(self.data_root_path + 'data/', ct_file))
            sitk.WriteImage(new_seg,
os.path.join(self.data_root_path + 'label/', ct_file.replace('volume', 'segmentation')))- 1
- 2
- 3
- 4
- 5
- 6
- 7
- 8
- 9
- 10
- 11
- 12
- 13
- 14
- 15
- 16
- 17
- 18
- 19
- 20
- 21
- 22
- 23
- 24
- 25
- 26
- 27
- 28
- 29
- 30
- 31
- 32
- 33
- 34
- 35
- 36
- 37
- 38
- 39
- 40
- 41
- 42
- 43
- 44
- 45
- 46
- 47
- 48
- 49
- 50
- 51
- 52
- 53
- 54
- 55
- 56
- 57
- 58
- 59
- 60
- 61
将ct值转化为标准的hu值
直方图均衡化
窗口化操作
归一化
仅提取腹部所有切片中包含了肝脏的那些切片,其余的不要
#part2
    # 接part1
   images = get_pixels_hu(image_slices)

   images = transform_ctdata(images,500,150)

   start,end = getRangImageDepth(livers)
   images = clahe_equalized(images,start,end)

   images /= 255.
   # 仅提取腹部所有切片中包含了肝脏的那些切片,其余的不要

   total = (end - 4) - (start+4) +1
   print("%d person, total slices %d"%(i,total))
   # 首和尾目标区域都太小,舍弃
   images = images[start+5:end-5]
   print("%d person, images.shape:(%d,)"%(i,images.shape[0]))

   livers[livers>0] = 1

   livers = livers[start+5:end-5]
- 1
- 2
- 3
- 4
- 5
- 6
- 7
- 8
- 9
- 10
- 11
- 12
- 13
- 14
- 15
- 16
- 17
- 18
- 19
- 20
- 21
def clahe_equalized(imgs,start,end):
   assert (len(imgs.shape)==3)  #3D arrays
   #create a CLAHE object (Arguments are optional).
   clahe = cv2.createCLAHE(clipLimit=2.0, tileGridSize=(8,8))
   imgs_equalized = np.empty(imgs.shape)
   for i in range(start, end+1):
       imgs_equalized[i,:,:] = clahe.apply(np.array(imgs[i,:,:], dtype = np.uint8))
   return imgs_equalized
- 1
- 2
- 3
- 4
- 5
- 6
- 7
- 8
3.2 LiTS数据的读取
首先是将130个数据随机分为训练集(0.8)和验证集(0.1)和测试集(0.1)
1、读取volume和segmentation
2、进行scale,将分辨率压缩
3、每个样例随机截取n个(depth,height,width)大小的3维块作为一个输入的batch
4、数据归一化到0-1
5、将读取函数包装为dataset、dataloader
使用的时候主要使用了以下函数
def next_train_batch_3d_sub_by_index(self, train_batch_size, crop_size, index,resize_scale=1):
        train_imgs = np.zeros([train_batch_size, crop_size[0], crop_size[1], crop_size[2], 1])
        train_labels = np.zeros([train_batch_size, crop_size[0], crop_size[1], crop_size[2], self.n_labels])
        img, label = self.get_np_data_3d(self.train_name_list[index],resize_scale=resize_scale)
        for i in range(train_batch_size):
            sub_img, sub_label = util.random_crop_3d(img, label, crop_size)

            sub_img = sub_img[:, :, :, np.newaxis]
            sub_label_onehot = make_one_hot_3d(sub_label, self.n_labels)

            train_imgs[i] = sub_img
            train_labels[i] = sub_label_onehot

return train_imgs, train_labels- 1
- 2
- 3
- 4
- 5
- 6
- 7
- 8
- 9
- 10
- 11
- 12
- 13
- 14
3.3 数据增强
利用keras的数据增强接口,可以实现分割问题的数据增强。一般的增强是分类问题,这种情况,只需要对image变形,label保持不变。但分割问题,就需要image和mask进行同样的变形处理。具体怎么实现,参考下面代码,注意种子设定成一样的。
3.4 数据存储
一般而言,数据量较大的话,都会先将原始数据库的东西转化为np或者h5格式的文件,我感觉这样有两个好处,一是真正输入网络训练的时候io量会大大减少(特别是h5很适用于大的数据库),二是数据分享或者上传至服务器时也方便一点。
实验中会出现两个类,分别是写h5和读h5文件的辅助类:
这读文件的类写成了generator,这样可以结合训练网络时,keras的fit_generator来使用,降低内存开销。
4 U-Net3d搭建
这里其实没什么好讲的,主要使用几个模块,resblock,seblock,RecombinationBlock、denseBlock等,然后上采样方式可以选是线性插值或者是deconv
class UNet(nn.Module):
    def __init__(self, in_channels, filter_num_list, class_num, conv_block=RecombinationBlock, net_mode='2d'):
        super(UNet, self).__init__()

        if net_mode == '2d':
            conv = nn.Conv2d
        elif net_mode == '3d':
            conv = nn.Conv3d
        else:
            conv = None

        self.inc = conv(in_channels, 16, 1)

        # down
        self.down1 = Down(16, filter_num_list[0], conv_block=conv_block, net_mode=net_mode)
        self.down2 = Down(filter_num_list[0], filter_num_list[1], conv_block=conv_block, net_mode=net_mode)
        self.down3 = Down(filter_num_list[1], filter_num_list[2], conv_block=conv_block, net_mode=net_mode)
        self.down4 = Down(filter_num_list[2], filter_num_list[3], conv_block=conv_block, net_mode=net_mode)

        self.bridge = conv_block(filter_num_list[3], filter_num_list[4], net_mode=net_mode)

        # up
        self.up1 = Up(filter_num_list[4], filter_num_list[3], filter_num_list[3], conv_block=conv_block,
                      net_mode=net_mode)
        self.up2 = Up(filter_num_list[3], filter_num_list[2], filter_num_list[2], conv_block=conv_block,
                      net_mode=net_mode)
        self.up3 = Up(filter_num_list[2], filter_num_list[1], filter_num_list[1], conv_block=conv_block,
                      net_mode=net_mode)
        self.up4 = Up(filter_num_list[1], filter_num_list[0], filter_num_list[0], conv_block=conv_block,
                      net_mode=net_mode)

        self.class_conv = conv(filter_num_list[0], class_num, 1)

    def forward(self, input):

        x = input

        x = self.inc(x)

        conv1, x = self.down1(x)

        conv2, x = self.down2(x)

        conv3, x = self.down3(x)

        conv4, x = self.down4(x)

        x = self.bridge(x)

        x = self.up1(x, conv4)

        x = self.up2(x, conv3)

        x = self.up3(x, conv2)

        x = self.up4(x, conv1)

        x = self.class_conv(x)

        x = nn.Softmax(1)(x)

return x- 1
- 2
- 3
- 4
- 5
- 6
- 7
- 8
- 9
- 10
- 11
- 12
- 13
- 14
- 15
- 16
- 17
- 18
- 19
- 20
- 21
- 22
- 23
- 24
- 25
- 26
- 27
- 28
- 29
- 30
- 31
- 32
- 33
- 34
- 35
- 36
- 37
- 38
- 39
- 40
- 41
- 42
- 43
- 44
- 45
- 46
- 47
- 48
- 49
- 50
- 51
- 52
- 53
- 54
- 55
- 56
- 57
- 58
- 59
- 60
- 61
- 62
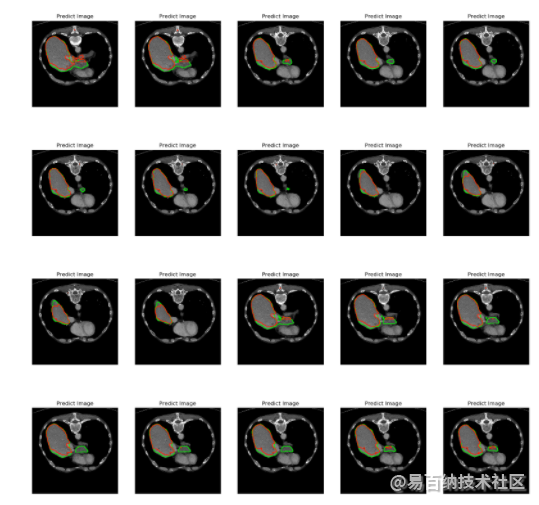
5 结果
绿色轮廓为真实分割结果,红色轮廓为预测分割结果

- 分享
- 举报
-
浏览量:7339次2021-04-29 12:46:50
-
浏览量:7414次2021-07-19 17:10:27
-
浏览量:5136次2021-04-12 16:28:50
-
浏览量:13420次2021-07-05 09:47:30
-
浏览量:12023次2021-05-04 20:20:07
-
浏览量:7541次2021-07-19 17:08:40
-
浏览量:157次2023-08-30 15:28:02
-
浏览量:4489次2021-04-23 14:09:15
-
浏览量:8859次2021-07-19 17:09:44
-
浏览量:6626次2021-06-07 09:26:53
-
浏览量:11140次2021-06-25 15:00:55
-
浏览量:4284次2021-07-19 18:05:51
-
浏览量:9055次2021-05-13 12:53:50
-
浏览量:1134次2024-07-31 19:46:13
-
浏览量:13476次2021-07-08 09:43:47
-
浏览量:13026次2021-05-11 15:08:10
-
浏览量:14398次2021-05-04 20:16:03
-
浏览量:6808次2021-05-04 20:17:10
-
浏览量:4084次2021-05-14 09:47:57
-
广告/SPAM
-
恶意灌水
-
违规内容
-
文不对题
-
重复发帖
这把我C


 微信支付
微信支付举报类型
- 内容涉黄/赌/毒
- 内容侵权/抄袭
- 政治相关
- 涉嫌广告
- 侮辱谩骂
- 其他
详细说明


 微信扫码分享
 QQ好友
QQ好友


1