ffmpeg+opencv视频裁剪转码批处理的实现
摘要:
视频预处理是很多领域都会遇到的问题,特别是现如今各行业对视频剪辑视频转码和批处理相关操作对要求更多,市场也更大,所以各式各样的视频工具如雨后春笋般诞生,下面我们就从ffmpeg 和 opencv 两个视频工具深入分析原理及应用。

认识ffmpeg+opencv库
ffmpeg库是一个功能及其强大,集成各种视频处理类,可快速便捷对视频流文件进行二次处理,它能够解码、编码、转码、混合、解密、流媒体、过滤和播放人类和机器创造的几乎所有东西。它支持最晦涩的古老格式,直到最尖端的格式。无论它们是由某个标准委员会、社区还是公司设计的。它还具有高度的便携性。同时FFmpeg 可以在 Linux、Mac OS X、Microsoft Windows、BSDs、Solaris 等各种构建环境、机器架构和配置下编译、运行,并通过测试基础设施 FATE。opencv也不再调他是多强大的API,下面我们直接利用图像处理的原理来实现视频的尺寸处理、视频音频处理、读取摄像头信息、鼠标事件、帧采集等相关技术。
逐帧裁剪得到无音效视频
API说明:common_cut_action函数通过传入目标文件路径root_pass,原始视频目录get_video_dir,生成文件及路径video_file,以及相关时间参数类型、指定视频大小等,通过全局捕获所有视频文件,批量操作,主要是需要指定ffmpeg_path路径。
最终实现视频抹除音频、提取音频、使用ffmpeg 合并音频视频、逐帧裁剪、修改参数,具体实现如下:
#当对应尺寸需要裁切时调用 def common_cut_action(root_pass, old_void_name, get_video_dir, video_file, nowTime, data, type, size): no_audio_video = root_pass + '/vedio_file_cut/no_audio.mp4' add_audio_video = root_pass + '/vedio_file_cut/add_audio.mp4'

cut_video_file = root_pass + '/vedio_file_cut/%s.mp4' % old_void_name

title = data[0]["name"].replace(' ', '')
time_length = data[0]["length"]
name = data[0]["user"].replace(' ', '')
video_name = nowTime + "-" + title + "-" + time_length + '-1280x720-' + name
video_name = video_name#.decode("utf-8").encode("gbk")
video_dir = root_pass + '/new_vedio_file/' + old_void_name + '/'+type+'-channel'
cut_video_file = video_dir + '/%s.mp4' % video_name

if os.path.exists(root_pass + '/vedio_file_cut'):
system_rmdir(root_pass + '/vedio_file_cut')
system_mkdir(root_pass + '/vedio_file_cut')

#逐帧裁剪得到无音效视频
readVideo(video_file, 1, no_audio_video)

ffmpeg_path = root_pass + '/ffmpeg-win64-static/bin/ffmpeg.exe'
#提取音频
audio_path = root_pass + '/vedio_file_cut/audio.mp3'
getmp3 = '%s -i %s -ac 2 -ar 48k -f wav -vn %s' % (ffmpeg_path, video_file, audio_path)
# os.popen3(getmp3)
os.system(getmp3)
# 添加音频 使用ffmpeg 合并音频视频
add_audio_run = '%s -i %s -i %s %s' % (
ffmpeg_path, no_audio_video, audio_path, add_audio_video)
# os.popen3(add_audio_run)
os.system(add_audio_run)
#修改添加音频后的视频参数
if type == 'normal':
cmd_action = '%s -i %s -r 25 -b 194k -b:v 5300k -ac 2 -profile:v main -ar 48k %s.mp4' % (
ffmpeg_path, add_audio_video, cut_video_file)
else:
if size == '640x360':
    cmd_action = '%s -i %s -r 24 -b:a 90k -b:v 650k -ac 2 -profile:v main -ar 44.1k %s.mp4' % (
        ffmpeg_path, add_audio_video, cut_video_file)
elif size == '640x480':
    cmd_action = '%s -i %s -r 24 -b:a 90k -b:v 750k -ac 2 -profile:v main -ar 44.1k %s.mp4' % (
        ffmpeg_path, add_audio_video, cut_video_file)
elif size == '960x540':
    cmd_action = '%s -i %s -r 24 -b:a 90k -b:v 1500k -ac 2 -profile:v main -ar 44.1k %s.mp4' % (
        ffmpeg_path, add_audio_video, cut_video_file)

# os.popen3(cmd_action)
os.system(cmd_action)

#删除中间处理文件 拷贝到生成文件夹
os.remove(video_file)
# system_cp(cut_video_file, get_video_dir)
system_rmdir(root_pass + '/vedio_file_cut')
视频尺寸转换逻辑

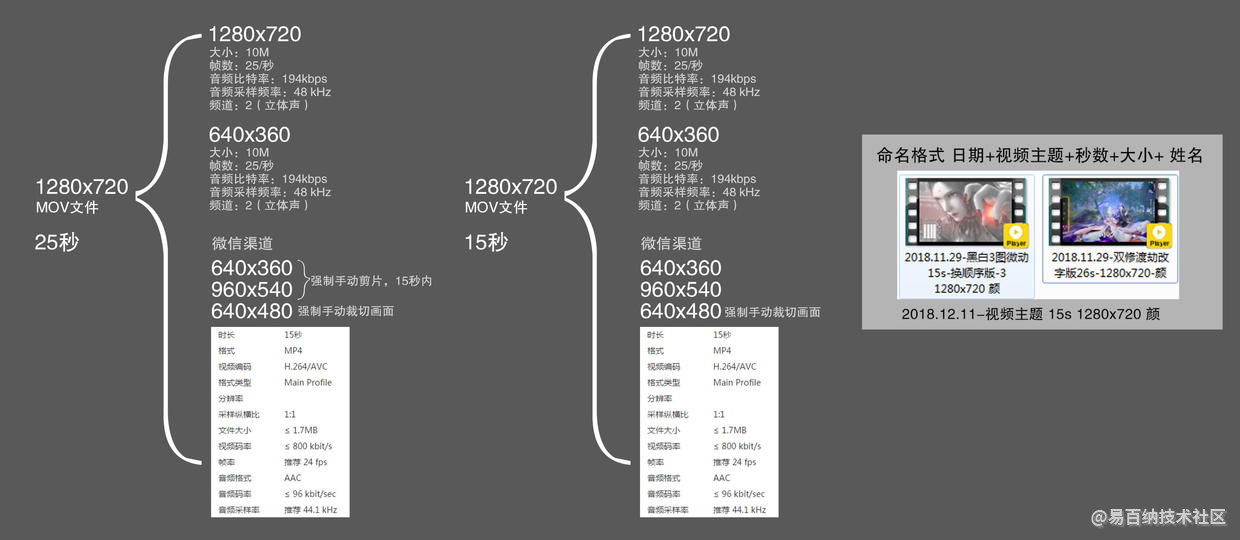
该过程是一个批处理过程等实现逻辑,如上图所示,可以将某个单视频文件进行多尺寸拆解,得到不同类型参数等视频,这个逻辑及其强大,对一些需要对视频进行多渠道分发操作的实现来说这是一个比较好的一个实现过程,参数类型比较简单,主要包括根路径,目标视频文件夹,和希望获取的视频类型,特别说明一下cmd_run3 = '%s -i %s -ss %s -t %s -r 24 -b:a 90k -b:v 650k -ac 2 -profile:v main -ar 44.1k -s 640x360 %s.mp4' % (ffmpeg_path, video_file, start_time, end_time, get_video_file3) 执行逻辑里面的相关数据比较复杂,设计音频,视频及一些特殊处理,这里就不一一展开描述,后续会针对具体过程单独写一篇文章阐述。
def transform_vedio_action(root_pass,old_void_name, type): ffmpeg_path = root_pass + '/ffmpeg-win64-static/bin/ffmpeg.exe' video_file = root_pass + '/vedio_file/%s.mp4' % old_void_name #就可以把源文件.mov转成.mp4 if type == '.mov': os.popen3('%s -i %s %s' %(ffmpeg_path, root_pass + '/vedio_file/%s.mov' % old_void_name, video_file))

os.system('%s -i %s %s' % (ffmpeg_path, root_pass + '/vedio_file/%s.mov' % old_void_name, video_file))

txt_path = '' txt_path = root_pass + '/vedio_file/%s.txt' % old_void_name nowTime = datetime.datetime.now().strftime('%Y.%m.%d') nowTime = nowTime.replace('.0', '.')

fp = io.open(txt_path, 'r+')
data = json.load(fp)

title = data[0]["name"].replace(' ', '')
time_length = data[0]["length"]
start_time = data[0]["start_time"]#.decode("utf-8").encode("gbk")
end_time = data[0]["end_time"]#.decode("utf-8").encode("gbk")
name = data[0]["user"].replace(' ', '')
print (data)
if ffmpeg_path:

print("XXXXXXXXXXXXXXXXXXXXXXXXXXXXXXXXXXXXXXX")
print("####-------- normal-channel---------###")
print("XXXXXXXXXXXXXXXXXXXXXXXXXXXXXXXXXXXXXXX")

# 1280x720
print("start_normal-channel_1280x720")
video_name_1 = nowTime + "-" + title + "-" + time_length + '-1280x720-' + name
video_name_1 = video_name_1#.decode("utf-8").encode("gbk")
video_normal_dir = root_pass +'/new_vedio_file/'+ old_void_name + '/normal-channel'
get_video_file1 = video_normal_dir + '/%s' % video_name_1
print(get_video_file1)

if end_time[-4:-2] != '00' or end_time[-7:-5] != '00':
    cmd_run1 = '%s -i %s -ss %s -t %s -r 25 -b 194k -b:v 5300k -ac 2 -profile:v main -ar 48k -s 1280x720 %s.mp4' % (ffmpeg_path, video_file, start_time, end_time, get_video_file1)
else:
    cmd_run1 = '%s -i %s -r 25 -b 194k -b:v 5300k -ac 2 -profile:v main -ar 48k -s 1280x720 %s.mp4' % (ffmpeg_path, video_file, get_video_file1)
print(cmd_run1)
os.popen3(cmd_run1)
# os.system(cmd_run1)

#得到的尺寸拿来做裁剪
if data[1]['1280x720'] == 1:
    common_cut_action(root_pass, old_void_name, video_normal_dir, get_video_file1+'.mp4', nowTime, data, "normal",'1280x720')

print("end_normal-channel_1280x720")

# 640x360
print("start_normal-channel_640x360")
video_name_2 = nowTime + "-" + title + "-" + time_length + '-640x360-' + name
video_name_2 = video_name_2#.decode("utf-8").encode("gbk")
get_video_file2 = video_normal_dir + '/%s' % video_name_2
print(get_video_file2)
if end_time[-4:-2] != '00' or end_time[-7:-5] != '00':
    cmd_run2 = '%s -i %s -ss %s -t %s -r 25 -b 194k -b:v 5300k -ac 2 -profile:v main -ar 48k -s 640x360 %s.mp4' % (ffmpeg_path, video_file, start_time, end_time, get_video_file2)
else:
    cmd_run2 = '%s -i %s -r 25 -b 194k -b:v 5300k -ac 2 -profile:v main -ar 48k -s 640x360 %s.mp4' % (ffmpeg_path, video_file, get_video_file2)
print(cmd_run2)
os.popen3(cmd_run2)
# os.system(cmd_run2)

if data[1]['640x360'] == 1:
    common_cut_action(root_pass, old_void_name, video_normal_dir, get_video_file2+'.mp4', nowTime, data, "normal",'640x360')
print("end_normal-channel_640x360")

print("XXXXXXXXXXXXXXXXXXXXXXXXXXXXXXXXXXXXXXX")
print("####---------wechat-channel---------###")
print("XXXXXXXXXXXXXXXXXXXXXXXXXXXXXXXXXXXXXXX")

# 640x360 1.5M (通过调整-b:v 改变最终视频大小)
print("start_wechat-channel_640x360")
video_name_3 = nowTime + "-" + title + "-" + time_length + '-640x360-' + name
video_name_3 = video_name_3#.decode("utf-8").encode("gbk")
video_wechat_dir = root_pass +'/new_vedio_file/'+ old_void_name + '/wechat-channel'
get_video_file3 = video_wechat_dir + '/%s' % video_name_3
print(get_video_file3)
if end_time[-4:-2] != '00' or end_time[-7:-5] != '00':
    cmd_run3 = '%s -i %s -ss %s -t %s -r 24 -b:a 90k -b:v 650k -ac 2 -profile:v main -ar 44.1k -s 640x360 %s.mp4' % (ffmpeg_path, video_file, start_time, end_time, get_video_file3)
else:
    cmd_run3 = '%s -i %s -r 24 -b:a 90k -b:v 650k -ac 2 -profile:v main -ar 44.1k -s 640x360 %s.mp4' % (ffmpeg_path, video_file, get_video_file3)
print(cmd_run3)
os.popen3(cmd_run3)
# os.system(cmd_run3)

if data[2]['640x360'] == 1:
    common_cut_action(root_pass, old_void_name, video_wechat_dir, get_video_file3+'.mp4', nowTime, data, 'wechat', '640x360')
print("end_wechat-channel_640x360")

# 960x540 3M
print("start_wechat-channel_960x540")
video_name_4 = nowTime + "-" + title + "-" + time_length + '-960x540-' + name
video_name_4 = video_name_4#.decode("utf-8").encode("gbk")
get_video_file4 = video_wechat_dir + '/%s' % video_name_4
print(get_video_file4)
if end_time[-4:-2] != '00' or end_time[-7:-5] != '00':
    cmd_run4 = '%s -i %s -ss %s -t %s -r 24 -b:a 90k -b:v 1500k -ac 2 -profile:v main -ar 44.1k -s 960x540 %s.mp4' % (ffmpeg_path, video_file, start_time, end_time, get_video_file4)
else:
    cmd_run4 = '%s -i %s -r 24 -b:a 90k -b:v 1500k -ac 2 -profile:v main -ar 44.1k -s 960x540 %s.mp4' % (ffmpeg_path, video_file, get_video_file4)
print(cmd_run4)
os.popen3(cmd_run4)
# os.system(cmd_run4)

if data[2]['960x540'] == 1:
    common_cut_action(root_pass, old_void_name, video_wechat_dir, get_video_file4+'.mp4', nowTime, data, 'wechat', '960x540')

print("end_wechat-channel_960x540")

# 640x480
print("start_wechat-channel_640x480")
video_name_5 = nowTime + "-" + title + "-" + time_length + '-640x480-' + name
video_name_5 = video_name_5#.decode("utf-8").encode("gbk")
get_video_file5 = video_wechat_dir + '/%s' % video_name_5
print(get_video_file5)
if end_time[-4:-2] != '00' or end_time[-7:-5] != '00':
    cmd_run5 = '%s -i %s -ss %s -t %s -r 24 -b:a 90k -b:v 500k -ac 2 -profile:v main -ar 44.1k -s 640x480 %s.mp4' % (ffmpeg_path, video_file, start_time, end_time, get_video_file5)
else:
    cmd_run5 = '%s -i %s -r 24 -b:a 90k -b:v 500k -ac 2 -profile:v main -ar 44.1k -s 640x480 %s.mp4' % (ffmpeg_path, video_file, get_video_file5)
print(cmd_run5)
os.popen3(cmd_run5)
# os.system(cmd_run5)

if data[2]['640x480'] == 1:
    common_cut_action(root_pass, old_void_name, video_wechat_dir, get_video_file5+'.mp4', nowTime, data, 'wechat', '640x480')
print("end_wechat-channel_640x480")

if type == '.mov':
    os.remove(video_file)
核心逻辑
截取视频过程,其实就是独帧采集视频里,之后再次进行组装视频的过程,摄像头通过 cv2.VideoCapture捕获到视频信息,通过掩码操作,让矩阵与图片大小类型一致,设置初始化为全0像素值,之后操作区域赋值为1即完成一个区域像素单元。
#读取摄像头/视频,然后用鼠标事件画框
def readVideo(pathName, skipFrame, new_path): #pathName为视频文件路径,skipFrame为视频的第skipFrame帧
cap = cv2.VideoCapture(0) #读取摄像头
if not cap.isOpened(): #如果为发现摄像头,则按照路径pathName读取视频文件
cap = cv2.VideoCapture(pathName) #读取视频文件,如pathName='D:/test/test.mp4' c = 1 s = 0 while(cap.isOpened()):
s += 1
if s == 2: break
ret, frame = cap.read()

gray = cv2.cvtColor(frame, cv2.COLOR_BGR2GRAY)
if(c>=skipFrame):
    mask = np.zeros(gray.shape, dtype=np.uint8) #掩码操作,该矩阵与图片大小类型一致,为初始化全0像素值,之后对其操作区域赋值为1即可
    if(c==skipFrame):
        (a,b) = get_rect2(frame, title='get_rect') #鼠标画矩形框
        img01, img02 = frame, frame
        gray01, gray02 = gray, gray

        fps = cap.get(cv2.CAP_PROP_FPS) # 获取视频帧率
        fourcc = cv2.VideoWriter_fourcc(*'MPEG') # 使用XVID编码器

        Width_choose = b[0] - a[0] # 选中区域的宽
        Height_choose = b[1] - a[1] # 选中区域的高
        print("视频选中区域的宽:%d" % Width_choose, '\n'"视频选中区域的高:%d" % Height_choose)
        print(Width_choose)
        print(Height_choose)
        cv2.VideoWriter_fourcc('m', 'p', '4', 'v')
        out = cv2.VideoWriter(new_path, cv2.VideoWriter_fourcc('m', 'p', '4', 'v'), fps,
                              (Width_choose, Height_choose)) # 参数分别是:保存的文件名、编码器、帧率、视频宽高
        Video_choose = np.zeros((Width_choose, Height_choose, 3), np.uint8)
        while True:
            grabbed, frame1 = cap.read() # 逐帧采集视频流
            if not grabbed:
                break
            print (grabbed)
            print (frame1)
            if frame1.any()==None:
                break
            gray_lwpCV = cv2.cvtColor(frame1, cv2.COLOR_BGR2GRAY)#cv2.cvtColor(frame1, cv2.COLOR_BGR2GRAY) # 转灰度图
            frame_data = np.array(gray_lwpCV) # 每一帧循环存入数组
            box_data = frame_data[a[1]:b[1], a[0]:b[0]] # 取矩形目标区域
            pixel_sum = np.sum(box_data, axis=1) # 行求和q
            x = range(Height_choose)
            emptyImage = np.zeros((Width_choose * 10, Height_choose * 2, 3), np.uint8)
            Video_choose = frame1[a[1]:b[1], a[0]:b[0]]
            out.write(Video_choose)
            cv2.imshow('Video_choose', Video_choose)
            for i in x:
                cv2.rectangle(emptyImage, (i * 2, (Width_choose - pixel_sum[i] // 255) * 10),
                              ((i + 1) * 2, Width_choose * 10),
                              (0, 240, 120), 1)
            emptyImage = cv2.resize(emptyImage, (320, 240))
            # lwpCV_box = cv2.rectangle(frame, tuple(self.coor[1, :]), tuple(self.coor[2, :]), (0, 255, 0), 2)
            cv2.imshow('lwpCVWindow', frame) # 显示采集到的视频流
            # videoWriter.write(lwpCV_box) # 将截取到的画面写入“新视频”
            # videoWriter = ('lwpCVWindow', frame)
            # cv2.imshow('sum', emptyImage) # 显示画出的条形图
            key = cv2.waitKey(1) & 0xFF
            if key == ord('q'):
                break
        # out.release()
        # camera.release()
        # cv2.destroyAllWindows()
    else:
        img1, img2 = prev_frame, frame
        gray1, gray2 = prev_frame, frame
    cv2.imshow('frame', frame)
c = c + 1
prev_gray = gray
prev_frame = frame
if cv2.waitKey(1) & 0xFF == ord('q'):   #点击视频窗口,按q键退出
    break
cap.release()
cv2.destroyAllWindows()
总结
剪切视频
使用 -ss 和 -t 选项,从第0秒开始,向后截取31秒视频,并保存
ffmpeg -ss 00:00:00 -i video.mp4 -vcodec copy -acodec copy -t 00:00:31 output1.mp4从第01:33:30 开始,向后截取 00:47:16 视频,并保存
ffmpeg -ss 01:33:30 -i video.mp4 -vcodec copy -acodec copy -t 00:47:16 output2.mp4合并视频
把剪切得到的两个视频合并成一个视频
使用 TS格式拼接视频
先将 mp4 转化为同样编码形式的 ts 流,因为 ts流是可以 concate 的,先把 mp4 封装成 ts ,然后 concate ts 流, 最后再把 ts 流转化为 mp4。
ffmpeg -i output1.mp4 -vcodec copy -acodec copy -vbsf h264_mp4toannexb output1.ts
ffmpeg -i output2.mp4 -vcodec copy -acodec copy -vbsf h264_mp4toannexb output2.ts
为了减少命令的输入,需要一个filelist.txt文件,里面内容如下
file 'output1.ts'
file 'output2.ts'
合并视频命令
ffmpeg -f concat -i filelist.txt -acodec copy -vcodec copy -absf aac_adtstoasc output.mp4转码
最简单命令如下:
ffmpeg -i out.ogv -vcodec h264 out.mp4

ffmpeg -i out.ogv -vcodec mpeg4 out.mp4

ffmpeg -i out.ogv -vcodec libxvid out.mp4

ffmpeg -i out.mp4 -vcodec wmv1 out.wmv

ffmpeg -i out.mp4 -vcodec wmv2 out.wmv
-i 后面是输入文件名。-vcodec 后面是编码格式,h264 最佳,但 Windows 系统默认不安装。如果是要插入 ppt 的视频,选择 wmv1 或 wmv2 基本上万无一失。
附加选项:-r 指定帧率,-s 指定分辨率,-b 指定比特率;于此同时可以对声道进行转码,-acodec 指定音频编码,-ab 指定音频比特率,-ac 指定声道数,例如
ffmpeg -i out.ogv -s 640x480 -b 500k -vcodec h264 -r 29.97 -acodec libfaac -ab 48k -ac 2 out.mp4剪切
用 -ss 和 -t 选项, 从第 30 秒开始,向后截取 10 秒的视频,并保存:
ffmpeg -i input.wmv -ss 00:00:30.0 -c copy -t 00:00:10.0 output.wmv

ffmpeg -i input.wmv -ss 30 -c copy -t 10 output.wmv
达成相同效果,也可以用 -ss 和 -to 选项, 从第 30 秒截取到第 40 秒:
ffmpeg -i input.wmv -ss 30 -c copy -to 40 output.wmv值得注意的是,ffmpeg 为了加速,会使用关键帧技术, 所以有时剪切出来的结果在起止时间上未必准确。 通常来说,把 -ss 选项放在 -i 之前,会使用关键帧技术; 把 -ss 选项放在 -i 之后,则不使用关键帧技术。 如果要使用关键帧技术又要保留时间戳,可以加上 -copyts 选项:
ffmpeg -ss 00:01:00 -i video.mp4 -to 00:02:00 -c copy -copyts cut.mp4合并
把两个视频文件合并成一个。
简单地使用 concat demuxer,示例:
$ cat mylist.txt

file '/path/to/file1'

file '/path/to/file2'

file '/path/to/file3'

$ ffmpeg -f concat -i mylist.txt -c copy output
更多时候,由于输入文件的多样性,需要转成中间格式再合成:
ffmpeg -i input1.avi -qscale:v 1 intermediate1.mpg

ffmpeg -i input2.avi -qscale:v 1 intermediate2.mpg

cat intermediate1.mpg intermediate2.mpg > intermediate_all.mpg

ffmpeg -i intermediate_all.mpg -qscale:v 2 output.avi
调整播放速度
加速四倍:
ffmpeg -i TheOrigin.mp4 -vf "setpts=0.25*PTS" UpTheOrigin.mp4四倍慢速:
ffmpeg -i TheOrigin.mp4 -vf "setpts=4*PTS" DownTheOrigin.mp4本篇内容就到这里,后面会对视频处理过程中的鼠标事件和一些ffmpage的深入探讨和学习展开更为详细的讲解,希望对大家有更多的帮助。
- 分享
- 举报
 暂无数据
暂无数据-
浏览量:5534次2021-04-23 14:11:19
-
2024-01-17 10:40:55
-
浏览量:1017次2023-12-14 16:51:13
-
浏览量:2723次2024-01-17 11:25:11
-
浏览量:3000次2023-12-21 17:20:27
-
2024-12-10 10:52:33
-
浏览量:5109次2021-02-22 13:48:24
-
浏览量:1725次2024-01-24 16:33:36
-
浏览量:1791次2024-02-04 10:08:58
-
浏览量:2363次2024-01-22 17:02:06
-
浏览量:4427次2020-08-26 17:39:57
-
浏览量:3003次2020-02-14 11:29:22
-
浏览量:2464次2022-11-21 17:11:41
-
2024-02-04 10:33:53
-
浏览量:5922次2021-04-25 16:34:37
-
浏览量:2565次2022-05-13 09:55:32
-
浏览量:4556次2021-04-25 16:34:01
-
浏览量:5023次2021-04-25 16:35:51
-
浏览量:7602次2021-04-26 17:28:30
-
广告/SPAM
-
恶意灌水
-
违规内容
-
文不对题
-
重复发帖
这把我C


 微信支付
微信支付举报类型
- 内容涉黄/赌/毒
- 内容侵权/抄袭
- 政治相关
- 涉嫌广告
- 侮辱谩骂
- 其他
详细说明


 微信扫码分享
 QQ好友
QQ好友


